Hack 91 Copy Slides with Your Digicam
| < Day Day Up > |
| Dedicated slide scanners can be expensive and more than a little tedious to use. The digicam you already own might be your best bet for digitizing some of your favorite slides . I have a lifetime of slides neatly tucked away in my closet, and I know it would take two lifetimes to properly clean, preview, scan, correct, and archive my legacy image collection. But wait! What about using a digicam to copy all those images? Previously, the preferred method was to enslave yourself to an ergonomic chair in front of a dedicated slide copier that was connected to your computer. Nikon, Minolta, Microtek, and Polaroid all have competent units. Inexpensive flatbeds with transparency units in the lid don't do nearly as good a job as the dedicated slide copiers. Agfa, Epson, and Microtek make more expensive flatbeds that do better. The inexpensive units are not only cumbersome and time-consuming . They also don't have the resolution for small formats, such as 35mm, nor do they capture the density range that can hide in a slide. You're really better off renting time on a dedicated slide scanner. This brings us back to using a digicam for this project. Before getting too excited, let's examine some of the potential drawbacks:
Okay, so now your hopes are somewhat deflated. Don't give up yet. Copying slides with digicams also presents a few advantages:
8.7.1 Using the Right CameraThis entire hack hinges on having the right digicam. Not every model is capable of capturing a tiny 35mm frame. First, your camera must have a Macro mode. Second, it has to capture a sharp image, corner to corner, with no lens distortion. Third, it has to get pretty close to the subject. Sometimes, that means adding a close-up converter lens.
I don't want to discourage you from rigging up an attachment to hold a slide in perfect alignment to any digicam's sensor plane. The US$40 Happenstance (http://www.steves-digicams.com/happenstance.html) is a simple device with which you mount your slide against a translucent piece of plastic and photograph it in Macro mode. I found that adding a little duct tape around the side, to keep ambient light from hitting the front of the slide, improved results. If you have a digital SLR, you can adapt an old film slide adapter [Hack #12] . This system is cheap and works well. The only drawback is that most digital SLRs have more magnification than their traditional 35mm brethren, so your adapted 35mm slide adapter won't copy full frame. You will have to do some cropping, whether you want to or not. Beyond that, some people have even built rigs with nothing more than a paper cup and rubber band. Put the slide in the paper cup so that the light shines through the bottom of the cup, illuminating the slide, and use a rubber band to attach the whole thing to your camera. Crude, yes. But in a pinch you can get a decent image out of it. That said, I prefer to use the manufacturer's device for copying slides with my digicam. I need every advantage I can get. 8.7.2 Coolpix 990 with Slide CopierWhen I want to copy film with a digicam, I use a Nikon Coolpix 990 with the US$80 Nikon Slide Copying Adapter (ES-E28). The Coolpix's Macro capability sets it apart from many other digicams, and the slide copier takes full advantage of it. The Nikon adapter is a bulky but lightweight cylinder that screws into the lens thread, as shown in Figure 8-17. It has slots on both sides to slip in either the double-slide holder (which lets you leave the slides in their mounts) or the six-negative film-strip holder. The adapter holds them in place with a strong metal spring. The front of the adapter is a piece of milky Plexiglas that diffuses the light source. Figure 8-17. My Nikon 990 setup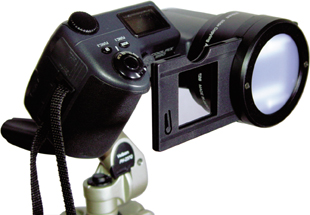 In addition to sliding the holder back and forth, you can adjust the two-piece barrel up and down and change the angle of rotation. You can use a set screw to fix any adjustments you make. Unlike some rigs I've seen, the Nikon adapter does not permit any ambient light to fall on the front of the slide. Not only is it enclosed , but it's also black inside. So the only light that hits the lens is transmitted through the slide. You'll also need a tripod and your camera's power adapter. You want the camera to stay on while you reload the holders, and you don't want it sliding around as you shoot. Finally, get a can of compressed air, preferably the environment-friendly kind that doesn't use CC and HCFC. Shooting this close greatly magnifies imperfections, such as scratches and dust, so cleanliness is a big issue. Just a couple shots of air on both sides of each slide or negative strip will help deliver clean images. 8.7.3 Technique with the CoolpixFortunately, no elaborate studio lighting is required. I've happily used nothing but sunlight as my light source. For night work, I've used my 16" 18" portable light table with two short, fluorescent tubes of certainly the wrong degrees Kelvin. I've also used a soft box. Anything that provides bright, even illumination to the diffused white plastic will work, but I do balance the light by setting a custom white balance while no slide is mounted. I even do that for sunlight so that the color cast of the slide itself isn't a factor. If you use sunlight, remember that it moves. Make sure shadows don't fall across your setup as the day passes . I just take a look at the front of the adapter every time I reload it. This kind of work is best done in Manual recording mode. Aperture Priority mode lets you choose a sharp f-stop (between f-4 and f-5 for this lens). You can adjust exposure for underexposed or overexposed slides by using the EV setting, which changes the shutter speed. Manual focus is also worth considering. Once you've found focus, it won't change. Automatic focus systems that are based on contrast detection can be confused by flat subjects such as seascapes. The next trick is to align the slides to the sensor. Since the adapter screws into the lens mount on the camera, I reset the alignment every time I attach the adapter. With a loaded film holder positioned in the adapter, use the zoom control to display a nice, tight crop in the LCD, as shown in Figure 8-18. Take a shot and pull the card out of the camera. Then take a look at it in your image-editing program. Did you get the whole image? Is it too low or too high? Is it square? Make any necessary adjustments and continue testing until you get the alignment right. Figure 8-18. The slide in the LCD viewfinder, ready for capture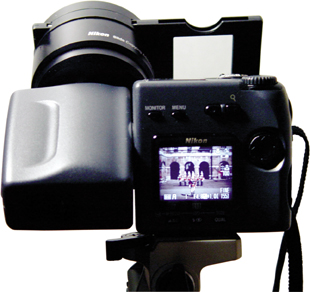 Then, it's just a matter of loading the holder, blasting both sides of the slide with air, slipping each slide into the adapter, and firing the shutter for each image. 8.7.4 Extending the Density RangeWhile your digicam captures only eight bits per channel, this setup is ideal for bracketing two 8-bit captures that can later be blended into a single 16-bit image in Photoshop. This technique can greatly extend the dynamic range of images that have a lot of contrast. Take at least two shots of any difficult image: one underexposed and the other slightly overexposed. You aren't limited to two, of course. I've taken as many as five. Open each image in Photoshop and convert it into a 16-bit image. Use the Blend Exposures plug-in from Reindeer Graphics' Optipix suite (http://www.reindeergraphics.com) to create one 16-bit image whose tonal range and contrast provide the best of both images. When you're happy with the blend, save the image as an 8-bit channel image with the detail intact. 8.7.5 Copying Color NegativesColor negatives are a special case. There's a great deal of misinformation about them, especially on how to handle the orange you see. It's important to understand that the orange tint you see when looking at a color negative is not equally distributed in the highlights and shadows, so you should not simply mask out orange from the image. Shoot the negative normally (with a custom white balance) and convert it using custom curves in an image-editing program. You can batch your curves to apply to whole rolls at a time. If manipulating curves sounds too tricky, you might consider LaserSoft Imaging's NegaFix, part of their SilverFast Ai package (http://www.silverfast.com). 8.7.6 Final ThoughtsWith the right equipment, it's easy, quick, and inexpensive to get pleasing results when copying slides and negatives with your digicam. But the real thrill is having digital access to all your old images, many of which might never have been printed, were perhaps given away, or have been forgotten. If you can't spend the rest of your life scanning every slide in your collection, the next best thing is to copy your favorites with a digicam. Mike Pasini |

| < Day Day Up > |
EAN: 2147483647
Pages: 161