Hack 86 Create a Coffeetable Photo Book
| < Day Day Up > |
| Beautiful, hardcover photo books were once reserved for published photographers. But thanks to print-on-demand technology, you can make one for less than the price of a memory card . When I share my pictures with others, I use a variety of media to show off my work. The computer screen is a natural display, especially for digital slideshows. And colorful , 4" 6" prints are always welcome. But the one format that really lights up smiles is the hardbound picture book on glossy, archival paper. The first thing I typically hear when I hand such a book to a friend is, "You made this?" Yes, I did. And you can too, easily. I first heard about these books from Apple CEO Steve Jobs when he debuted iPhoto, a digital shoebox for Mac OS X users. For a while, it seemed you'd have to borrow someone's Mac if you wanted to create these books. But not for long; Windows users can also now build their own printed masterpieces, and just as easily. 8.2.1 A Look at iPhotoI want to give iPhoto (http://www.apple.com/ilife/iphoto/) its due here, because this digital-shoebox application has popularized hobbyist book production. You have to run Mac OS X to use it, and it's part of Apple's iLife suite of programs that includes iTunes, iDVD, iMovie, and GarageBand. Making a book in iPhoto is easy. Create an album of pictures by selecting File Figure 8-1. Building a picture book in iPhoto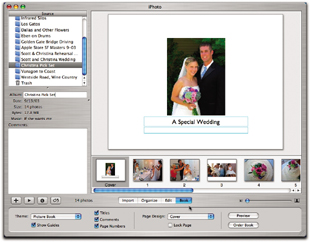 At this point, you can add text, adjust the layout, and even change the order of the pages. When a page looks the way you want it to appear in the final book, click the Lock Page box to ensure that it doesn't change as you work on the rest of the book.
When you think you have things right, press the Preview button to review an electronic version of your publication. You can also make a PDF version of your book to share with others by selecting File When you're ready to place your order, make sure your computer is connected to the Internet and click the Order Book button. iPhoto will walk you through the ordering process, upload your images, and generate a confirmation email once everything is set. Most books cost less than US$40 and arrive in about a week. (Pricing starts at $30 for a 10-page book and $2.99 for each additional page.) 8.2.2 MyPublisher for WindowsThanks to MyPublisher (http://www.mypublisher.com), printing a custom photo book from Windows is just about as easy as from the Mac. The process is similar to iPhoto, except that you build your book in MyPublisher's BookMaker software, which runs inside the web browser. The software downloads quickly because it's only about a megabyte large. Once the download is complete, the program launches and you can begin constructing your book. Make sure all your images are in one folder, preferably in the order you'd like them to appear in your book. You can control the order of the photos by labeling them Wedding 001 , Wedding 002 , and so on. Click the Get Photos button in BookMaker and navigate to the folder containing your images, as shown in Figure 8-2. Figure 8-2. Choosing the images you want for your book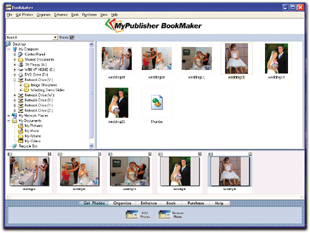 BookMaker puts the photos on a sequence line to let you know they are included in the project. Click the Organize button if you'd like to change the order of the images. You also have the option to perform some basic image editingsuch as rotate, zoom in, or convert to B&Wby clicking the Enhance button. Once you have matters in hand, click the Book button to apply the finishing touches, such as adding text and modifying the template, as shown in Figure 8-3. Figure 8-3. Adding text to the pages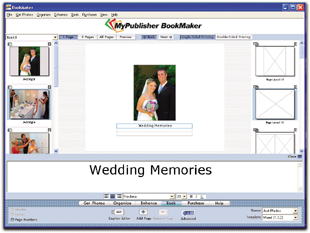 Place your order by clicking the Purchase button. After helping you set up an account, MyPublisher receives your files for printing. The pricing is the same as with iPhoto, usually about US$40. The minimum page count is 10, but you can certainly add moreup to 100 pages, at $2.95 eachif you need to. 8.2.3 Book-Making TipsThe most important thing to keep in mind is that the book is the final output of your images. Make sure you've looked at each picture closely in your image editor to ensure that the color and exposure are as you want them. Just one bad picture in the entire book will ruin the whole project for you. Believe me; that bad egg will drive you crazy. I like to print sample images on my inkjet printer, or order prints online, before I build my books. That way, I can see how they look printed, not only individually, but also next to each other. Also, keep in mind that ample image resolution is important for quality output. For the highest quality, I recommend you set your photos to 200 ppi [Hack #62] . These books are a beautiful way to show off your work, and they make cherished gifts for others. The output is quite stunning, especially if you take time to prepare your images carefully before assembling the book. |
 New Album and dragging images from your master iPhoto Library into it. Once you have all the pictures in the new album, arrange them in the order you want them presented in the book. The first photo will be the cover shot, and the sequence goes on from there. When you have the images in the desired order, click on the Book button, as shown in Figure 8-1. iPhoto will build a draft of the book for you in the default template, Picture Book. You also have other themes to choose from, such as Catalog or Storybook.
 | < Day Day Up > |
EAN: 2147483647
Pages: 161