Setting Options for People with Impaired Mobility
These options allow you to control how Windows handles keyboard and mouse input.
- StickyKeys. Allows you to type keystroke combinations without the need to hold down one key while you press another.
- FilterKeys. Lets you ignore accidentally repeated keystrokes or brief keystrokes that are made by touching a key in error.
- MouseKeys. Lets you use the keyboard to simulate mouse movements and clicks.
- On-Screen Keyboard. Displays a keyboard replica on which you "type" by clicking its keys with a mouse or other pointing device.
- SerialKey. Enables the use of alternative input devices that connect to a serial port.
Facilitating Entry of Keystroke Combinations with StickyKeys
Windows makes extensive use of shortcut keys, which generally require you to press more than one key at a time. For example, to use the keystroke combination Ctrl+Alt+Delete, a user must hold down the Ctrl and Alt keys while pressing the Delete key. In cases where a user is limited to one hand or a mouthstick, pressing multiple keys at the same time might not be possible.
TIP
Depending on how your system is set up, you probably have to press Ctrl+Alt+Delete to log on. Ordinarily, accessibility settings are stored as part of your profile and aren't applied until after you log on. To get around this catch-22, open Accessibility Options in Control Panel, click the General tab, and select Apply All Settings To Logon Desktop.
StickyKeys enables users to input key combinations by pressing the applicable keys in sequence rather than simultaneously. This option causes the Ctrl, Alt, Shift, and Windows logo keys to become sticky—when a user presses one of these modifier keys, the key is locked down until any other key (except for Ctrl, Alt, Shift, or the Windows logo key) or a mouse button is pressed and released. Pressing the modifier key twice locks it "permanently"—until you press that modifier key a third time. While a key is locked, that key's space in the status area of the taskbar is shaded.
To turn on StickyKeys using the Accessibility Wizard, step through the wizard until you come to the page shown in Figure 7-2. Select I Have Difficulty Using The Keyboard Or Mouse, and then click Next (or press Enter). Depending on the other options you select on this page, you'll come either immediately or eventually to the StickyKeys page, where you'll be given the option to turn on StickyKeys.
To turn on StickyKeys using Accessibility Options in Control Panel, select the first check box on the Keyboard tab in the Accessibility Options dialog box. (See Figure 7-8.) Then click Settings to make sure that options affecting the StickyKeys feature are set as you want them. Figure 7-9 shows the Settings For StickyKeys dialog box.

Figure 7-8. The Keyboard tab in the Accessibility Options dialog box (accessible via Control Panel) lets you turn on or off the StickyKeys, FilterKeys, and ToggleKeys features.
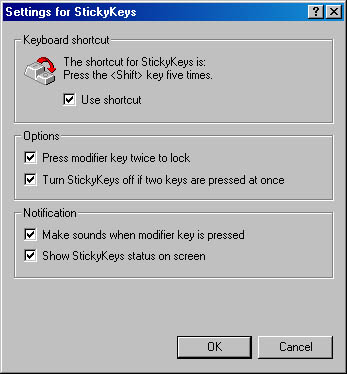
Figure 7-9. You can customize StickyKeys behavior in the Settings For StickyKeys dialog box.
The following settings are available for StickyKeys:
- To enable the shortcut key, select the Use Shortcut check box. Once you've done this, you can turn StickyKeys on or off by pressing the Shift key five times in succession.
- The StickyKeys feature allows users to lock a modifier key (Ctrl, Alt, Shift, or Windows) by pressing a modifier key twice. The key remains locked until you press it a third time. As a general rule, if you need the StickyKeys feature at all, you should leave this option enabled. You can, however, disable it by clearing the Press Modifier Key Twice To Lock check box.
- If several people use the same computer, keep the Turn StickyKeys Off If Two Keys Are Pressed At Once option selected (as it is by default). With this option selected, users who don't require StickyKeys can turn off the feature simply by pressing a modifier key and any other key at the same time.
- The Make Sounds When Modifier Key Is Pressed option can provide useful auditory feedback each time a Ctrl, Alt, Shift, or Windows logo key is pressed. It's a handy reminder that StickyKeys is active. If, however, you're the only user and have no need to be reminded, clear this option.
- You shouldn't need to change the default setting for Show StickyKeys Status On Screen, which displays an icon in the taskbar's status area. The icon lets you know that the feature is active and which modifier keys are currently locked.
Controlling the Keyboard Repeat Rate with FilterKeys (BounceKeys)
The FilterKeys options provide precise control over the keyboard repeat rate. These options are particularly useful if involuntary hand movements cause accidental key presses.
NOTE
For reasons unknown, the feature that is called FilterKeys in the Accessibility Options dialog box is called BounceKeys in the Accessibility Wizard. FilterKeys in the Accessibility Options dialog box offers some additional settings that you can't make using the wizard.
To activate BounceKeys using the Accessibility Wizard:
- Step through the wizard until you come to the page shown in Figure 7-2. Select I Have Difficulty Using The Keyboard Or Mouse.
- Click Next. Keep moving through wizard pages until you come to the BounceKeys page.
- Select Yes and then click Next.
- When you are satisfied with your settings, exit the wizard.
The BounceKeys Settings page allows you to set a minimum time within which repeated keystrokes will be treated as only a single keystroke; you can also test your settings on this page.
SEE ALSO
For information about setting the keyboard repeat rate, see "Adjusting Keyboard Repeat Parameters."
To activate FilterKeys using Accessibility Options in Control Panel, click the Keyboard tab, select the Use FilterKeys check box, and then click the Settings button to make sure the options are set as you want them. Figure 7-10 shows the Settings For FilterKeys dialog box.
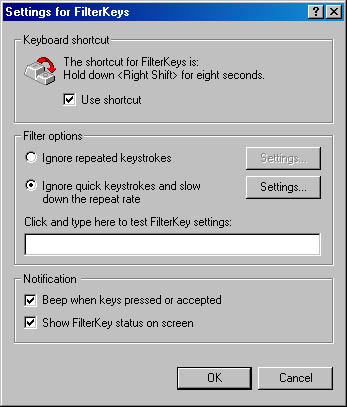
Figure 7-10. The Settings For FilterKeys dialog box lets you ignore repeated keystrokes or brief keystrokes.
To enable the shortcut key, select the Use Shortcut check box. Once you've done this, you can turn FilterKeys on or off by holding down the right Shift key for eight seconds.
Use the Ignore Repeated Keystrokes option button to instruct Windows to ignore all but the first keystroke when a key press is rapidly repeated. The Advanced Settings For FilterKeys dialog box shown in Figure 7-11 allows you to set a time interval within which repeated keystrokes are treated as a single keystroke. Test your settings in the test area provided before you accept them.
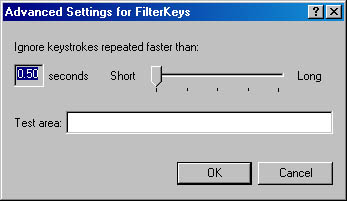
Figure 7-11. With FilterKeys (or BounceKeys) enabled, key presses repeated more rapidly than the time shown in the Advanced Settings For FilterKeys dialog box are treated as only one keystroke.
The Ignore Quick Keystrokes And Slow Down The Repeat Rate option causes the computer to ignore keys that are tapped only briefly, as when a finger or mouthstick might slip off one key and hit another. When FilterKeys is active, these settings override Control Panel's Keyboard repeat settings. Clicking the Settings button next to this option opens the Advanced Settings For FilterKeys dialog box shown in Figure 7-12.

Figure 7-12. Adjusting keyboard speed and repeat rates here overrides those set in Control Panel's Keyboard.
Select No Keyboard Repeat to turn off the keyboard repeat feature altogether. With this option selected, it doesn't matter how long you hold down a key; it won't repeat under any circumstances.
Select the Slow Down Keyboard Repeat Rates option and adjust the Repeat Delay setting and the Repeat Rate setting if you want to retain the ability to repeat keystrokes.
Using the Keyboard Instead of the Mouse
MouseKeys lets you use Windows without a mouse. Normally, despite a program's implementation of keyboard equivalents, some tasks can be performed only by moving the mouse pointer, clicking, and dragging. But with MouseKeys on, you can use the keys on the numeric keypad to simulate mouse actions, as follows:
- To move the mouse pointer, press any number key except 5. The arrows in Figure 7-13 show the direction in which each key moves the pointer. If you hold down a directional number key, the mouse pointer begins moving slowly and then accelerates to its maximum speed.
- To select which mouse button to use for clicking and dragging, press the slash (/) key to select the left button, the minus (-) key to select the right button, or the asterisk (*) key to select both buttons. Your selection stays in effect until you select another; you don't need to select a button before each click or drag.
- To click the selected button, press the 5 key.
- To double-click the selected button, press the plus (+) key.
- To drag with the selected button, position the mouse pointer on the object and press the 0 key (Ins). Then use the directional number keys to move the mouse pointer. Press the period (.) key (Del) to release the mouse button, which completes the drag operation.
- To move the mouse pointer in larger increments, hold down the Ctrl key while you use the direction keys.
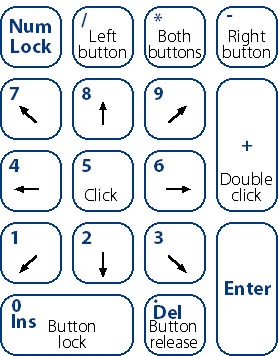
Figure 7-13. Use the numeric keypad to imitate mouse actions.
To turn on MouseKeys with the Accessibility Wizard:
- Select I Have Difficulty Using The Keyboard Or Mouse on the page shown in Figure 7-2.
- Click Next. After several pages relating to keyboard options, you'll come to the MouseKeys page.
- Select Yes on the MouseKeys page and click Next again to see the MouseKeys Settings page, shown in Figure 7-14.
- Adjust the speed at which your mouse moves and accelerates.
- Decide whether you want MouseKeys to work with Num Lock on or off.
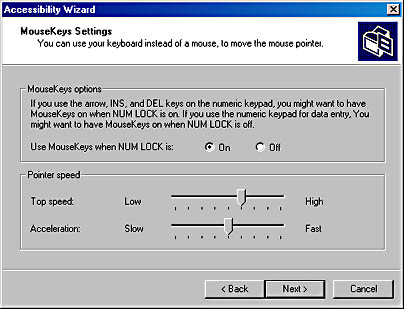
Figure 7-14. Use this page to change the speed and acceleration characteristics of your MouseKeys mouse.
To activate MouseKeys using Accessibility Options in Control Panel, click the Mouse tab and select Use MouseKeys. Then click the Settings button to adjust the speed and acceleration of your mouse. The Settings For MouseKeys dialog box that you reach via Control Panel is organized somewhat differently than is the Accessibility Wizard's page, but it includes all the wizard's options and these three additional options:
- The Use Shortcut option turns on the shortcut key for MouseKeys. With the shortcut key enabled, pressing the left Shift key, the left Alt key, and Num Lock at the same time toggles MouseKeys on or off.
- The Pointer Speed section activates a Ctrl+key and Shift+key throttle system. To enable this feature, select the Hold Down Ctrl To Speed Up And Shift To Slow Down check box. When enabled, if you hold down a direction key and also press Ctrl, the mouse pointer begins moving slowly and then accelerates to its maximum speed. If you hold down Shift while you hold down a direction key, the mouse pointer moves at a slow, steady rate.
- The Show MouseKey Status On Screen check box adds an icon to the taskbar status area that shows which mouse button is selected. Double-clicking the icon opens the Accessibility Options dialog box.
Making the Mouse Pointer Easier to See and Use
The Accessibility Wizard offers some additional options for making the mouse pointer more visible. You can change the size and color of the pointer, switch the primary and secondary mouse buttons, and change the pointer speed. These options are presented on a series of wizard pages that appear when you select I Have Difficulty Using The Keyboard Or Mouse on the Set Wizard Options page shown in Figure 7-2. These choices don't appear in Control Panel's Accessibility Options, but you can get to them via Mouse in Control Panel.
SEE ALSO
For information about Mouse in Control Panel, see "Adjusting Mouse Behavior."
Using On-Screen Keyboard
MouseKeys, described earlier in this chapter, lets you use the keyboard instead of a mouse. On-Screen Keyboard, new in Windows 2000, provides the opposite functionality: it lets you use the mouse (or another pointing device) instead of a keyboard. To start On-Screen Keyboard, choose it from the Accessibility folder of your Start menu. You'll see a display similar to the one shown in Figure 7-15.
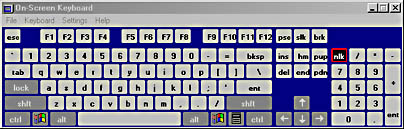
Figure 7-15. On-Screen Keyboard lets you type by clicking "keys" in this window.
To "type," you use the mouse pointer to point to a key button, and then click. To type a capital letter, click the Shift button and then click the letter button. The modifier keys (Ctrl, Alt, Shift, and Windows logo) work somewhat like StickyKeys, even if you don't have that feature enabled: when you click one of these keys, it remains locked down until you click any other key (except Ctrl, Alt, Shift, or Windows logo). If you click a modifier key by mistake, click it again to release it.
NOTE
You can't type with On-Screen Keyboard while it is the active application. Switch to the application that you want to receive the keystrokes; the On-Screen Keyboard window remains on top.
You can choose one of several keyboard arrangements by choosing commands on the Keyboard menu.
If it's difficult for you to click a mouse button, open the Settings menu and choose Typing Mode to use one of On-Screen Keyboard's alternative input methods:
- Hover To Select. With this method, you type a character simply by pointing at it with the mouse pointer, a head pointer, or other pointing device, and hovering for at least the number of seconds specified in the Minimum Time To Hover box.
- Joystick Or Key To Select. In this mode, On-Screen Keyboard continually scans the displayed keyboard, selecting it row by row, until you press a key (you can specify which key) or activate a switch connected to a serial, parallel, or game port. When you select a row, On-Screen Keyboard then selects each character in that row until you press a key or activate a switch; it then types the selected character.
TIP
If you're logged on as a member of the Administrators group, you can add On-Screen Keyboard to the list of programs controlled by Utility Manager; doing so lets you easily start On-Screen Keyboard when you start Windows. To do this, open the File menu in On-Screen Keyboard and choose Add To Utility Manager.
Installing Support for SerialKey Devices
A SerialKey device is a device that plugs in to one of your computer's serial ports and provides alternative access to keyboard and mouse features. To use one of these devices, you must enable its support by going to the General tab of Accessibility Options in Control Panel. Select the Support SerialKey Devices check box. Then click the Settings button and specify the serial port you'll be using and the baud rate (speed).
EAN: 2147483647
Pages: 317