Changing Your Desktop s Display Properties
Like just about everything else in Windows, your desktop has a properties dialog box, and that properties dialog box allows you to change many aspects of your desktop's appearance. You can modify the display resolution (so that more or less information fits on the screen), modify the color depth (the richness of color that Windows uses to display everything you see), add a background pattern or wallpaper (a background image, optionally displayed as a repeating pattern), change colors and fonts used for various components of the Windows user interface, install a screen saver, and change the icons assigned to standard desktop elements (such as My Computer and My Network Places). You can also use the Display Properties dialog box to get to an additional dialog box that governs your video hardware.
To see and work with the Display Properties dialog box, right-click your desktop and choose Properties. Or launch Display in Control Panel.
Changing Display Resolution
Resolution is a measure of the amount of information that Windows can fit on your screen, expressed in pixels. A pixel (a contraction of the words picture element) is a single addressable dot on your screen. Common resolutions include 640×480 (also known as VGA resolution), 800×600 (sometimes called Super VGA or SVGA resolution), 1024×768, 1152×864, 1280×1024, and 1600×1200. The range of resolutions available to you depends on your display hardware.
The higher your resolution, the more data you can work with at once. A monitor that displays 17 rows and 9 columns of a spreadsheet at 640×480 pixels, for example, might show 33 rows and 15 columns of the same spreadsheet at 1024×768. High resolutions also allow you to keep many windows visible at once without their overlapping one another.
The tradeoff for increasing the number of pixels on the screen is that each pixel must be smaller. Smaller pixels means smaller images. A 10-point font that is easy to read at 800×600 might become illegible at 1280×1024 (depending, of course, on your visual acuity and the size of your monitor).
To change your display resolution:
- Click the Settings tab in the Display Properties dialog box, shown in Figure 4-8.
- Drag the Screen Area slider to the right to increase resolution or to the left to decrease it.
- Click OK.
- Click OK again to answer the confirmation prompt.
- Click Yes when Windows asks if you want to keep the new screen resolution.
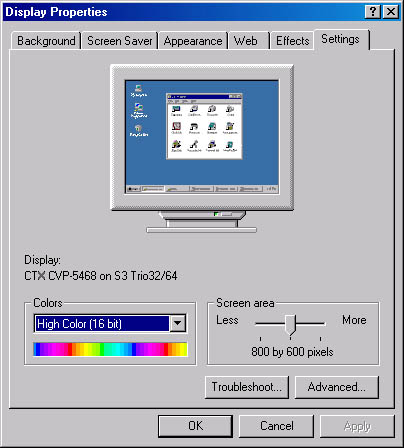
Figure 4-8. In this dialog box, you can change the resolution and color depth of your display.
Windows asks for the confirmation in step 5 because it's possible (but unlikely) that the Display Properties dialog box will offer you a resolution choice that doesn't work on your hardware. If you happen to choose an unworkable resolution, your screen would probably go blank and you wouldn't see that final confirmation prompt. After waiting 15 seconds for your okay, Windows automatically restores your prior resolution.
TIP
If you like working with graphics programs at 1024×768 but find writing impossible at this resolution, you can make text sizes larger for all your programs. Click the Advanced button on the Settings tab and then, on the General tab of the dialog box that appears, select a larger font size.
Changing Color Depth
The term color depth denotes the number of distinct colors that your system can display. The higher the color depth, the more realistic the images appear. As with display resolution, the available color depth choices depend on your hardware. The common options are 16 colors, 256 colors, 16-bit high color (65,536 colors), and 24-bit and 32-bit true color (approximately 16 million colors).
Choosing the highest possible color depth makes images look as good as they possibly can on your screen, but it might also cause images to be displayed somewhat more slowly. That's because the greater the number of colors your system can display, the more video memory it has to manage. You might want to experiment to see what color depth seems optimal on your equipment.
To change color depth, visit the Settings tab in the Display Properties dialog box. As Figure 4-8 shows, that dialog box includes a Colors list. Simply select the option you want from this list.
Extending Your Desktop Across Two or More Monitors
If you have a computer with PCI or AGP slots, you might be able to extend your desktop across two or more monitors. You need a separate PCI or AGP display adapter for each monitor you want to use (or a single adapter that supports multiple monitor outputs). Windows 2000 supports up to 10 monitors.
NOTE
Not all display adapters supported by Windows 2000 can be used as secondary adapters. Before you try to set up multiple monitors, check the "Display Adapter" section of the Windows 2000 Hardware Compatibility List (HCL) at www.microsoft.com/hcl/.
Extending your desktop across multiple monitors gives you much more display real estate, allowing you, for example, to display more columns in a Microsoft Excel spreadsheet, or to have more than one maximized program visible at the same time. You can easily integrate information from different files by dragging it from one monitor to another. Or you might want a program visible on one monitor and its help files visible on another. You can assign separate resolutions and color depths to each monitor. So, for example, if you have a 19-inch monitor and a 15-inch monitor, you could run the larger display at 1024×768 and the smaller one at 800×600.
To set up and configure an additional monitor:
- Turn off your computer and any attached devices, and install an additional supported PCI or AGP display adapter. Connect the monitor to the new adapter.
- Turn on the computer. Windows detects the new hardware and installs the appropriate drivers.
- In Control Panel, launch Display, and then click the Settings tab.
Once you've installed more than one supported display adapter, the Settings tab in the Display Properties dialog box changes to show the current physical arrangement of your monitors. Figure 4-9 shows an example of how that dialog box might appear. Note that a number appears on the screen of each monitor shown in the dialog box. These numbers correspond to entries in the Display list.
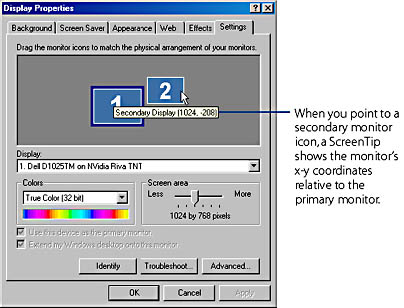
Figure 4-9. When you have multiple display adapters installed, the Settings tab in the Display Properties dialog box lets you specify the physical arrangement of your monitors.
TIP
To see which actual monitor is represented by each monitor in the dialog box, click Identify. A large number, similar to the ones in the dialog box, appears on each monitor.
- Click the icon for the new monitor, and then select Extend My Windows Desktop Onto This Monitor.
- In the Screen Area box, set the resolution for the new monitor.
- Drag the monitor icons so that they match the physical arrangement of your monitors.
To allow you to move display objects from one monitor to another, Windows needs to know how your monitors are physically arranged.
Once you've shown Windows the layout of your displays, you can drag icons and windows from one monitor to the other. If your secondary display is to the right of your primary display, as shown in Figure 4-9, for example, you can move an icon from primary to secondary by dragging it off the right edge of the primary display. New windows open initially on the primary monitor, which is also where the Windows logon screen appears.
If you maximize a window, it fills only the screen on which it currently resides. If a window is currently split across two or more screens, Windows maximizes it on whichever screen currently displays its largest portion.
NOTE
If you run Command Prompt or an MS-DOS-based program in a full-screen window, it always appears only on the primary monitor—and all other monitors are blank until you close the program or switch back to a Windows-based program.
Changing Colors, Fonts, and Sizes
When you first install Windows 2000, it uses a combination of colors, fonts, and sizes called Windows Standard. It's a fine arrangement, but you can also choose from a number of alternative schemes or you can design your own. Once you've found a pleasing arrangement of colors, fonts, and sizes, you can name and save the arrangement. You can design as many custom appearance schemes as you want, adding each to the menu that Windows supplies. As mood or necessity dictates, you can switch from one scheme to another by choosing from a simple list.
To see what the supplied appearance schemes look like, choose Properties from the shortcut menu that appears when you right-click the desktop, and click the Appearance tab. Windows presents the dialog box shown in Figure 4-10. The upper part of this dialog box is a preview window, showing you a sample of each screen element whose color, font, or size you can modify.
Click the Scheme box, and then use the Up arrow key and the Down arrow key to step through the list of named appearance schemes. As you highlight the name of each scheme, Windows displays a sample of that scheme in the upper part of the dialog box. You can apply any appearance scheme to your Windows environment by highlighting its name and clicking OK or Apply.
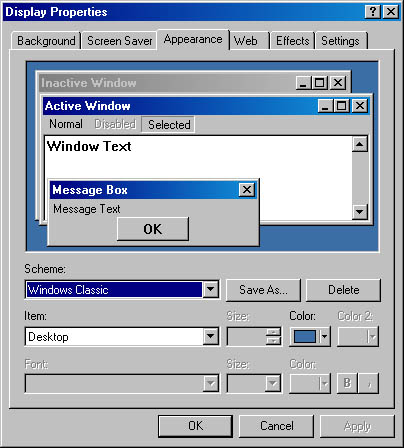
Figure 4-10. As you select from the supplied appearance schemes or create your own, the upper part of this dialog box provides a preview of your selections.
Modifying the Supplied Appearance Schemes
To modify one of the supplied appearance schemes, select its name in the Scheme list. In the sample window, click the screen element you want to change. Then use the list boxes and buttons at the bottom of the dialog box to make your color, font, and size selections.
For example, suppose you want to modify the Windows Standard color scheme, making the active window's title bar gradated from yellow to red, with black text in 12-point, bold, italic Verdana. To assign this admittedly garish combination:
- Select Windows Standard in the Scheme list.
- In the preview area of the dialog box, click the title bar labeled Active Window. (Or select Active Title Bar in the Item list.)
- In the Font list, select Verdana.
- In the Size list directly to the right of the Font list, select 12.
- Click the I (italic) button to the right of the font-size list. (The bold button is already selected.)
- Open the Color list to the right of the Item list and select yellow.
- Open the Color 2 list and select red.
- Open the Color list to the right of the Font list and select black.
Finding a Color if You Don't See the One You Want
The Color list boxes for the item and font colors offer a selection of 20 colors. If you don't see the one you're looking for, click the button labeled Other. Windows then displays a larger menu, consisting of 48 colors. Should you fail to find exactly the shade you want in this expanded offering, you can define your own custom colors, as discussed next.
Defining Custom Colors
To add your own colors to the ones Windows offers, open the Color list for the screen element you want to change and click the Other button. Windows opens the Color dialog box, shown in Figure 4-11.
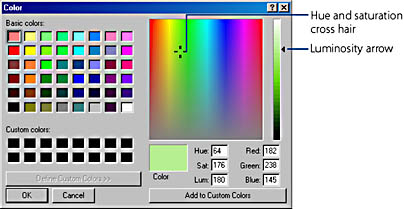
Figure 4-11. You can add custom colors to the Windows user interface by defining them in this dialog box.
To set a custom color with the mouse, adjust the position of two indicators—the cross hair in the big square grid and the arrow to the right of the vertical scale. As you move these indicators, Windows displays a sample of the selected color in the box near the center of the dialog box. If you prefer using your keyboard, you can precisely specify a color by entering its hue, saturation, and luminosity values, or by entering its red, green, and blue component values in the text boxes at the lower right corner of the dialog box. For information about color parameters, see the "How Colors Are Defined" sidebar.
The sample color box actually comprises two halves because your system might be incapable of displaying every possible color. For colors that your system can't display directly, Windows creates a patterned mixture of two or more colors that it can display directly—a process called dithering. The left half of the sample box (the one marked Color) displays the dithered color; the right half (marked Solid) displays a closely related color that your system can display without dithering. However, if your system is set at a color depth that can show high color or true color, you'll see only a single box labeled Color, as in Figure 4-11.
How Colors Are DefinedColors in Windows are recorded as a combination of three parameters: hue, saturation, and luminosity. Roughly speaking, the basic quality of a color—its redness, blueness, or whatever—is defined by its hue. The purity of a color is defined by its saturation; a lower saturation value means more gray is mixed in. The brightness or dullness of a color is defined by its luminosity.
Hue, saturation, and luminosity are the parameters that Windows uses internally, but your video display hardware lives by a different set of numbers. Images on a color monitor are formed by a combination of pixels. To make each pixel visible, a beam of electrons is fired at three tiny spots of phosphor—one red, one green, and one blue. The result is three points of distinctly colored light so close together that they're perceived as a single light source. The apparent color of that light source is determined by the relative intensities of its red, green, and blue components.
Therefore, every combination of hue, saturation, and luminosity is translated by Windows into varying levels of energy directed at those spots of red, green, and blue phosphor. Thus, there are two sets of boxes in the lower right corner of the custom color dialog box—one for the parameters used by Windows, the other for the relative red, green, and blue intensities. You can define a custom color by modifying the numbers in either set of boxes, or by simply dragging the indicators until you see the color you're looking for.
Experimenting with Color
In the Color dialog box, the vertical scale on the right controls luminosity (brightness). As you move its arrow indicator higher, the color becomes lighter. Putting the arrow at the top of the scale creates pure white, no matter where the cross hair is in the grid; putting the arrow at the bottom of the luminosity scale produces black.
The square grid controls hue and saturation. Moving the cross hair from side to side changes the hue; moving it higher increases the saturation.
To see the range of pure colors available, start by putting the luminosity arrow about halfway up the vertical scale. Then put the cross hair at the upper left corner of the square grid. This combination gives you a fully saturated red of medium luminosity. Now slowly drag the cross hair across the top of the grid; as you do so, you'll move from red through yellow, green, blue, violet, and back to red again. (Alternatively, you can enter a value in the Hue box to step the Hue parameter from 0 to 239.)
To see the effect of luminosity on color, double-click the Solid half of the sample box or press Alt+O. This moves the cross hair to the nearest position where you see a pure color in both sample boxes. Then move the luminosity arrow up and down the scale (or change the value in the Lum box).
To see the effect of saturation, put the luminosity arrow back in the middle of the scale and drag the cross hair straight up and down in the square grid (or change the value in the Sat box).
Adding Custom Colors to Your Palette
When you find a color you like, you can add it to your Custom Colors palette by clicking Add To Custom Colors. (If you prefer to add the solid color, double-click the Solid half of the sample box or press Alt+O first.) Windows adds the color to the first available Custom Colors box. If you want to add a color to a specific box in your custom palette (for example, if you want to replace a custom color), you must select that box first, reset the custom color using any of the above methods, and then click Add To Custom Colors.
When you've filled out the Custom Colors palette to your satisfaction, click OK to return to the Appearance tab of the Display Properties dialog box. Now you can assign your custom colors to the screen elements exactly as you did the basic colors.
Changing the Size of Particular Display Elements
You can make certain elements of the Windows user interface—such as title bars, caption (title bar) buttons, and window borders—larger or smaller by using the Size box to the right of the Item list on the Appearance tab, shown in Figure 4-10. If a number appears in this box, the element shown in the Item list can be sized.
Windows automatically adjusts the size of elements that contain text. For example, if you increase the font size for your active title bars, Windows adjusts the height of the title bar to accommodate the larger text. But you can override Windows' judgment by manipulating the values in the Size box.
Saving an Appearance Scheme
If you discover a pleasing new combination of colors, fonts, and sizes, it's a good idea to name and save your new scheme before leaving the Appearance tab of the Display Properties dialog box. That way, you'll be able to switch back and forth between your own custom formats and the ones supplied by Windows—or between several of your own making.
To save a scheme, simply click the Save As button and supply a name. Windows adds the name you provide to the list.
If you tire of your new scheme, you can easily remove it. Simply select its name, and then click the Delete button.
Whither Desktop Themes?Desktop themes add thematically consistent sounds and sights to your system, using wallpaper, specially designed icons, sound schemes, color schemes, fonts, animated mouse pointers, and screen savers. The Travel theme, for example, uses a train station for wallpaper, assorted propellers and clocks for mouse pointers, an airplane for a screen saver, and various toots, honks, beeps, and "a-oogas" to enliven your day.
Windows 2000 doesn't include desktop themes. However, if you installed Windows 98, Plus! for Windows 95, or Plus! for Windows 98 before you upgraded to Windows 2000, you can use desktop themes as you always have. And you'll discover a new feature: the Desktop Themes dialog box now includes an option to switch to a new theme once a month. (It uses a scheduled task to make the switch; edit the task if you want to change the interval. For more information about scheduling tasks, see "Running Programs on Schedule.")
Even if you didn't upgrade from Windows 98 or Plus!, you can still use desktop themes. Although Windows 2000 doesn't include any predefined themes, it does include the Desktop Themes program, an executable named %SystemRoot%\System32\Themes.exe. To use desktop themes, create a shortcut to this file. You can download predefined themes from a number of sites on the World Wide Web, or you can create your own.
To create your own theme from scratch, simply use Control Panel to set up all the elements of your theme. For example, to select wallpaper, go to the Background tab in the Display Properties dialog box. To change a mouse pointer, launch Mouse and click the Pointers tab. Then go to Desktop Themes, select Current Windows Settings, click Save As, and name your theme.
Using Wallpaper
Wallpaper refers to any background image displayed on the desktop, whether a small image repeated to fill the desktop (as in conventional wallpaper), a centered image, or a large image that covers the entire desktop. If you're not using Web-content view, your wallpaper can be supplied by any graphics file with the extension .bmp, .dib, or .rle. On a desktop that has Web content enabled, you can also use GIF and JPEG files (graphics formats commonly used on Web pages), or you can drape your desktop with an HTML file stored on your computer or on a network drive, complete with live links.
To make a wallpaper choice, right-click the desktop, choose Properties from the shortcut menu, and click the Background tab. This takes you to the dialog box shown in Figure 4-12. Note that the default choice, (None), appears at the top of the list. You'll want to return to (None) if you get tired of having wallpaper.
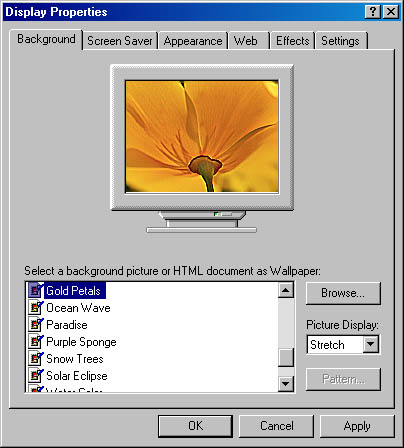
Figure 4-12. The Background tab in the Display Properties dialog box lets you add a pattern, picture, or HTML page to your desktop.
Select an image file from the Wallpaper list, or click the Browse button to find one that's not in the list. (The list initially includes image files in your My Pictures folder and the %SystemRoot% folder.) Note that if you choose a GIF image, a JPEG image, or an HTML file, Windows offers to enable Active Desktop's Show Web Content option if it's not already enabled.
After choosing a wallpaper file, you can choose either Center, Tile, or Stretch from the Display list. If you choose Tile, your image is repeated as often as needed to fill the screen. If you choose Stretch, Windows enlarges your image to fill the screen (in the process possibly distorting it beyond recognition).
Using a Background Pattern
A background pattern is an 8-pixel by 8-pixel picture that can be used like tiled wallpaper. You can either fill your entire desktop with a pattern, or, if you have a centered wallpaper image, you can fill the space around that image with a pattern. Windows supplies about a dozen patterns to choose from, and you can edit any of these to create your own patterns.
To apply a pattern, first visit the Display Properties dialog box shown in Figure 4-12. Then click Pattern to open the Pattern dialog box shown in Figure 4-13. Note that the Pattern button is unavailable unless your current wallpaper is centered or you have no wallpaper.
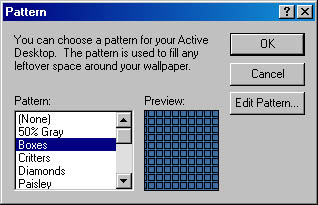
Figure 4-13. A pattern can be used alone or with centered wallpaper.
Editing an Existing Pattern
To edit one of the Windows-supplied patterns, select its name in the Pattern list and click the Edit Pattern button. The Pattern Editor appears, as shown in Figure 4-14.

Figure 4-14. The Pattern Editor lets you modify or create background patterns for your desktop.
The Pattern Editor shows two boxes. The Sample box, on the right, shows a swatch of the current pattern. The Pattern box, on the left, shows a magnified image of the 8-pixel by 8-pixel cell that produces the pattern. To edit the pattern, you'll work with the Pattern box. You can see the effects of your work by watching the Sample box.
Each pixel in the Pattern box is displayed in either black or the current background color of your desktop. Clicking a pixel inverts it from black to color or vice versa. When you're satisfied with your editing, click Change to save the revised pattern. Then click OK to select it.
Creating a New Pattern
To create a new pattern, simply edit an existing one. Then give your work a new name by replacing the text in the Name text box. Click Add, and your new pattern joins the list of existing patterns.
Using a Screen Saver
Screen savers were originally created to prevent damage that could occur to monitors when the same picture or text remained on screen for a long period of time. With current display technology, however, the probability that you'll damage your screen with a burned-in image is remote. But screen savers have other virtues as well. They're fun to watch, and they're one way to prevent others in your vicinity from prying while you're away from your machine. As soon as you press a key or (with most savers) move the mouse, the screen saver restores the original image.
Many screen savers have a save-now option and a password option. The save-now option lets you display the saver on demand, either by pressing a certain keyboard combination or by moving the mouse to a particular corner of the screen. The password option ensures that only you are able to restore the original image. If your screen saver has these features, you can display the saver any time you walk away from your computer and be reasonably confident that no one will invade your privacy.
To install one of the Windows-supplied screen savers, right-click the desktop and choose Properties from the shortcut menu. Then click the Screen Saver tab to open the dialog box shown in Figure 4-15.
To select a screen saver, choose it from the Screen Saver list. Then use the Wait box to specify how long a period of inactivity Windows should allow before displaying the screen saver.
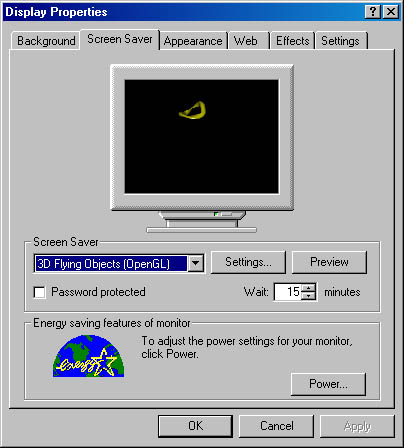
Figure 4-15. The Screen Saver tab in the Display Properties dialog box offers a choice of customizable screen savers.
All the Windows-supplied screen savers (except for Default Screen Saver and Logon Screen Saver) include options that you can set. These options let you adjust colors, speed, and other display preferences. Figure 4-16 shows the settings dialog box for the 3D Flying Objects screen saver.
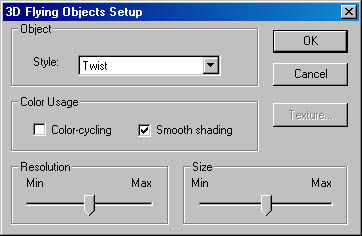
Figure 4-16. After selecting a screen saver, you can click the Settings button to specify display options.
Changing Desktop Icons
Tired of looking at the same old My Computer and Recycle Bin icons? As Figure 4-17 shows, you can go to the Effects tab in the Display Properties dialog box to change them. Simply select the icon you want to change, and then click Change Icon. You'll see a dialog box with several icons. Select a new icon from the ones displayed, or click Browse to point to a different icon file.
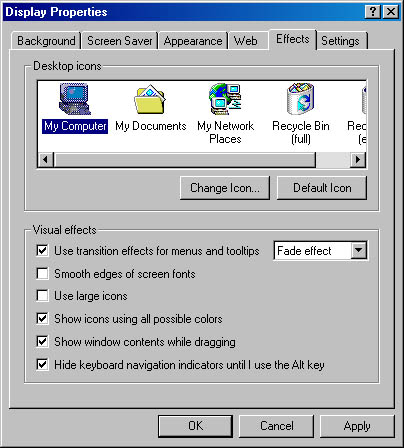
Figure 4-17. The Effects tab in the Display Properties dialog box lets you change the content, size, and color depth of system icons, among other settings.
You can also use check boxes on the lower part of the Effects tab (see Figure 4-17) to enlarge your system icons and change their color depth. If you're running your system at 16-bit or higher color depth, selecting Show Icons Using All Possible Colors will get you a prettier icon display.
When you're using an HTML page as a background for your Active Desktop, some of your desktop icons might clash visually with some of your HTML links. In that case, you might want the desktop icons to disappear altogether. To perform this vanishing act, right-click the desktop, choose Active Desktop from the shortcut menu, and then choose Show Desktop Items. (If you need the icons, you can deploy them in a more compact and out-of-the-way manner by displaying the Desktop toolbar. For details, see "Using Desktop Toolbars.")
Controlling Menu Appearance, Font Smoothing, and Window-Drag Display
The remaining check boxes on the Effects tab in the Display Properties dialog box, shown in Figure 4-17, control these visual effects:
- Use Transition Effects For Menus And Tooltips. Causes the menus (such as the Start menu and its submenus, or shortcut menus) to unfurl somewhat less than instantaneously. (The Fade Effect option causes menus to fade in from transparent to opaque. The Scroll Effect option causes menus to grow from a starting point to their full size.) Clear this check box if you want the menus to appear more quickly.
- Smooth Edges Of Screen Fonts. Causes Windows to fill in the jagged edges of large fonts, giving large type a more natural appearance. It also slows down your display slightly, but with a fast processor you might not notice the performance hit.
- Show Window Contents While Dragging. Displays the full contents of a window as you drag it. If you turn off this option, Windows displays only a ghost border while you drag and fills in the window after you release the mouse button. Turn off this option if your performance drags while you drag.
- Hide Keyboard Navigation Indicators Until I Use The Alt Key. Hides the underscores that identify shortcut keys on menus and in dialog boxes, in an attempt to reduce visual clutter. When you press Alt—the key you must press as part of the shortcut key combination—the underscores appear. If you prefer constant reminders of the available shortcut keys, clear this check box.
![]()
EAN: 2147483647
Pages: 317