Adding Shortcuts to Your Desktop
A shortcut is a tiny file that provides a link to a program, document, folder, or Internet address. The file is represented by an icon that includes a black arrow in its lower left corner, like this:

If the shortcut is linked to a file or folder, that file or folder can be anywhere—on a local hard disk or CD-ROM drive, on a floppy disk, on a network server, or on the Internet. Like any other kind of file, a shortcut can be stored in any folder, including your desktop. If you store shortcuts for programs and documents on your desktop, you can get to them easily at any time. For example, if you use a half dozen or so programs nearly every day, why not simply place shortcuts for them on your desktop? Particularly if the items in question are buried several levels deep in the Start menu, it can be easier to get to them via desktop shortcuts.
Because a shortcut is a pointer to an object, not the object itself, you can create and delete shortcuts without affecting the underlying object in any way. It also means you can create a shortcut to a major program without duplicating the large file that actually runs that program. Shortcuts themselves use less than 2 kb of disk storage, so a proliferation of shortcuts isn't likely to run you out of hard disk space.
Creating a Shortcut
There are three easy ways to create a shortcut: by dragging and dropping, by using cut and paste, and by visiting the Create Shortcut Wizard.
Creating a Shortcut by Using Drag and Drop
If the item for which you want to create a shortcut is visible in a Windows Explorer window, right-drag that item to wherever you want the shortcut to appear. Then, from the shortcut menu, choose Create Shortcut(s) Here.
You can also right-drag an item from the Start menu to create a shortcut on the desktop:
- Click the Start button to open the menu.
- Move your mouse pointer to the menu item you're interested in.
- Right-drag it to your desktop.
- Choose Create Shortcut(s) Here from the menu that appears.
CAUTION
Left-dragging moves the shortcut to the desktop—and it's no longer on the Start menu.
TIP
All the procedures described here for creating shortcuts on the desktop work for creating shortcuts in other folders as well.
You can turn any Web link into a desktop shortcut by simply dragging the link (the underlined text) and dropping it on the desktop. Opening that shortcut later will activate your browser, connect you to the Internet (if you're not already there), and take your browser to the appropriate URL.
TIP
You can also create a shortcut by dragging an item from a Search Results window. Thus, if you want to create a shortcut to a program and you're not sure where that program resides, you can use Search to locate it. Then right-drag the found item to the desktop to create the shortcut. For information about using the Search feature, see Chapter 11, "Searching for Files and Folders."
TIP
Some shortcuts can be used as targets for drag and drop. For example, if you put a shortcut for a printer on your desktop, you can print documents by dragging them from Windows Explorer windows to the printer shortcut. If you create a shortcut for a floppy disk drive or the top-level folder on a hard disk, you can copy files by dragging them from Windows Explorer windows to the shortcut. For more information, see "Printing from Windows Explorer" and "Moving or Copying Folders, Files, and Shortcuts."
Creating a Shortcut by Using Copy and Paste
Right-dragging an item from a Windows Explorer window to the desktop isn't convenient when the Windows Explorer window is maximized. In that situation, the easiest way to build your shortcut is to right-click the item and choose Copy from the shortcut menu. Then display the desktop, right-click anywhere on it, and choose Paste Shortcut from the shortcut menu.
Creating a Shortcut by Using the Create Shortcut Wizard
To use the Create Shortcut Wizard, start by right-clicking the desktop. From the shortcut menu, choose New, and then choose Shortcut. The Create Shortcut Wizard appears, as shown in Figure 4-7.
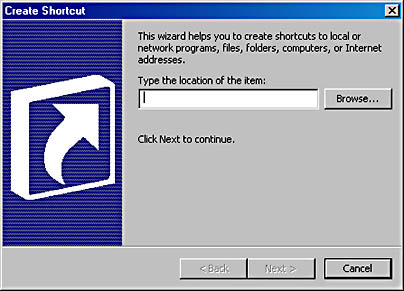
Figure 4-7. The Create Shortcut Wizard makes it easy to populate your desktop—or any other folder—with shortcuts.
If you know the command line required to run your program or to open your document, simply type it and click the Next button. (The command line is whatever you would type to run your program or to open your document if you were using the Start menu's Run command.)
If you don't know the command line, or if Windows gives an error message when you click Next, click the Browse button. In the Browse For Folder dialog box, locate the item for which you want to create a shortcut. Then click the OK button. After you click OK, the wizard returns you to its initial dialog box, with the command line filled in.
Click Next, type a name for your shortcut, click Finish, and your shortcut will appear.
Renaming a Shortcut
When you first create a shortcut, Windows gives it a default name based on the underlying object. To rename a shortcut:
- Right-click the shortcut.
- From the shortcut menu, choose Rename.
- Type the name you want to use.
TIP
You can also rename any object by selecting it, pressing F2, and typing the new name.
Assigning Other Properties to a Shortcut
You can assign a shortcut key to a shortcut, allowing you to activate the shortcut with a combination of keyboard characters. (For example, you might assign Ctrl+Alt+P to the Microsoft Paint program.) You can also change the icon displayed by a shortcut, specify what kind of window the shortcut should open (maximized, minimized, or normal), and assign an initial data folder to be used by whatever program the shortcut opens. All these customizing steps involve modifying the shortcut's properties, just as you would to customize items on the Start menu.
SEE ALSO
For more information about shortcut properties, see "Changing Shortcut Properties."
Repositioning Shortcuts on the Desktop
You can change the position of your desktop shortcuts at any time. Simply drag them. You can also get Windows to help you keep your shortcuts neatly aligned. To line up desktop icons:
- Use the mouse to bring your shortcut icons into approximate alignment.
- Right-click the desktop.
- From the shortcut menu that appears, choose Line Up Icons.
If you want all of your desktop shortcuts organized in columns starting at the left side of the desktop, right-click the desktop, choose Arrange Icons, and then choose Auto Arrange. With Auto Arrange turned on, your icons always stay neatly aligned, even if you try to drag them out of place.
Whether you choose Line Up Icons or Auto Arrange to tidy up your desktop, Windows aligns the icons to an invisible grid that evenly spaces them. If you want the icons to be closer together or farther apart, you can adjust the grid spacing. To adjust the spacing:
- Right-click the desktop.
- From the shortcut menu, choose Properties.
- In the Display Properties dialog box, click the Appearance tab.
- Open the Item list and select Icon Spacing (Horizontal) or Icon Spacing (Vertical).
- Adjust the setting in the Size box. (A larger number increases the space between icons.)
NOTE
In addition to controlling the desktop icons, changing the icon spacing affects the spacing of icons in folders when you use Large Icons view.
Deleting a Shortcut
To remove a shortcut, simply select it and press the Delete key. Or right-click it and choose Delete from the shortcut menu. Note that deleting a shortcut doesn't delete the program or document that the shortcut points to; doing so deletes only the shortcut itself.
EAN: 2147483647
Pages: 317
- Chapter II Information Search on the Internet: A Causal Model
- Chapter V Consumer Complaint Behavior in the Online Environment
- Chapter VIII Personalization Systems and Their Deployment as Web Site Interface Design Decisions
- Chapter XI User Satisfaction with Web Portals: An Empirical Study
- Chapter XIV Product Catalog and Shopping Cart Effective Design