Working with Cutouts
After you've defined a cutout, you can do any of the following with it:
- Cut it to the Clipboard
- Copy it to the Clipboard
- Copy it to a separate disk file
- Move it to another place within the current picture
- Copy it to another place within the current picture
- Sweep it across your picture, leaving a trail of copies in its wake
- Change its size or shape
- Stretch (distort) or skew (slant) it
- Flip or rotate it
- Reverse its colors
- Erase it
SEE ALSO
For information about defining a cutout, see "Defining Cutouts with the Free-Form Select Tool and the Select Tool," above.
TIP
The easiest way to perform most cutout operations is to select a command from the cutout's shortcut menu. After you define a cutout, right-click it to display its shortcut menu.
Cutting or Copying a Cutout to the Clipboard
To put your cutout on the Clipboard, choose Cut or Copy from the Edit menu (or from the shortcut menu that appears when you right-click the selection). If you choose Cut, Paint removes it from the current picture and transfers it to the Clipboard. If you choose Copy, Paint puts a copy of the cutout on the Clipboard and leaves the current picture unchanged.
Linking and Embedding Cutouts
The Paint program can be a source for linked objects. That means that pictures created or edited in Paint can be linked or embedded in documents created by programs that can create compound documents, such as WordPad, Microsoft Excel, or Microsoft Word. For information about linking and embedding, see Appendix D, "Cutting, Pasting, Embedding, and Linking."
When you use the Cut command to put the cutout on the Clipboard, the area of the picture that was occupied by the cutout assumes the current background color. If you want the area to look like the blank canvas after the cutout is removed, be sure the current background matches your initial background color.
Copying a Cutout to a Disk File
You can copy a cutout to a separate disk file, thereby creating a new Paint document. It's a good idea to do this if you want to use the cutout in different pictures.
SEE ALSO
For information about the Save As dialog box, see "Saving and Opening Paint Documents."
To save the cutout to a new document, choose Copy To from the Edit menu or the cutout's shortcut menu and fill out the Save As dialog box that appears.
Pasting a Cutout from the Clipboard
To paste a cutout from the Clipboard, choose Paste from the Edit menu. Your cutout appears in the upper left corner of the drawing area surrounded by a dotted line. At this point, you can drag it to any part of the drawing area, or you can manipulate it in any of the other ways described in the following sections.
Note that pasting in Paint is a bit different from pasting in other programs. In a word processor, for example, you first position the insertion point where you want the contents of the Clipboard pasted, and then choose Paste. In Paint, you paste first, and then you position the pasted object.
NOTE
Paint handles Clipboard text differently from graphics. When you paste text from the Clipboard, you must position the insertion point first, and then choose the Paste command.
Pasting from a Disk File
To paste a cutout that was saved as a separate disk file, open the Edit menu, choose Paste From, and then choose the file you want from the Open dialog box that appears. This dialog box is the same as the one that appears when you choose Open from the File menu.
When you choose Paste From, the cutout appears in the upper left corner of the drawing area, just as when you paste from the Clipboard.
TIP
If you want to place the contents of a saved cutout somewhere other than the drawing area's upper left corner, you can drag it after you choose Paste From. But there's an easier way: use the Select tool to define a cutout before you choose Paste From, and the saved cutout is then pasted into the upper left corner of the selected cutout.
Moving a Cutout
To move a cutout from one place to another, position the mouse pointer anywhere within the dotted line (the pointer changes to a four-headed arrow), and then drag. When you move a cutout, the portion of the picture you move the cutout onto is obscured by the cutout object.
Copying a Cutout Within a Picture
To make a duplicate of a cutout, position the cursor within the dotted area surrounding the cutout and hold down the Ctrl key while dragging the mouse. The original cutout remains where it was and a duplicate appears where you release the mouse button.
Sweeping a Cutout
To sweep a cutout means to create a trail of copies with it as you pass the mouse across the canvas. Figure 34-8 shows an object that has been swept across the canvas.
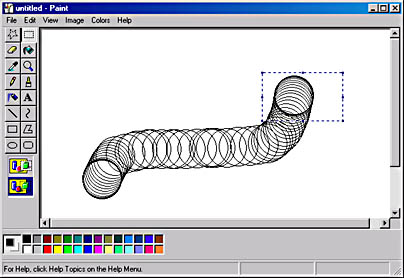
Figure 34-8. Sweeping can be useful, or it can just make a mess.
To sweep a cutout, first move the cutout where you want to begin the sweep. Then position the cursor within the dotted area and hold down the Shift key while dragging.
The speed at which you drag the mouse determines the number of copies that result from the sweep.
TIP
Most often you will want to select the icon for transparent drawing below the toolbox. Otherwise, each new image in the sweep obscures part of the image that preceded it.
This Ought to Clear Things Up
Cutouts can be moved, copied, or swept either opaquely or transparently. When you move, copy, or sweep a cutout opaquely (the default), any background portions of the cutout are moved, copied, or swept along with the foreground material and can obscure another object that the cutout lands on. If you move, copy, or sweep a cutout transparently, any parts of the cutout that are in the current background color disappear, allowing the underlying image to show through. To select transparent operations so the background won't obscure other parts of the drawing, clear the check mark from the Draw Opaque command on the Options menu, or click the draw transparent icon below the toolbox (the bottom icon).The opaque and transparent options also control the background of a text box when you use the Text tool.
Resizing a Cutout
You can change the size of a cutout horizontally, vertically, or both. To change the size of a cutout, position the mouse pointer over one of the handles in the dotted rectangle surrounding the cutout. There are eight handles—one in each corner and one in the middle of each side.
When the mouse pointer is correctly positioned, it assumes the shape of a double-headed arrow. If it's on a corner handle, the arrow is diagonal and you can size vertically and horizontally at the same time.
Stretching and Skewing a Cutout
To adjust a cutout with absolute precision, choose Stretch/Skew from the Image menu to display the Stretch And Skew dialog box, as shown in Figure 34-9. Using this dialog box, you can alter the size of the cutout either horizontally or vertically by specifying a percentage greater or smaller than its original 100 percent. You can skew the cutout horizontally or vertically by specifying the number of degrees to skew.
To change the size of a cutout, enter the percentage in the appropriate text box. For example, to double the vertical size of a cutout, enter 200 in the Vertical text box.
To skew the cutout, enter the number of degrees to skew. Use a positive number to skew the cutout in the direction of the icon in the dialog box, or a negative number to skew the cutout in the opposite direction.
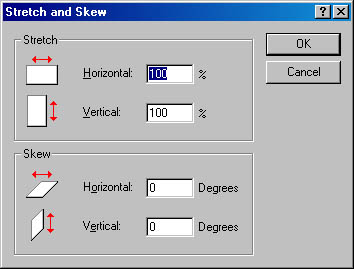
Figure 34-9. With the Stretch And Skew dialog box, you can precisely control the image's size and shape.
Flipping or Rotating a Cutout
Using the Image menu's Flip/Rotate command, you can flip any image vertically or horizontally, or rotate it 90, 180, or 270 degrees. To flip or rotate a cutout, choose Flip/Rotate from the Image menu; the Flip And Rotate dialog box appears. Select the Flip Horizontal, Flip Vertical, or Rotate By Angle option. If you select Rotate By Angle, you must also select one of the angle options. Finally, click OK.
Reversing the Colors of a Cutout
The Image menu's Invert Colors command reverses the colors of your cutout. Black becomes white, white becomes black, and colors switch to their complementary color on the red-green-blue color wheel.
Inverting color can give unexpected, and sometimes unwanted, results. Just remember that you can use the Undo command if the new colors aren't what you had in mind.
Erasing a Cutout
You can erase a large area by defining it as a cutout and then choosing the Clear Selection command from the Edit menu or the cutout's shortcut menu. Like the Cut command (see "Cutting or Copying a Cutout to the Clipboard."), this command removes the cutout and replaces it with the current background color. However, it doesn't move the cutout to the Clipboard, so if you want to leave the Clipboard contents unchanged, use the Clear Selection command.
EAN: 2147483647
Pages: 317