Installing a Legacy Device
After you install a new legacy device (one that is not Plug and Play compatible), use Add/Remove Hardware in Control Panel to let Windows know what you've done. To use Add/Remove Hardware:
- Open the Start menu and choose Settings, Control Panel, Add/Remove Hardware.
- On the wizard's Welcome page, click Next.
- On the Choose A Hardware Task page, select Add/Troubleshoot A Device, and then click Next.
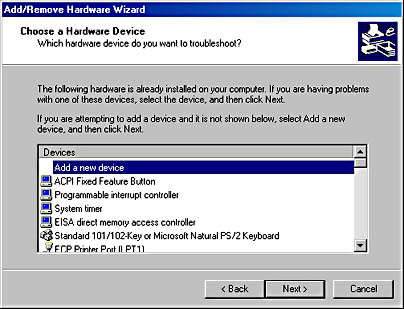
- Select the first entry, Add A New Device, and then click Next.
- On the Find New Hardware page, decide whether you want Windows to search for your new hardware or whether you want to select from a list.
- If you want the wizard to try to determine what you've added, select Yes, Search For New Hardware and click Next. The wizard can detect many types of devices, even if they don't support Plug and Play. If Windows succeeds in identifying one or more new devices, it presents you with a list of all devices found. Select the first member of the list and click Next. You'll then receive instructions about what to do next. (For example, you might be asked to insert a disk or the Windows CD so that Windows can get one or more driver files.) If the wizard is unable to detect the new device, click Next after the wizard informs you of this result. You'll then see a wizard page similar to the one shown in Figure 24-1, where you can identify the device yourself.
- If you prefer to skip Windows' automatic-detection services, select No, I Want To Select The Hardware From A List and then click Next. On the Hardware Type page shown in Figure 24-1, select the type of hardware you're installing and click Next. Make-and-model options appear next on the Select A Device Driver page. (See Figure 24-2.) Select the vendor of your new hardware on the left side of this page and the specific model on the right. Then click Next once more and follow the ensuing instructions.
The Add/Remove Hardware Wizard appears.
Windows then searches for new Plug and Play devices, and eventually displays the Choose A Hardware Device page, which lists all your currently installed devices.
The Find New Hardware page appears. Now you have a choice.
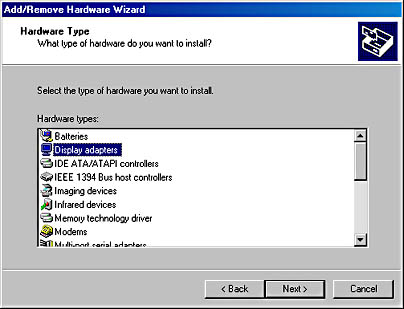
Figure 24-1. If you decide not to let the wizard detect your new hardware (or if it's unable to), you must tell it what type of hardware you want to install.
NOTE
You must be logged on as a member of the Administrators group to install the driver files for a device. If the files already exist on your computer, any user can install a device with the assistance of the Add/Remove Hardware Wizard.
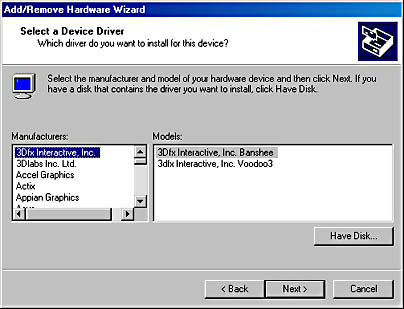
Figure 24-2. After telling the wizard what kind of hardware you're installing, you'll be asked to identify the hardware's make and model.
Alternative Ways to Install Certain Legacy Devices
You can use the Add/Remove Hardware Wizard to install any type of new device. For a new printer, modem, scanner, camera, or game controller, however, you can also use other Control Panel items to let Windows know what you've done. The following sections explain how to use Control Panel to install these devices, and also explain some of the device-specific settings you can make to properly configure your hardware.
EAN: 2147483647
Pages: 317