Using Cover Page Editor
Cover Page Editor is a simple black-and-white graphics application that lets you design and edit cover pages. Figure 20-13 shows Cover Page Editor with one of the four cover pages supplied with Windows 2000.
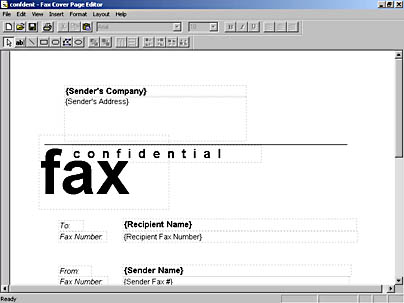
Figure 20-13. You can use Cover Page Editor to modify supplied cover pages or create your own.
You probably won't find a Start menu item for Cover Page Editor. You can open the Start menu, choose Run, and type the name of its executable—faxcover.exe—or you can run it as follows:
- From the Start menu, choose Programs, Accessories, Communications, Fax, My Faxes.
- In the My Faxes folder, open Common Coverpages.
- Double-click the entry for the cover page you want to work with. (To create a new cover page from scratch, open any existing cover page. Then choose New from the File menu.)
Selecting, Sizing, and Moving Objects
Every element on a cover page that's bounded by a dotted line in Cover Page Editor is a distinct object. To size or move an object, begin by clicking it. Black handles appear around the selected object's perimeter. To change an object's size, drag one of the handles. To move an object, position the mouse along the perimeter, but not on a handle. A four-headed arrow appears beside the normal mouse pointer. Drag the object to its new location. If you change your mind, choose Undo from the Edit menu.
To move two or more objects at once, Ctrl-click each one. The objects become temporarily grouped and will move together.
Aligning Objects
You can use the View menu's Grid Lines command to display light-blue grid lines in the editor. These might help you in positioning objects. To achieve alignment between objects, however, it's simpler to use the Layout menu's Align Objects command. First Ctrl-click each of the objects you want to align, and then choose the command. Options on the Align Objects submenu let you line up objects flush left or flush right. You can also top align and bottom align objects or center objects horizontally or vertically.
Spacing Objects Evenly
To ensure that three or more objects have equal vertical or horizontal space between them, first Ctrl-click those objects. Then open the Layout menu, point to Space Evenly, and choose Across or Down from the submenu.
Centering Objects on the Page
To center one or more objects on the page, vertically or horizontally, first Ctrl-click the objects. Then open the Layout menu, point to Center On Page, and choose Width or Height.
Changing the Z Order of Stacked Objects
If two or more objects lie atop one another, the order in which they're stacked is called the z order (x, y, and z are the letters used in geometry to describe width, height, and depth.) To change the z order of an object relative to others, select the object, open the Layout menu, and choose either Bring To Front or Send To Back.
Adding Fixed Text
Fixed text is text that doesn't change (as distinguished from fields, which are replaced by information about the sender, recipient, or content of a fax). To add fixed text:
- Click the Text tool on the Drawing toolbar. (If the Drawing toolbar isn't visible, choose Drawing Toolbar from the View menu.)
- Click one corner of the place where you want the object to go. Then drag to the diagonally opposite corner. A perimeter rectangle with black handles appears as you drag.
- Type your text within the object perimeter. Use the Format menu's Font and Align Text commands (or their toolbar equivalents) to get the text looking the way you want it.
![]()
Note that new objects don't affect the placement of existing objects. If you want to insert a line of text between two lines, you must first drag objects out of the way to make room for the incoming text.
Inserting Fields, Images, and Graphics
Objects that begin and end with braces—such as {Recipient Name} and {Recipient Fax Number} in Figure 20-13—are fields. When your fax is sent, these fields will be replaced by data—the name and number of the person to whom you're faxing, for example. To add fields to a cover page, use the Insert menu. The available fields appear in three submenus: Recipient, Sender, and Message.
To place an image on a cover page, first open or create that image in another application (such as Paint). Copy the image to the Clipboard, and then use Cover Page Editor's Paste command. The pasted image appears in the upper left corner of the Cover Page Editor window. Use the mouse to drag it into position.
To insert lines and shapes, use the Line, Rectangle, Rounded Rectangle, Polygon, and Oval tools from the Drawing toolbar. (If you don't see the Drawing toolbar, choose the View menu's Drawing Toolbar command.)
| |  |  |  | |
To use any of these tools other than the Polygon tool, simply click the cover page and drag. To use the Polygon tool, click each vertex of your polygon. When you have finished, double-click to close the polygon.
Holding down the Shift key while you drag constrains the Line, Rectangle, Rounded Rectangle, and Oval tools. Shift-dragging with the Line tool creates a horizontal, vertical, or 45-degree diagonal line. Shift-dragging with the Rectangle and Rounded Rectangle tools creates a square and square with rounded edges, respectively, while Shift-dragging with the Oval tool creates a circle.
Previewing, Printing, and Saving
You can use the File menu's Print Preview command to get a bird's-eye view of your cover page. Other commands on the File menu let you send the page to the printer or store it on disk. Use the Save As command on the File menu to give your file an original name. Or use the Save command to save under the current name.
EAN: 2147483647
Pages: 317