Changing the Appearance of Outlook Express
With the single exception of the message list, all the features of the Outlook Express window are optional. You can hide or display the Contacts list, Outlook bar, Folders list, Folder bar, Views bar, status bar, toolbar, and the preview pane by choosing Layout from the View menu. Figure 19-5 shows the Window Layout Properties dialog box that appears.
The top part of the Window Layout Properties dialog box controls the presence or absence of three different ways to display lists of Outlook Express folders:
- The Outlook bar is a column of buttons—one for each mail folder and news server. Because the oversized buttons often necessitate scrolling the column of buttons, the Outlook bar is the most attractive and least useful of the lot.
- The Folders list shows all mail folders, news servers, and subscribed newsgroups in outline form, much like the Folders bar in Windows Explorer.
- The Folder bar, which displays the name of the selected folder near the top of the window, occupies the least screen space. When you click the Folder bar, the Folders list opens temporarily to let you select another folder. Once you do, the list disappears to get out of your way.
With any of these navigation tools, you simply click the name of a folder or news server and Outlook Express displays its contents in the message list. You probably won't want to make all three options visible at the same time, but you can experiment to find which ones you like best.
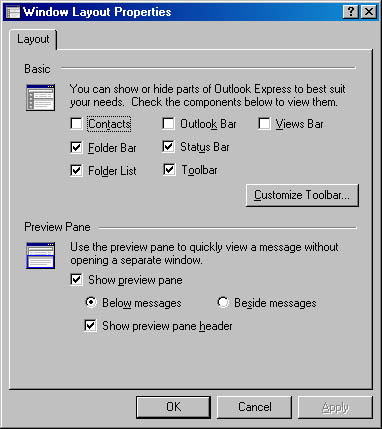
Figure 19-5. The Window Layout Properties dialog box lets you control which elements are displayed in the Outlook Express window.
Customizing the Toolbar
To add or remove buttons from the current toolbar, click the Customize Toolbar button in the Window Layout Properties dialog box. To add a function to the toolbar, select it in the left side of the Customize Toolbar dialog box and click the Add button. To remove a function, select it in the right side of the dialog box and click the Remove button. To change the position of an item on the toolbar, select it in the right side of the dialog box and click Move Up or Move Down. You can use the Text Options box to change the position of the text associated with toolbar buttons—or to remove the text. The Icon Options box lets you change the size of the toolbar icons.
Viewing or Hiding the Preview Pane
The preview pane is a section of the Outlook Express window that displays the contents of the currently selected message. When you're scanning mail messages or news messages rather than taking the time to read each one entirely, you can save yourself a lot of time by selecting items from the list and reading the first few lines.
If you don't want to use the preview pane, use the Window Layout Properties dialog box to hide it, which allows more space for the message list. You can place the preview pane below the message list or arrange the message list and preview pane side-by-side.
Customizing the Message List
Outlook Express maintains a group of display settings for each folder. These settings let you decide which columns are displayed, the order and width of the columns, and the sort order. You can customize each of these settings.
Selecting Columns to Display
To specify which columns are displayed or to change the order in which they appear:
- Open the View menu and choose Columns. The Columns dialog box appears, as shown in Figure 19-6.
- To add a new column, select its check box.
- To remove a column, clear its check box.
- To change a column's position, select it and then click Move Up or Move Down.
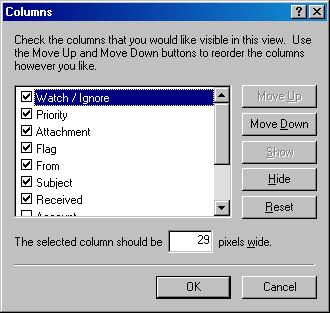
Figure 19-6. You can select which columns to display for each folder.
TIP
You can change the width of any column by dragging the right border of the column heading. You can change the order of the columns by dragging a column heading to the new location; a blue line between column headings indicates where the column will go when you release the mouse button.
Sorting Messages
The column heading that Outlook Express currently uses to sort the items in the message list has an arrowhead in it. When the arrowhead points up, the messages appear in ascending order (A to Z, or oldest to most recent); when the arrowhead points down, the messages appear in descending order (Z to A, or most recent to oldest). To use a different field to sort the message list, click that column heading. To switch between ascending order and descending order, click the column heading again.
Organizing Mail in Conversation Threads
Outlook Express normally treats each message in a folder as a discrete entity for sorting purposes. When you have messages with replies, and particularly if the replies have replies of their own, an arrangement that treats such collections of messages as conversation threads might prove more useful. If you choose to organize your messages in conversation threads, a plus (+) sign (the common symbol for an expandable outline entry in Windows 2000) appears next to a message that has a reply. Click the plus sign to display the reply—and all additional messages in the thread.
To organize your messages in conversation threads, point to Current View on the View menu and choose Group Messages By Conversation.
Typically, your own replies to messages you receive appear initially in your Sent Items folder. To make them part of a conversation thread, you need to move them back to the Inbox folder—or move all messages in a thread to some other folder. If you move messages from various folders to a common folder, Outlook Express immediately gathers the related messages into threads.
EAN: 2147483647
Pages: 317