Entering and Editing Contact Information
Figure 17-3 shows Address Book's data-entry form. As you can see, the form uses seven tabs to segregate various kinds of information about each of your contacts. (After you have created an Address Book record, an eighth tab—Summary—appears.) Out of all the many fields available, only one is required. You must enter some form of name for a contact; that is, your contact must have at least a first, middle, or last name. Everything else is optional.
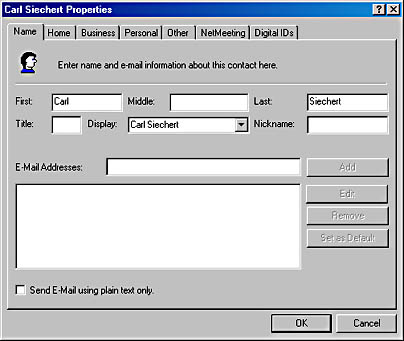
Figure 17-3. Each entry in your Address Book has its own properties dialog box.
To create a new Address Book entry, click the New button on the toolbar and choose New Contact. To edit an existing contact, double-click it.
E-Mail Addresses
To enter an e-mail address, click the Name tab, type the address into the E-Mail Addresses box, and then click the Add button. If you enter an invalid Internet e-mail address (by Address Book's judgment), you'll get a warning prompt. If the address is correct, prompt notwithstanding, click Yes.
You can enter as many e-mail addresses for a contact as you want. If you have more than one, select the one that you want Address Book to display in Details view, and then click the Set As Default button.
Outlook Express can send e-mail in HTML (Hypertext Markup Language), allowing you to apply rich formatting to the text of your message, include links to Web pages, and so on. If you select this option in Outlook Express, you can still opt to send messages to particular recipients in plain text. If you know that a contact can't read HTML-encoded e-mail, be sure to select the check box labeled Send E-Mail Using Plain Text Only on the Name tab of the contact's properties dialog box. Note that this check box affects all e-mail addresses for the current contact. If a contact has one e-mail address to which you want to send HTML and another to which you want to send plain text, create two separate address book records for that contact.
Default Addresses
You can enter separate home and business addresses for a contact, using the Home and Business tabs. If you have a program that works with data from Address Book, you should specify which of the two available addresses the program should use by default. You can do that by selecting the Default check box on either the Home or Business tab. Selecting one of these check boxes clears the other.
Web Pages
The Home and Business tabs both include Web Page fields, allowing you to associate your contact with both a personal and a professional Web site. After you've entered a URL in either of those fields, you can use the Go button to the right of the field to connect to the specified Web site.
Finding a Contact on the Map
Below the address section on both the Home and Business tabs is a View Map button. Clicking here sends your Web browser to an Internet site that will attempt to display the associated address on a map.
Children
To add the name of a contact's child, click the Add button on the Personal tab. An item called New Child appears in the Children window. Simply type the child's name to rename this item.
Conferencing Servers and Addresses
On the NetMeeting tab, you can enter conferencing servers and conferencing addresses for use in NetMeeting calls. To enter server names, type into the Conferencing Server line and then click the Add button. The first server you enter is automatically used as the default by NetMeeting. To enter a conferencing address, type it into the Conferencing Address box or open the list and choose one of your existing e-mail addresses. Be aware that a person's conferencing address might not be the same as his or her e-mail address. For more information about using NetMeeting, see Chapter 21, "Using NetMeeting."
Digital IDs
A digital ID, also known as a security certificate, is a statement issued by a third-party certifying authority attesting to your identity. Digital IDs enable correspondents to exchange secure (encrypted) e-mail. To associate a digital ID with an e-mail address:
- Click the Digital IDs tab.
- Select an e-mail address from the list.
- Click the Import button and specify the filename of the digital ID.
SEE ALSO
For more about using digital IDs, see "Using Digital Signatures and Encryption."
EAN: 2147483647
Pages: 317