Working with Comments
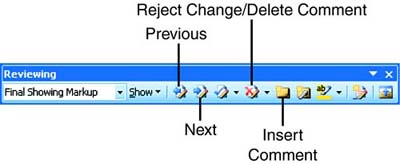
| You may, at times, want to write notes in a document (either to yourself or to other people) that don't print out. Word's Comment feature lets you add comments that reference particular blocks of text and track comments from multiple people. Furthermore, each person's comments appear in a different color , which makes them easy to differentiate onscreen. If you work extensively with comments, you'll appreciate the buttons in the Reviewing toolbar (choose View, Toolbars, Reviewing), shown in Figure 18.3. Figure 18.3. The Reviewing toolbar contains buttons for working with comments. Using Print Layout ViewThe comments feature behaves differently depending on whether you're in Print Layout or Normal view. These steps for inserting a comment assume you are using Print Layout view:
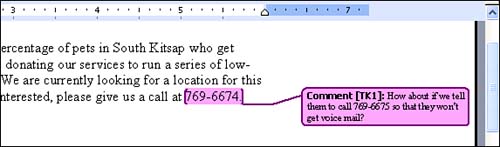
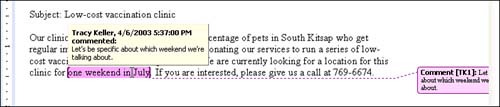
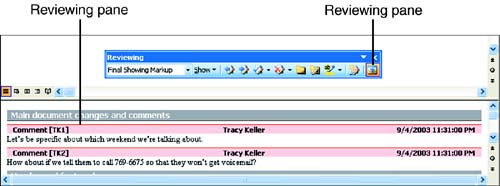
After you finish the comment, the text you selected remains highlighted and enclosed in thin colored brackets to indicate that there is a comment about it. A dotted line runs from the highlighted text to the balloon. To read the comment, you can read the contents of the balloon or simply rest the mouse pointer over the highlighted text. In a moment, a ScreenTip appears with the name of the person who wrote the comment and the comment itself (see Figure 18.5). Figure 18.5. Rest your mouse pointer over highlighted text to read the associated comment. To move from one comment to the next in a document, click the Next and Previous buttons in the Reviewing toolbar. If your document also includes tracked changes and you don't want to stop at each tracked change, click the Show button in the Reviewing toolbar and clear the check mark next to Insertions and Deletions to temporarily hide tracked changes from view. To edit a comment, click in the balloon and revise the text. (If you right-click the highlighted text of any comment and choose Edit Comment in the context menu, Word places the insertion point in the associated balloon.) To delete a comment, click either the highlighted text or the balloon and click the Reject Change/Delete Comment button on the Reviewing toolbar (or right-click the highlighted text or balloon and choose Delete Comment from the context menu). If you want to delete all the comments in your document, click the down arrow to the right of the Reject Change/Delete Comment button and choose Delete All Comments in Document. If you want to temporarily hide the highlights in the text and the balloons from view to get a clean view of your document, click the Show button in the Reviewing toolbar and click Comments in the menu that appears to clear its check mark. Using Normal ViewIf you are using Normal view, clicking the Insert Comment button on the Reviewing toolbar opens the Reviewing pane at the bottom of the Word window (see Figure 18.6) and inserts a header for your comment. After you've typed your text, click the Reviewing Pane button in the Reviewing toolbar to close the pane. By the same token, when you right-click highlighted text and choose Edit Comment in the context menu, Word opens the Reviewing pane and places your insertion point in the appropriate comment text. You'll also notice that in Normal view the reference mark appears in the document text immediately after the highlighted text. Figure 18.6. When you're using Normal view, you enter comments in the Reviewing pane.
|
EAN: 2147483647
Pages: 315