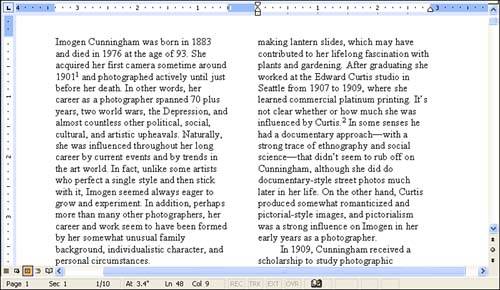
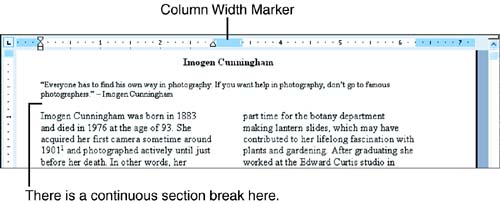
Creating Columns


Creating Columns

If you plan to produce newsletters, bulletins , journal articles, and so on with relatively simple formatting, you'll appreciate Word's capability to format text in multiple columns. When you use this feature, the text snakes from column to column (see Figure 15.1). After you've formatted your text in columns, changing the number of columns is a breeze . (For highly formatted documents that use columns, you will probably want to use a layout program such as Publisher, which comes with several editions of Microsoft Office 2003.)

Figure 15.1. This document is formatted in two columns.

graphics/15fig01.jpg

Columns fall into the page formatting category. As with other page formatting, columns apply to your entire document unless you insert section breaks around the text that you want in columns. For example, you might do this if you want a title above the columns that is centered in the middle of the page (see Figure 15.2). To do this, you need to insert a continuous section break between the title and the remainder of the document.

Figure 15.2. A continuous section break separates the title from the rest of the text.

graphics/15fig02.jpg

You can then leave the default (single) column formatting in the first section, and apply two or more columns to the rest of the text. If you need help with section breaks, see the section "Varying the Page Formatting in Your Document" in Hour 8, "Formatting Pages."

Follow these steps to format your text in columns:

  1. Make sure you're using Print Layout view (choose View, Print Layout ). Columns don't display accurately in Normal view.

  2. If you have inserted section breaks, make sure your insertion point is in the section where you want to apply the columns. If you're applying columns to the entire document, your insertion point can be anywhere in the document.

  3. Click the Columns button on the Formatting toolbar, and click the number of columns that you want in the grid that drops down (see Figure 15.3).

    Figure 15.3. Click the number of columns that you want in the grid attached to the Columns button in the Formatting toolbar.

    graphics/15fig03.gif

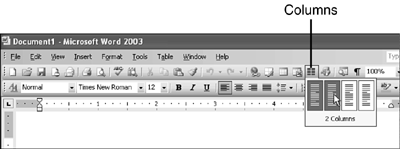
Word creates the number of columns that you specified. If you decide to change the number of columns in your document, follow these steps again. To remove columns, click the leftmost column in the grid in step 3.

graphics/bookpencil_icon.gif

If you want your entire document formatted in columns and your document does not already include section breaks, you can simply click anywhere in your document, choose Format, Columns, click the number of columns you want under Presets, and click OK. If you want some but not all of your document formatted in columns, it is also possible to select the text that you want formatted in columns first and then define your columns in the Columns dialog box. Word will insert section breaks around the selected text for you. If you use this approach, however, Word may not insert the type of section breaks around your selected text that you wanted. If it inserted next -page section breaks and you wanted continuous ones, or vice versa, you need to switch to Normal view, delete the breaks, and insert the ones you want.


Sams Teach Yourself Microsoft Office Word 2003 in 24 Hours
ISBN: 067232556X
EAN: 2147483647
Year: 2003
Pages: 315
Authors: Heidi Steele

flylib.com © 2008-2017.
If you may any questions please contact us: flylib@qtcs.net