Working with Toolbars
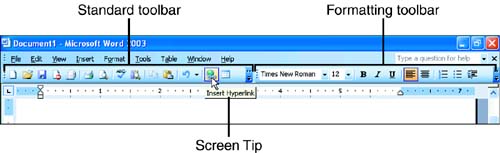
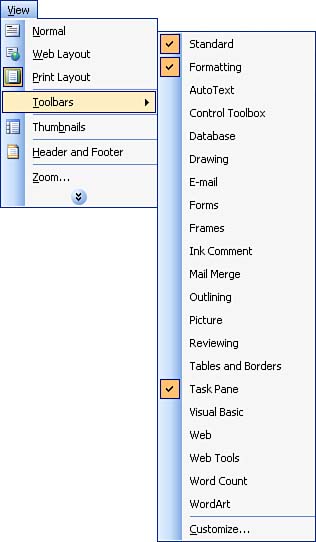
Working with ToolbarsFor many people, the fastest way to issue commands in Word is by using the toolbars. Word comes with a large set of toolbars. By default, it displays two of themthe Standard and Formatting toolbars, as shown in Figure 1.13. The Standard toolbar contains buttons for performing file-management tasks , such as starting, saving, opening, and printing documents. The Formatting toolbar contains buttons for common formatting tasks, including changing the font and font size, and adding boldface, italic, or underline to your text. Figure 1.13. The Standard and Formatting toolbars are displayed by default. To see what a toolbar button does, rest your mouse pointer on it for a moment. A ScreenTip appears with the button's name , as shown in Figure 1.13. Displaying and Hiding ToolbarsThe toolbars that aren't displayed by default can help you with all kinds of tasks. For example, the Tables and Borders toolbar has buttons for creating and formatting tables, and the Reviewing toolbar contains buttons that are useful if you're editing someone else's document. Some of these toolbars appear automatically when needed, but you can also display any of them "manually" whenever you like. You may also want to hide toolbars that you never use, to create more space in the Word window. To display or hide a toolbar, choose View, Toolbars (see Figure 1.14). The toolbars that are currently displayed have check marks next to them. The ones that are currently hidden do not. Click the toolbar that you want to display or hide. (Depending on your Word installation, your available toolbars may not exactly match the ones shown in Figure 1.14.) Figure 1.14. Use the Toolbars submenu to display or hide toolbars.
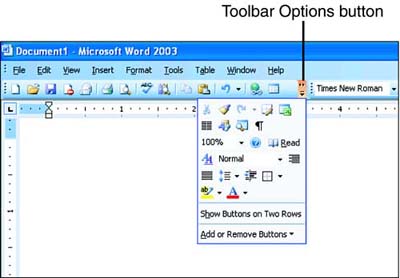
Accessing Hidden Toolbar ButtonsDepending on the size of your Word window, the number of toolbars that are sharing the same row, and so on, Word may not have room to display all of a toolbar's buttons. If you want to use a toolbar button that's currently hidden from view, click the Toolbar Options arrow at the right end of the toolbar (or at the bottom of the toolbar if you've docked it on one of the sides of your Word window). Word displays a list of all the hidden buttons (see Figure 1.15). Figure 1.15. Word puts any toolbar buttons that are currently hidden in the Toolbar Options list. Click the button that you want to use. As soon as you click it, Word removes it from the Toolbar Options list and places it in a visible spot on the toolbar. (See "Moving Buttons Around a Toolbar" later in this hour if you want to adjust the button's position in the toolbar.) If you want to restore the default set of visible buttons in your toolbars, follow these steps:
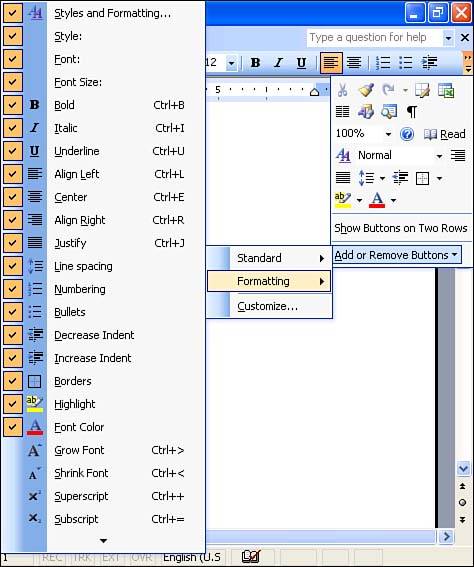
Adding and Removing Toolbar ButtonsIn addition to accessing hidden toolbar buttons, you can also use the Toolbar Options list to add new buttons to a toolbar, or to remove buttons that you never use. Click the Toolbar Options arrow at the right (or bottom) end of the toolbar, click Add or Remove Buttons, and then click the name of the toolbar whose buttons you want to add or remove (see Figure 1.16). Buttons that don't have check marks are not currently included in the toolbar; those that do have check marks are included. Click the button that you want to add or remove. Figure 1.16. Click a button in the Add or Remove Buttons list that you want to add to or remove from the toolbar.
Moving Toolbars Around the Word WindowYou can position your toolbars anywhere you like in the Word window. One reason to move a toolbar is to make it easier to see. If you have several toolbars displayed at the top of the Word window, they may seem to merge into one jumbled clump of buttons. You can visually separate the toolbars by spreading them out in different parts of the Word window. Another reason to move a toolbar is to bring all of its buttons into view. If a toolbar is sharing a row with other toolbars, some of its buttons are probably hidden. If you want to access all the buttons without using the Toolbar Options list (see "Accessing Hidden Toolbar Buttons" earlier in this hour), you can move the toolbar onto its own row.
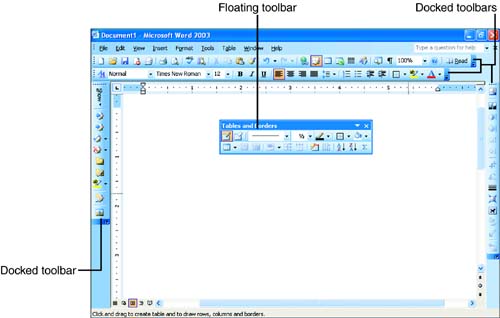
You can dock toolbars on the top, left, right, and bottom edges of the window, or float them over the screen (see Figure 1.17). By default, most toolbars in Word are docked. Figure 1.17. You can dock toolbars or let them float. To move a docked toolbar, point to the dotted line at the left (or top) end of the toolbar. The mouse pointer becomes a four-headed arrow, as shown in Figure 1.18. If you want the toolbar to float, drag it into the text area of the window, and release the mouse button. To move the toolbar after you've released the mouse button, drag its title bar. If a toolbar is floating, you can quickly dock it on the edge of the window where it was most recently docked by double-clicking its title bar. Figure 1.18. Drag the dotted line at the top (or left) end of a docked toolbar to move it. Another way to dock a toolbar on the edge of the Word window is to drag it toward that edge until its title bar disappears and it "flattens out," and then release the mouse button.
Moving Buttons Around a ToolbarYou can rearrange the order of the buttons on a toolbar if you like. To move a button, point to it and hold down the Alt key as you drag it to the desired position. As you drag, a black I-beam with a button icon attached to it shows where the toolbar button will end up. When the I-beam is in the right place, release the Alt key and your mouse button. |

EAN: 2147483647
Pages: 315