| Chances are that you usually need to print labels or envelopes to go with your form letters. When you merge addresses onto labels or envelopes, the six basic steps of the Mail Merge wizard stay the same. However, you will see different options as you run through the wizard that are specific to envelopes or labels as opposed to letters . Merging Envelopes Because the general steps for merging envelopes are the same as for merging letters, you'll find it helpful to practice a few mail merges with letters before proceeding with this section and the next . Also note that this section assumes you already have a data source, so you'll open an existing one rather than creating a new one.  | If you have an envelope tray on your printer that holds a stack of envelopes, it will be much simpler for you to print a merge file for envelopes. To print a merge file of envelopes without an envelope tray, you have to feed each envelope manually. |
To merge your envelopes, follow these steps: -
Start a new, blank document and save it with a name that ends with Main to remind you that it's a main document used in mail merges. -
Choose Tools, Letters and Mailings, Mail Merge to display the Mail Merge task pane. -
Click Envelopes in the Mail Merge task pane (refer to Figure 14.1), and then click Next: Starting Document at the bottom of the task pane. -
Keep Change Document Layout marked in the task pane, and click the Envelope Options link. -
In the Envelope Options tab of the Envelope Options dialog box (see Figure 14.22), choose a different envelope size if desired (the default is a standard business envelope). Figure 14.22. Use the Envelope Options dialog box to specify the style of envelopes you are using. 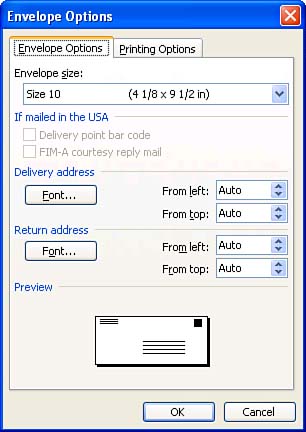 -
Click the Printing Options tab, make any changes and click OK . -
Your document is reformatted as an envelope, and a return address appears if you have one in the User Information tab of the Options dialog box (Tools, Options). If no return address appears, type it on your envelope now. (You might want to increase the Zoom setting on the Standard toolbar to see what you type more clearly.) You can also add it to the User Information tab so you don't have to type it again in the future. Then click Next: Select Recipients . | | If you have preprinted return addresses on your envelopes, just select the return address if one appears and delete it. |
-
Leave Use an Existing List marked, and click Browse . In the Select Data Source dialog box, navigate to and select your data source, and click Open . -
The Mail Merge Recipient dialog box appears. Sort and edit your address list (see "Sorting and Editing the Data Source" earlier in this hour ), and then click OK . -
Click Next: Arrange Your Envelope at the bottom of the task pane. -
Click in the area of the envelope where the recipient's address will be printed. The text box in which the address block will go will become visible, and your insertion point will appear inside of it (see Figure 14.23). Figure 14.23. Click roughly in the middle of the envelope to activate the text box in which the address block will appear. 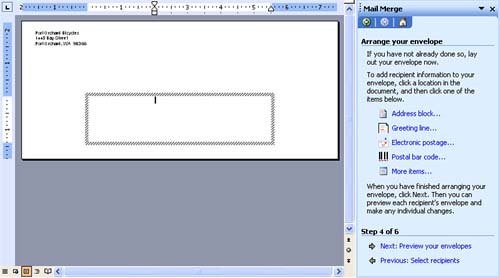 -
Click the Address Block link in the task pane. Make the desired selections in the Insert Address Block dialog box that appears, and click OK . The Address Block field is inserted in your envelope. -
If you want to change the look of the text, select the Address Block field on your envelope and apply whatever font or paragraph formatting you like to it, using the standard methods . (The merged addresses will take on the formatting of the Address Block field.) If the text is too small to see clearly, increase the Zoom setting on the Standard toolbar.  | If you want to use the Electronic Postage link (see Figure 14.23), you must first install electronic postage software. If you click this link, Word presents a dialog box asking if you want to visit Microsoft's Web site to find out about this type of software. You can use the Postal Bar Code link to insert the postal bar code. (Word determines what the code will be based on the ZIP code and street address of each address in your recipient list.) |
-
Save your main document, click the Next: Preview Your Envelopes link, and then follow the same steps as those described in "Previewing Your Merged Letters" and "Running the Merge" earlier in this hour. If you merge to a new document, the merged envelopes will be called Envelopes1 (or Envelopes2 and so on, depending on how many other merges you have completed in this Word session). Merging Labels As with merging envelopes, it's easiest to merge labels if you practice a few mail merges with form letters first. And remember that this section assumes that you already have a data source, so you'll open an existing one rather than creating a new one. Follow these steps to merge labels: -
Start a new, blank document and save it with a name that ends with Main to remind you that it's a main document used in mail merges. -
Choose Tools, Letters and Mailings, Mail Merge to display the Mail Merge task pane. -
Click Labels in the Mail Merge task pane, and then Next: Starting Document at the bottom of the task pane -
Keep Change Document Layout marked, and click Label Options . Select the product number for your labels, and click OK . | | If you are not using Avery labels, display the Label products drop-down list in the Label Options dialog box and look for the product line that includes your labels. When you select a different product, the Product number list updates to reflect that company's labels. If you still can't find your labels, click the New Label button, manually enter your label's measurements, and click OK. |
-
Your document is reformatted as a sheet of labels. Click Next: Select Recipients . | | Word uses its table feature to format labels. The gridlines that divide the rows and columns of a table can be visible onscreen or hidden. If they are hidden, you won't see much of a change in the appearance of your document in step 6. To bring the gridlines into view, choose Table, Show Gridlines. |
-
Leave Use an Existing List marked, and click Browse . Then select your data source in the Select Data Source dialog box, and click Open . -
The Mail Merge Recipient dialog box appears. Sort and edit your address list (see "Sorting and Editing the Recipient List" earlier in this hour), and then click OK. -
Click Next: Arrange Your Labels at the bottom of the task pane. -
The insertion point appears in the upper-left label where your address block field should go, and Next Record merge fields appear in all of the other labels (see Figure 14.24). Click the Address Block link in the task pane. Figure 14.24. Your insertion point appears in the upper-left label, where you need to insert the Address Block field. 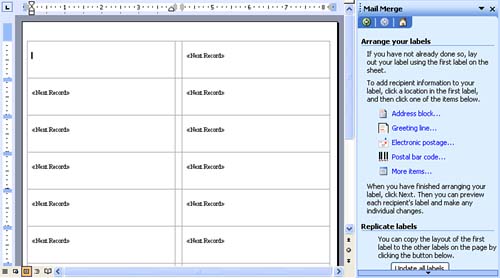 -
Make the desired selections in the Insert Address Block dialog box, and click OK. -
The Address Block merge field is inserted in the upper-left label on your sheet of labels. At this point you can select the field and apply whatever font or paragraph formatting you like to it, using the standard methods. (The merged addresses will take on the formatting of the Address Block field.) If the text is too small to see clearly, increase the Zoom setting in the Standard toolbar. -
Click the Update All Labels button near the bottom of the task pane to copy the Address Block field from the upper-left label to the remaining labels on the page. (It will appear immediately after the Next Record field in each label.) -
Save your main document, click the Next: Preview Your Labels link, and then follow the same steps as those described in "Previewing Your Merged Letters" and "Running the Merge" earlier in this hour. If you merge to a new document, the merged labels will be called Labels1. | | If you haven't printed on the particular labels you're using before, you might want to merge to a new document, and then print only one page of labels first to check how the addresses line up on the labels. If you need to adjust their position, see the "Q&A" section at the end of this hour. |
 |