Running the Merge


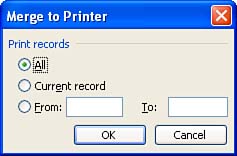
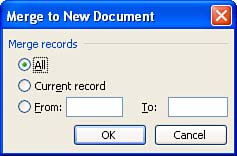
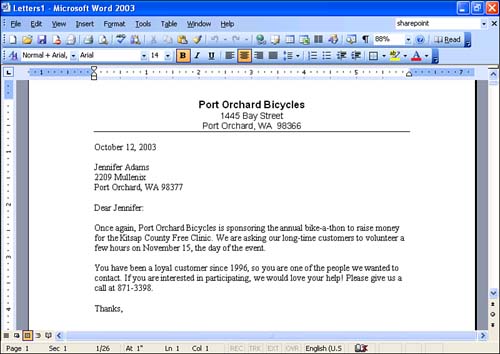
In this final phase of the mail merge process, you merge the main document with the data source to produce your form letters. In these steps, you can choose to print the merge letters as they are merged without displaying them onscreen (steps 1 through 4), or merge all of them to a new document so that you can make any further edits before printing (steps 5 through 8).

graphics/lightbulb_icon.gif

Usually, there's usually no need to save the letters you generate in a mail merge, because you can always merge the same main document and data source to regenerate them.


  1. In step 6 of the wizard (Complete the Merge), click the Print link if you are sure that all of your letters are ready to be printed. They will be sent to the printer without appearing onscreen.

    graphics/bookpencil_icon.gif

    The Print option is a good option to use if your data source contains hundreds of addresses. The document containing all of your merged letters would be hundreds of pages long (or more if your form letter is more than one page long), and if your computer is short on memory, it may balk at the task of displaying this document onscreen.


  2. In the Merge to Printer dialog box that appears, mark the All option button if you want to print all of your records (see Figure 14.19).

    Figure 14.19. Use the Merge to Printer dialog box if you want to send all of your merged letters directly to the printer without displaying them onscreen.

    graphics/14fig19.jpg

  3. If you only want to print the letter that's onscreen now, mark the Current Record option.

  4. If you want to print a particular set of letters, enter the beginning and ending record numbers in the From and To boxes. Then click OK to merge the letters and send them to the printer.

  5. To instead create a document containing the merged letters and display it onscreen, click Edit Individual Letters .

  6. The Merge to New Document dialog box appears with options exactly like the Merge to Printer dialog box (see Figure 14.20). When you've made your selections, click OK .

    Figure 14.20. Use the Merge to New Document dialog box if you want to see your merged letters on screen and optionally edit them before printing.

    graphics/14fig20.jpg

  7. Word performs the merge and displays the merged letters onscreen in a document titled Letters1 (see Figure 14.21). The letters print on separate pages because Word separates them with next -page section breaks. (If your main document is a multiple-page letter, the section break comes at the bottom of the last page of each letter.) The document shown in Figure 14.21 is 26 pages long because it contains a one-page letter for each of the 26 people in the data source.

    Figure 14.21. Use the Merge to New Document dialog box if you want to see your merged letters on screen and optionally edit them before printing.

    graphics/14fig21.jpg

  8. Edit any letters that need fine-tuning, and then click the Print button on the Standard toolbar to print the letters.

  9. Close the Letters1 document. Assuming you didn't do extensive editing in the previous step that you want to save, you don't need to save the merged letters because you can always run the merge again.

That's it! Everything else you can do with mail merge builds on the procedure you've just completed.


Sams Teach Yourself Microsoft Office Word 2003 in 24 Hours
ISBN: 067232556X
EAN: 2147483647
Year: 2003
Pages: 315
Authors: Heidi Steele

flylib.com © 2008-2017.
If you may any questions please contact us: flylib@qtcs.net