| Learning the names of the elements of the Word window may not be the most stimulating part of learning the program, but it's essential for understanding the instructions throughout the rest of this book, and in Word's help system. Figure 1.5 labels the most important parts of the Word window. Figure 1.5. It's a good idea to learn the names of the different parts of the Word window. 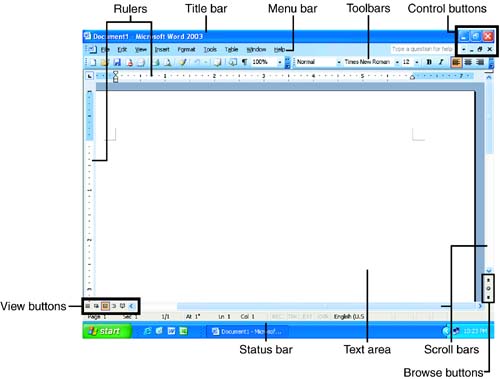 Here is a description of these elements: -
Title bar . The title bar of any Windows application lists the name of the application ”in this case, Microsoft Word 2003. Word's title bar also contains the name of the open document. As you'll see in the section "Controlling the Position and Size of the Word Window" later in this hour , you can use the title bar to move the Word window around the desktop, or to minimize or maximize the window. When the Word window is active, the title bar is colored. When another area of your screen is active, the title bar is dimmed. -
Menu bar . The menu bar contains a set of pull-down menus that you use to issue commands. -
Toolbars . The toolbars contain buttons that you can click to issue commands. -
Rulers . The vertical and horizontal rulers show you where your text is on the page. The shaded sections at the ends of the rulers indicate the margin areas. You can use the rulers to change some formatting, including tabs, indents, and margins (see Hour 7, "Formatting Paragraphs," and Hour 8, "Formatting Pages"). Depending on which view you're using, you may see only a horizontal ruler. (You'll learn about views in Hour 4, "Viewing and Printing Your Documents.") To hide the rulers, choose View, Ruler. To display them, choose View, Ruler again. -
Text area . This is the area in which you can type text. -
View buttons . You can use these buttons to switch views (see Hour 4). -
Status bar . The status bar tells you about the current status of your document. The left section tells you the current page number and the total number of pages. The middle section tells you the location of the insertion point (the cursor), and the right section tells you whether some special features are turned on. -
Scrollbars . The horizontal and vertical scrollbars let you bring different parts of a document into view. You'll learn how to use them in the next hour. -
Control buttons . These buttons let you control the Word window. -
Browse buttons . You can use these buttons to navigate sequentially through your document in various ways (see the next hour). In addition to these basic elements of the Word window, you may also see the Getting Started task pane when you first start Word (see Figure 1.6). This and other task panes are discussed in "Working with Task Panes" later in this hour. Figure 1.6. The Getting Started task pane appears by default when you first start Word. 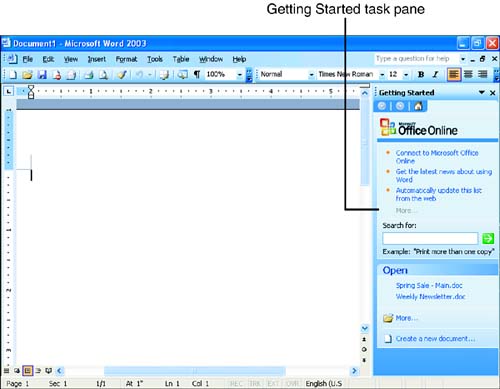  |