Automating Tasks with Macros The term macro refers to a piece of programming code that accomplishes a particular task in Word. (Word macros were formerly written in WordBasic, but starting with Word 97 they have been written in Visual Basic for Applications.) Back when word processing programs were truly designed to help you process words and not much more, macros were well worth learning about. Now, however, Word has expanded to include many features that perform tasks we once used macros for. For example, macros were once useful for inserting large blocks of " boilerplate " text, but we now can use the AutoText feature to accomplish this task. Furthermore, to create complex macros, you need to understand a fair amount about programming in general and Visual Basic in particular. Nonetheless, there are two aspects of working with macros that you might want to understand: -
How to use existing macros If you know this, then if your company or someone else gives you a macro, you'll know what to do with it. -
How to record a keyboard macro To create a complex macro, you have to write the VB code from scratch. However, you can create keyboard macros by simply recording the keystrokes you want the macro to automate. Word creates the Visual Basic for Applications code for you. Macros are so versatile that there is no "representative" example of an existing one that you might want to use. However, it might still be helpful to "see" one in action: A macro called AddTones, available for download on the Web, inserts diacritic marks over romanized Chinese words (words written using pinyin instead of characters ) to indicate tones. For example, if the user writes the text shown in Figure 12.24 and then selects it and runs the AddTones macro, it results in the text shown in Figure 12.25. Figure 12.24. The user types numbers to represent the four tones in Mandarin Chinese.  Figure 12.25. The AddTones macro converts the numbers to diacritic marks over each word. 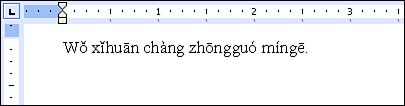 Using Existing Macros As you learned in Hour 10, "Working with Templates," macros are stored in templates (along with styles, AutoText entries, and toolbars ). When someone gives you a macro, it will arrive in a Word template (a file with a .dot extension). If you only need to use a macro when you're working with a document based on the template that contains the macro, you can store the template in the Templates folder. However, if you'd like the macro to be available whenever you are using Word, you need to store the template in Word's Startup folder or use the Organizer to copy the macro into the Normal template (see "Copying Items from One Template to Another" in Hour 10). To locate either the Templates folder or the Startup folder, follow these steps: -
Choose Tools, Options , and click the File Locations tab in the Options dialog box. -
Double-click User Templates or Startup . -
Display the Look In drop-down list in the Modify Locations dialog box and note the location of the folder. -
Click the Cancel buttons to back out of this dialog box, and then click Close to close the Options dialog box. After you've stored the Word template that contains the macro in the right folder, you need to know how to run it. To run a macro, follow these steps: -
Start a new document based on the template that contains the macro. -
Choose Tools, Macro, Macros (or press Alt+F8 ) to display the Macros dialog box. See Figure 12.26. Figure 12.26. The Macros dialog box lists your available macros. 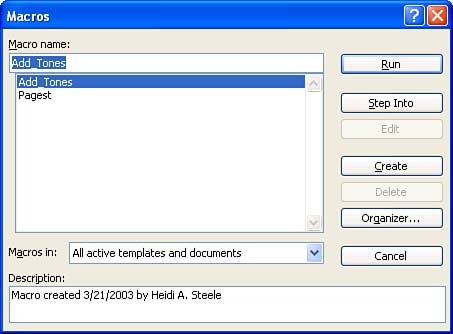 -
Double-click the macro you want to run.  | Word templates containing macros can and often do carry viruses. You need to be extremely cautious about using macros that you find on the Web. If you want to check your macro security settings, choose Tools, Options; click the Security tab; and click the Macro Security button. For most people, the Medium option is a good one to use. |
To delete a macro, display the Macros dialog box (Tools, Macro, Macros), select the macro, and press the Delete key. Recording Your Own Macro If you find yourself frequently repeating the same procedure on multiple documentswhether it involves typing, editing, formatting, or a combination of all threeit might be worth recording the keystrokes in a macro. For example, if you frequently have to remove paragraph marks or line-break characters from with paragraphs (as described in "Using Find and Replace to Remove Breaks Within Paragraphs" earlier in this hour), you can record the steps outlined in that section in a macro.  | Keep in mind that a recorded macro works best if all of the documents you run it on are consistent. If they differ so much that the exact same set of keystrokes won't work on all of them, you won't be able to use this type of simple recorded macro. For example, a macro that removes breaks within paragraphs using the steps described earlier in this hour won't work if the document contains some single-line paragraphs that don't have blank lines in between them, and you need to keep those paragraphs as is (the macro would run them together). |
The general steps for recording a macro are as follows : You choose a name for your macro, optionally create a toolbar button or keyboard shortcut for it, and then start recording your keystrokes. After the "tape recorder" is turned on, Word will record your every keystroke and menu command, whether you performed it accidentally or not. Consequently, it's wise to run through your keystrokes with a sample document first to make sure they work as intended before you create the macro. The last step is to turn off the tape recorder after you've recorded all of the keystrokes and menu commands. If you do make a mistake recording your macro, the easiest way to fix it is to rerecord the macro, keeping the same macro name so that you overwrite the original. To edit the macro, you have to know something about Visual Basic. | | While you're recording a macro, you can use the mouse to issue menu commands and select options in dialog boxes, but you must use the keyboard to select text. See Hour 2, "Entering Text and Moving Around," if you need help with this. |
Here are the specific steps for recording a macro: -
If you want to create a toolbar button for the macro, make sure the toolbar is displayed in your Word window. And if you want to store the macro in a template other than the Normal template, start a document based on that template now. -
Choose Tools, Macro, Record New Macro to display the Record Macro dialog box (see Figure 12.27). Figure 12.27. The Record Macro dialog box lets you define basic information about your macro. 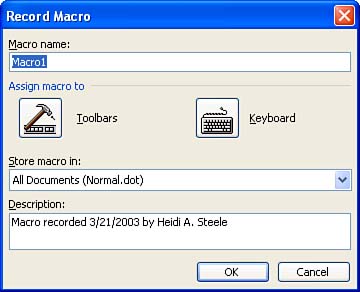 -
Type a name for your macro in the Macro Name text box, and optionally type a description for it in the Description text box. | | Here are the naming conventions for macros: The first character in the name cannot be a number. The name cannot include a space; period; exclamation point; or the characters @, &, $, or #. (You can use underscores.) Finally, the names cannot exceed 255 characters in length. |
-
If you want to store the macro in a template other than the Normal template, select it in the Store Macro In drop-down list. -
Optionally, click the Toolbars or Keyboard button to create a toolbar button or keyboard shortcut for the macro. If you don't want to do this, click OK and skip to step 7. -
If you clicked the Toolbars button, the Commands tab of the Customize dialog box appears. Under Commands on the right side of the dialog box, a temporary name for your macro, such as Normal.NewMacros.MyMacro, appears. Drag this name out of the dialog box and onto the toolbar where you want the macro's toolbar button to go. Then right-click the button in the toolbar, select the temporary name to the right of the Name command in the context menu, type the name you want to appear on the button, and press Enter . Finally, click Close to close the Customize dialog box. -
If you clicked the Keyboard button, the Customize Keyboard dialog box appears with the name for the macro listed under Commands. With the insertion point in the Press New Shortcut Key text box, press the key combination that you would like to use for your macro (actually press the keys; don't type the names of the keys). The dialog box refreshes and tells you whether the keyboard shortcut you pressed is assigned. When you find a key combination that's currently unassigned (or one that you don't mind overwriting), click the Assign button, and then click Close . -
The dialog box you were using disappears, a small Stop Recording toolbar appears, and your mouse pointer changes to show a tape recorder (see Figure 12.28). At this point, the "tape recorder" is now turned on. Enter all of the keystrokes that you want to record. Figure 12.28. A special mouse pointer indicates that Word is recording your keystrokes. 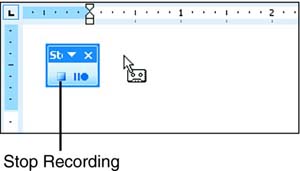 -
When you are finished, click the Stop Recording button on the Stop Recording toolbar. Word automatically stores the macro in the template you specified, and it will appear in the Macros dialog box the next time you choose Tools, Macro, Macros. |