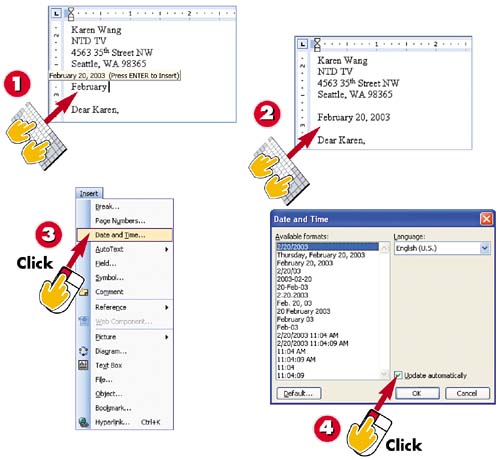
Begin typing today's date. After you type a portion of the date, a yellow box containing the completed date appears.
Press Enter to let Word fill in the rest of the date for you.
If you want to insert the date as a field, open the Insert menu and choose Date and Time .
The Date and Time dialog box opens. Click the Update automatically check box to select it.
INTRODUCTION
Your computer has a clock that keeps track of the current date and time. Instead of typing the current date in documents you create or edit, you can have Word take this information from the computer and insert it for you. You can even insert the date as a field , which enables Word to update it to the current date when you open the document in the future. Inserting a date as a field is useful in documents that you open frequently because the date is always current. The drawback to doing this is that you don't have a date within the document that verifies when the document was first created and saved.
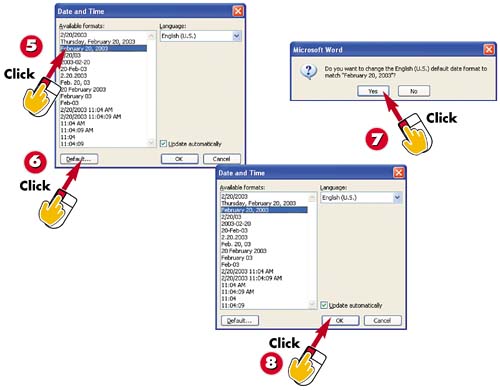
Click the date format that you want to use.
If you want to use this format all the time, click the Default button.
Click Yes in the message box that appears.
Click OK in the Date and Time dialog box. Word inserts the date in your document.
TIP
Deleting the Date Field
To delete a date that you've inserted as a field, select it first and then press Delete or Backspace .
TIP
What If Your Computer's Clock Is Wrong?
If Word inserts the wrong date in your document, you must correct your computer's clock. To do so, double-click the time at the right end of the taskbar to display the Date/Time Properties dialog box. Specify the correct date in the Date & Time tab, and click OK .