File Recovery
| | ||
| | ||
| | ||
When a file is deleted in Windows using the del command or from Windows Explorer, it is not actually wiped from the drive. The process of deleting a file in Windows is significantly more complex than in most other file systems. It has the Recycle Bin, which acts as a temporary repository for some deleted files and the exact method of deletion depends on the underlying file system (FAT or NTFS). We will examine the underlying file system deletion and recovery first and then tackle the Recycle Bin itself. One important note on file recovery: always write the recovered file to another drive. Doing otherwise risks overwriting evidence.
Command line deletions, using the del or deltree commands, are used to remove files from a particular partition. FAT-based file systems do not alter file data on deletion. A deletion actually takes the following actions:
-
The first character of the file's directory entry is set to E5h. Searching for E5h in a hex editor can reveal deleted directory entries. This is why undelete programs prompt users for the first letter in the file name .
-
The FAT is updated to mark the clusters previously used by the file as 0 or available.
When the previously used clusters are marked as available, other files written to disk will be able to use them. As soon as an individual cluster is overwritten, the data held there is no longer available, but until that occurs, the data can be recovered. File recovery tools first scan the FAT for entries marked with E5. They then retrieve the cluster specified by that file and any subsequent clusters up to the file size . The user supplies a character for the first letter file name and the file location contents are copied to the hard disk. If long file name FAT entries are used, the character is retrieved from the LFN portion of the entry.
A FAT12 formatted floppy disk has the following initial FAT values, showing used clusters for the directory entry (see Figure 10-5).
Figure 10-5: Initial FAT values
The first available cluster for data is likewise shown to have no information.
| Note | Technically, the first available cluster is cluster 33 for file data. Clusters 1932 are reserved for the root directory entry. |
The F6 character is used initially on data sectors for a full format for floppy disks (see Figure 10-6).
Figure 10-6: First data cluster initial values
Adding a small (<1K) file, test.txt, results in the change to the FAT shown in Figure 10-7. Note the additional cluster now marked as in-use.
Figure 10-7: Additional FAT entry for used cluster
The root directory clusters now contain the file name (created under root) as a directory entry (see Figure 10-8).
Figure 10-8: File name directory entry
The data sectors contain the actual file contents (see Figure 10-9).
Figure 10-9: File contents
Deleting the file itself first alters the FAT cluster map to show the used clusters as available (see Figure 10-10).
Figure 10-10: FAT cluster map after deletion
The directory entry under root is altered to change the first letter of the file name to E5h (see Figure 10-11).
Figure 10-11: Directory entry after deletion
But the file contents are still present (see Figure 10-12).
Figure 10-12: File data after deletion
As the example shows, even after deletion, recovery may be possible. For NTFS file systems, deletion is slightly different. Instead of altering the MFT record's first character, it is marked as deleted (by changing the IN_USE bit). The cluster chains are left intact as data, and the actual cluster map ($BITMAP) is changed to reflect those same clusters as available. Additionally, the directory pointer to the file is removed so that it will no longer appear as part of the directory listing. To see the results, the file test.txt was added to an NTFS drive. It contains more data than the preceding test.txt file because NTFS allows the storage of smaller files within the MFT record itself, and for this purpose we want to see multiple clusters.
To see this in action, we first view the file's MFT entry (see Figure 10-13). The actual file data location is as shown in Figure 10-14.
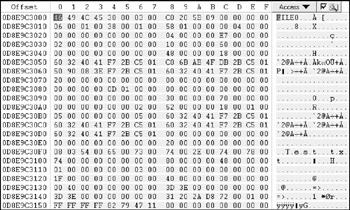
Figure 10-13: File MFT directory entry
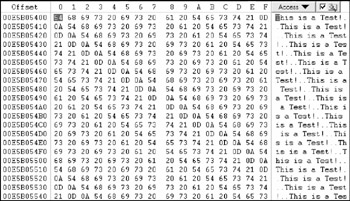
Figure 10-14: File data
After deleting the file and emptying the Recycle Bin, the MFT entry changes as shown in Figure 10-15.
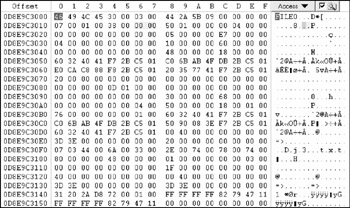
Figure 10-15: MFT entry after deletion
Two things to note: The file name has actually changed to Dj3.txt (performed by Windows when the file is added to the Recycle Bin), and the in-use bit has been set from 1 (active) to (deleted). The in-use bit is at a fixed location in MFT entries ( 0D8E9C3016 in the preceding example). This allows programs such as WinHex to scour the MFT for deleted entries.
| Warning | Files deleted from shares or using the command line are not placed in the Recycle Bin. Only files removed using Windows Explorer or its associated API are placed there. |
Showing the data location after deletion reveals the contents of the $DATA attribute's location is still intact (see Figure 10-16).
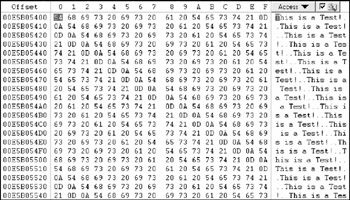
Figure 10-16: File $DATA attribute location after deletion
Recovery using WinHex is automated, and lost cluster entries are added to the Lost and Found folder on NTFS and listed under root on FAT systems. There are several other tools that allow recovery as well. A simple graphical tool, FreeUndelete can recover both FAT and NTFS files and is shown in Figure 10-17. The file Dj3.txt (the renamed version of test.txt) is shown as still being recoverable from the Recycle Bin, even after emptying.

Figure 10-17: FreeUndelete recovery of test.txt
| Note | When a file is deleted from an NTFS drive, all of the attributes actually remain intact, not just the $DATA attribute. |
Windows file deletion is further complicated by the Windows Recycle Bin. The Recycle Bin is a special folder that holds the links to previously deleted files for a period of time until it reaches a user-defined capacity. This provides the user of the system an undo capability. Accidentally deleted files can be quickly recovered by simply opening the Recycle Bin and clicking Restore for a given file. If the examiner is lucky (and the user does not think to empty it), deleted files can sometimes be this easy to recover.
The Recycle Bin is partition-specific; there is one bin per partition (per user for NT/2000/XP/2003). The file links for deleted files stored in the bins are located under the Recycler/SID subdirectory in a given partition on a local system to identify which user deleted the file. The files in the Recycle Bin are renamed in the format dx###, where x is the drive letter the partition is mapped under and ### is a sequential number used for indexing. The actual file name and the source directory and deletion time are stored in a file called INFO2. The Foundstone tool Rifuti can display all of the information stored in this file, as shown in the following example:
C:\RECYCLER\S-1-5-21-448539723-1563985344-1202660629-1003>dir /a Volume in drive C has no label. Volume Serial Number is 00A8-1CDC Directory of C:\RECYCLER\S-1-5-21-448539723-1563985344-1202660629-1003 03/20/2005 11:51 AM <DIR> . 03/20/2005 11:51 AM <DIR> .. 06/01/2004 08:38 AM 43,279 Dc3.htm 03/18/2005 03:44 PM 65 desktop.ini 03/20/2005 11:51 AM 820 INFO2 3 File(s) 44,164 bytes 2 Dir(s) 7,127,973,888 bytes free C:\RECYCLER\S-1-5- 21-448539723-1563985344-1202660629-1003>c:\tools\rifiuti.exe info2 INFO2 File: info2 INDEX DELETED TIME DRIVE NUMBER PATH SIZE 3 Sun Mar 20 16:51:31 2005 2 C:\report.htm 45056
A directory listing in the preceding example shows a single deleted file, http://www.Dc3.htm. Displaying the contents of the INFO2 file reveals that the original file was titled http://www.report.htm and was present on the root directory of the C: drive (hence the c in Dc3.htm) as the third file in the INFO2 index. Of particular interest to examiners is the deleted time. A mass deletion within a short period can indicate a user was tipped off to an investigation.
| Tip | Wotsit (short for Wotsit's Format) at http://www. wotsit .org is a treasure trove of useful file format details, including headers. |
Several issues can occur with file recovery, making it more difficult than it appears:
-
Deletion of meta-entries. If the actual MFT record (or directory entry in FAT) is overwritten, the starting cluster and meta-information on the file cannot be found. Some software, such as EnCase, will look through unallocated space for known file headers and attempt to carve old files from subsequent unused clusters, and the same can be done manually using tools like WinHex. For files that do not store length information or have known footers, this is especially difficult.
-
File system fragmentation. When the starting cluster and file size are known on an unfragmented system, the file can be recovered by simply calculating the number of clusters (file size/cluster size) and reading that many from the starting point. If the file system is fragmented , good recovery programs will skip clusters that are currently in use when recovering a file, but this may result in corrupt files if there are clusters that have been overwritten then unallocated.
-
Overwriting of file data space. The space that a file previously occupied may now be overwritten by a new file (as shown in the map of used clusters or FAT). If this is known, the remaining portion of the document can be recovered. If a cluster has been overwritten and then subsequently made available again (through a second deletion), this may not be known to the examiner.
| |
Steganography, or covered writing, is the science of hiding information within a carrier medium. Steganography differs from cryptography in that the underlying goal is to prevent the presence of a hidden message from being known. Steganalysis is the science of detecting and extracting messages hidden using steganography.
Non-digital steganography has been used for many years . In the early part of the century, small images or text were hidden in documents by scaling them down and placing them inside of the periods marking the end of sentences. Similarly, various types of invisible ink have been used for centuries to hide the presence of secret messages. One of the earliest proclaimed uses of steganography was documented by Herodotus. In ancient Greece, messages were tattooed on the scalps of slaves. After the hair grew back, the messages could escape detection.
Digital steganography is the use of covert storage channels to store hidden messages. The use of covert transmission channels to transmit hidden information is beyond the scope of this book, but has been well documented with respect to systems based on models such as Bell-Lapadula within innocuous files. The hidden content is frequently stored in image, audio, and video files, frequently by changing the least significant bit (LSB) information within those files. For example, the LSB in a typical high color-depth image may represent the difference between two shades of the same color which is undetectable to the human eye. Likewise, the LSB in an audio frequency (or amplitude) may represent a very slight change that is indistinguishable from the original to human hearing. Other forms of data hiding that could be considered steganography, such as using slack space and streams, were covered earlier in this chapter in the "Bitwise Searching" and "Index-based Searching" sections.
An example of hiding data follows . The program JP Hide 'n Seek was used to hide the message:
THIS IS A SECRET DOCUMENT! THE CONTENTS OF THIS FILE WILL SELF-DESTRUCT IN T-5..4..3..2..1
The message was hidden by applying it to the first image to produce the second image. The images are almost visually identical; to an individual without access to the first image, there are no visual clues at first glance that would show the presence of any hidden data.
Note that the Bell-Lapadula model defines subjects that have given rights to a set of objects. It is most frequently associated with classified information systems having data from multiple clearance levels (Top Secret, Secret, and Confidential) on the same system. Covert transmission channels are ways for individuals at a higher level of clearance to covertly transmit information to a lower clearance level using timing and shared resources.
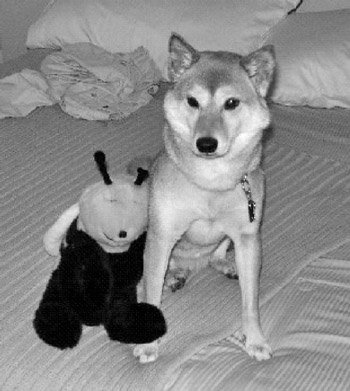
Original image

Image with hidden text
In addition to there being a lack of visual cues to detect the hidden text, there are no clues in the basic file details. As a result, a forensic examination of the file system and simple viewing of the images will not show even the presence of the hidden information. How then does a forensic analyst find content that uses steganography?
From a computer science perspective, there are several mechanisms for detecting content that has been altered by steganography programs. Encrypted additions can be detected when the LSB information is too random. There should be some patterns. Likewise, statistical analysis can be performed on the file contents to find anomalies. For images and movies, a palette analysis may show oddities (for example, pairs of colors very close together), and a reapplication of the DCT algorithm used for JPEG files may provide unusual results. Fortunately for the computer investigator , there are less sophisticated approaches to finding hidden content.
First, a list of steganography software can be searched for. The presence of steganography products such as JSteg, JP Hide 'n Seek, and Camouflage show a good likelihood of there being hidden content. The easiest way to identify these products is through a hash set analysis. A hash set of steganography tools can be found as part of the National Software Reference Library, available from NIST.
Second, the presence of similar images with different names may indicate the use of a steganography tool. Any thumbnail gallerygenerating tools (EnCase and IrfanView are examples) can be used to identify similar-appearing images. If these images have differing hash values, this may indicate the presence of hidden data.
Finally, some of the more sophisticated algorithms mentioned previously have been incorporated into software packages which assist in finding hidden items. Stegdetect and the xsteg front end are freeware tools that can analyze individual files for alteration four of the most common steganography tools. An example of stegdetect is shown in the following figure. Commercial suites which incorporate the NSRL database as well as proprietary hash sets and more advanced algorithmic checks are also available from vendors such as the Stego Suite available from Wetstone.
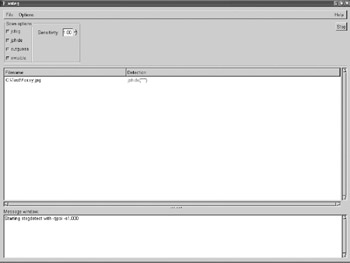
Stegdetect
| |
| | ||
| | ||
| | ||
EAN: 2147483647
Pages: 71