Exam 70-124: Objective 2.2, 2.3: Deploying and Managing Updates
|
|
Identifying the updates that your computers need might seem like the toughest part of this task; however, that's not the case. Deploying updates, which includes testing them thoroughly before deployment, is in most cases the most time-consuming and problematic part of the update process.
After you have thoroughly tested the updates in a safe environment, usually a lab or an isolated section of the network, you then face the task of actually getting them deployed to the computers that require them. You have a few options available to you when it comes to deployment time, ranging from creating update integrated installation media, using Group Policy and the Remote Installation Service to install updates for you, using other products such as Systems Management Server, or even using scripting.
Of course, all of this assumes that you have actually gone out and gotten the updates you need. You can go about getting the required updates in a variety of ways, some easier than others. How you get the updates you need depends on the method you plan to use to deploy them. The method you use to deploy updates depends on several issues such as whether the computers are new or existing, the physical location of the computers to be updated, and the number of computers to be updated, among other issues.
The most common deployment methods for new computers include slipstreaming and scripting. For existing computers, Windows Update, Software Update Services, Automatic Update, Systems Management Server, scripting, and Group Policy are the more common methods. Of these, Automatic Updates (which has recently replaced the now defunct Critical Notification Service) and Windows Update only apply to the specific computer that they are running on; the rest of the methods can be used to apply fixes and updates to multiple computers.
The Software Update Service is a relatively new service that replaces Windows Corporate Update; however, it only works with Windows 2000, Windows XP, and Windows .NET Servers computers and is not exactly all that intelligent when it comes to applying patches. Systems Management Server (SMS) has been around for quite some time and is due for a new version release, version 2003, in the near future. SMS can be used to deploy all sorts of fixes and updates to all versions of Windows computers.
Scripting can also apply fixes and updates to all versions of Windows computers and is perhaps the best choice when you have a large number of computers requiring the same updates. The same holds true for Group Policy software installation. Of course, there is always good old-fashioned "sneaker-net."
If you need to manually download fixes and patches, you can get them from the following locations:
-
For downloading service packs, your best bet is to go straight to the service pack homepage located at http://support.microsoft.com/default.aspx?scid=fh;EN-US;sp.
-
For hotfixes and other updates, you have several viable options:
-
You can go directly to the Q article that is listed with the fix. Q articles can be found at http://support.microsoft.com/default.aspx?scid=KB;EN-US;Qxxxxxx, where xxxxxx is the six-digit Q article number.
-
You can look up the specific Security Bulletin that is mentioned at www.microsoft.com/technet/security/bulletin/MSyy-bbb.asp, where yy is the year and bbb is the bulletin number within that year.
-
You can visit the Windows Catalog, which replaced the Windows Corporate Update Web site, at http://windowsupdate.microsoft.com/catalog. By working through the options and selecting your operating system and type of downloads you are looking for, you can find most all updates, patches, and hotfixes in one location.
Test Day Tip The download locations presented here are for your own professional knowledge and reference. Don't expect to be tested on them.
-
Test, Backup, Deploy
We cannot stress enough the importance of having a solid, well-documented, and verified update plan for your organization. Consider this scenario: You are the administrator for a small financial organization. Your organization's primary business is that of buying and selling stocks. You, without prior proper planning, apply an untested update to your member servers—the very lifeblood of your custom ASP and SQL financials application. The update causes several of the servers to become unstable because it is conflicting with another previously installed update (which, as you failed to see, the new update's installation notes plainly said to remove before installation). You've now created a problem.
Think that's bad? Wait, it gets worse. You have a pretty good backup plan in place—or so you think. Backups are performed nightly using a well-documented procedure, but no one has ever taken the time to test the plan to see just how well it works. No time is a worse time to test your backup plan than when your mission-critical production servers have been taken down—not by attackers but by the carelessness of the network administrator.
The solution to avoid such a scenario? Test, backup, deploy. Build a small test lab (as large as required and that can be afforded financially) that mimics your actual production environment. If you have Windows 2000 IIS servers and SQL 2000 servers in your production network, you need to duplicate that scenario in the lab. Using Active Directory and Exchange 2000 server? You need to duplicate those as well. Every detail is pertinent and no detail should be ignored, overlooked, or considered superfluous when it comes to building a test lab. Furthermore, the hardware and software configurations used in the production network should be the same ones used in the lab environment.
Once you've thoroughly tested a proposed update in your lab, you can take steps to deploy it to your network—but not before performing a backup on the affected systems. Haven't tested your disaster recovery plan lately? You might want to consider doing it now. It's better to find out that it doesn't work when you don't need it to. When you are certain that everything else is ready, then (and only then) can you go forward and deploy the updates. Using this three-step deployment strategy, you will in most cases prevent problems from occurring. You can deal with those that do occur because you now know that your disaster recovery plan works and can be called into action in short order.
The bottom line is this: You plan or you pay. Which will you do?
Exam 70-124: Objective 2.2.1: Installing Updates on New Computers
Deploying updates to new computers that are being prepared for installation is the easiest scenario that you can find yourself in. Unfortunately it's also the least likely scenario. But when you need to deploy updates to new computers, you have a couple of good options at your disposal that don't require you to visit each computer and perform the updates manually.
For service pack updates, you can create slipstreamed installation media that incorporate the latest service pack from the very beginning—no time wasted sitting in front of each computer installing the service pack and then waiting for the subsequent restart to confirm that all is well.
For applying the smaller patches, updates, and fixes, you can use a script and the Qchain.exe utility to install them, ensuring that version conflicts and file-locking issues are avoided and you, in the end, get all your updates installed. In some instances you might need to install these updates on computers that are located in isolated networks or are otherwise unavailable for any sort of over-the-network installation. In these cases, you will most likely find yourself visiting each computer with a specially created installation CD or sending the local staff this CD with instructions on its use. We examine each of these scenarios in more detail in the following sections, including several exercises on pulling each of them off successfully.
Slipstreaming Installation Media for RIS Deployment
What's more fun than installing Windows 2000 on 50 new client workstations? Going right behind this installation and installing the latest service pack, of course! In reality, we all know this statement is not exactly the truth, but it does make a good point as to how time-consuming and generally unnerving manually it can be to install an operating system and service pack on new computers.
Fortunately, Windows 2000 provides a solution to the problem of installing an operating system on new computers; it even allows us to ensure that the installation performed is one that is up to date with the latest service pack. Of course, this technology is not new to Windows 2000; it forms one of the cornerstones of Systems Management Server. Additionally, the functionality in Windows 2000 is not as robust as that you will find in Systems Management Server, but overall the Remote Installation Service in Windows 2000 is a fairly simple and foolproof way to perform new operating system installations over the network—all from the comfort of your own desk.
When it comes to deploying service packs to new clients, the method of choice is to slipstream the installation media with the service pack files, thus creating an integrated installation source that contains all the most up-to-date files. To slipstream means to place newer files directly over existing files without causing any version conflicts or other issues—something that was a constant source of frustration for Windows NT 4.0 administrators.
All Windows 2000 Service Packs are slipstream ready—meaning that you can extract the service pack files into a directory on your computer that contains the contents of a Windows 2000 Setup CD-ROM. The extracted service pack files simply overwrite the files that currently exist, and you end up with a new, integrated, and updated installation source. The process to slipstream an installation source is discussed in Exercise 3.05.
| Exam Warning | The process to slipstream service pack files into an installation source, including all commands issued, is something you should commit to memory. Questions about slipstreaming have an odd tendency to pop up here and there in several of the Windows 2000 MCSE exams. |
Exercise 3.05: Slipstreaming the Windows 2000 Professional Source Files with Service Pack 3
-
Create a new folder on your computer to hold the Windows 2000 Professional setup files, such as W2KPRO.
-
Copy the contents of your Windows 2000 Professional Setup CD-ROM to this folder.
-
Create a new folder on your computer to hold the contents of Service Pack 3, such as W2KSP3.
-
Extract Service Pack 3 to this folder by executing the following command at the command prompt: w2ksp3 –x (see Figure 3.16).
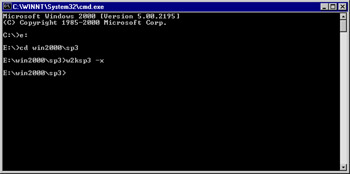
Figure 3.16: Extracting the Service Pack Files -
After the service pack verifies all files, you will be asked to choose a location to extract them to, as shown in Figure 3.17. Choose the Service Pack folder you created earlier.
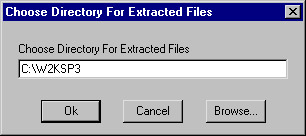
Figure 3.17: Entering the Extraction Location -
After all the service pack files have been extracted, click OK to close the extraction window.
-
To slipstream the extracted Service Pack 3 files into the original installation media, enter the following command from the command line: w2ksp3\i386\update\update.exe -s:c:\w2kpro (assuming that your folders are located on volume C). After you enter the command, a window like the one shown in Figure 3.18 will open and inform you of the slipstream status.
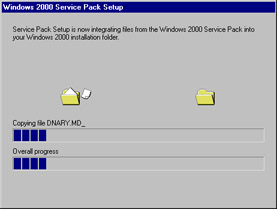
Figure 3.18: The Integration Process -
When the integration is complete, click OK to close the integration window and complete the slipstream process. You now have an integrated Windows 2000 Professional Service Pack installation source.
Of course, now that you have the slipstream installation source, you need to do something with it. You have three options at this point: You can use the Remote Installation Service to install new client systems, you can burn the files to CD-ROM to create an integrated Setup CD-ROM (this will come into play later in this chapter), or you can perform network installations from a file share using the integrated installation files you just created.
Before you can get to work installing Windows 2000 using the Remote Installation Service, you must have the service installed and configured on your network. If you are installing it for the first time, this is an all-in-one process. If you already have it installed, you will be able to skip Exercise 3.06 entirely and create a new installation image as outlined in Exercise 3.7. To use Remote Installation Service, you must have a Windows 2000 Active Directory domain and you must install RIS on a Windows 2000 server, either a member server or a domain controller. For a more in-depth discussion of Windows 2000 RIS, see http://infocenter.cramsession.com/techlibrary/gethtml.asp?ID=1514.
| Test Day Tip | Don't expect to be tested on the process to install and configure a RIS server in your network. This is outside the domain of this exam. Exercise 3.06 is provided for reference and as a lead-in for Exercise 3.07, which does present some information you could see on this exam. |
Exercise 3.06: Installing and Configuring the Remote Installation Service
-
If you already have RIS configured on your network, you can skip this exercise entirely and instead complete Exercise 3.7. If not, begin the process to install RIS by clicking Start | Settings | Control Panel | Add/Remove Programs. Select the Add/Remove Windows Components option.
-
From the Windows Component Wizard, select Remote Installation Services and click Next to continue.
-
The wizard will briefly copy the required files to your Windows 2000 Server in order to support RIS.
-
You might be prompted to provide your Windows 2000 Server Setup CD-ROM or to enter the path to its installation files. Provide the CD-ROM or installation path and click OK as required.
-
When the Completing Windows Component Wizard page is shown, click Finish to complete the installation of RIS.
-
You will be prompted to restart the server in order to finish the installation process.
-
After the server has restarted, open the Add/Remove Programs applet again and click Add/Remove Windows Components. You should now see an entry prompting you to configure RIS on the server, as shown in Figure 3.19. Click the Configure button to start the RIS Setup Wizard.
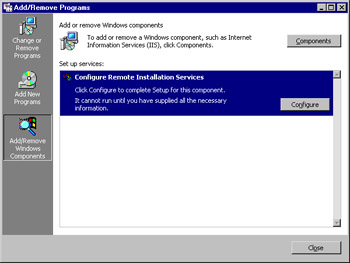
Figure 3.19: RIS Awaits Its Configuration… -
Click Next to dismiss the opening page of the RIS Setup Wizard.
-
Enter the folder path you want to use as the root for the RIS operating systems and then click Next (see Figure 3.20). This is the location at which RIS will store its installation images, so be sure to pick a location that is large enough for the number of installation sources you plan to create—about 250MB for a Windows 2000 installation. A few caveats about the location: It cannot be on a system volume, it must be on an NTFS 5 volume, and it cannot be a DfS share.
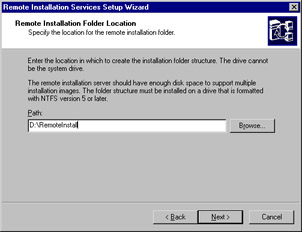
Figure 3.20: Selecting the Location for the RIS Root -
On the Initial Settings page, you are asked if you want to start responding to client requests for RIS services at this time. The preferred selection is not to respond to client requests until you have completed configuring and testing the RIS server. To prevent the RIS server from responding to all requests, leave both check boxes unselected and click Next to continue.
-
On the Installation Source Files Location page, enter the path to the Windows 2000 Professional installation files, and then click Next to continue. Using the location of the files from Exercise 3.5 would give us C:\W2KPRO, for example.
-
On the Windows Installation Image Folder Name page, enter a name for the folder that will store this operating system image, and then click Next to continue. In this example, we used windows2000.pro.sp3 as a folder name.
-
On the Friendly Description and Help Text page (see Figure 3.21), you need to provide a user-friendly name for the RIS image you are creating. Users will see this name on their selection menu when they boot into a RIS installation. After completing this page, click Next to continue.
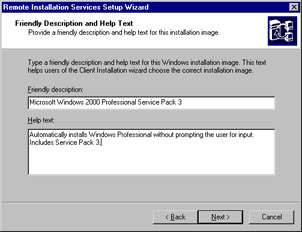
Figure 3.21: Entering a User-Friendly Name and Description for the RIS Image -
On the Review Settings page, you can review the settings that you have configured before creating the RIS image. When you are satisfied with your settings, click Finish to complete the RIS server setup and configuration process. You can watch the progress of the operation, as shown in Figure 3.22.
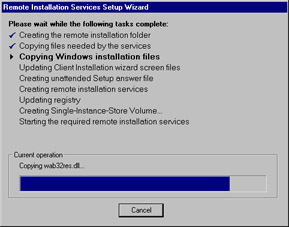
Figure 3.22: Completing the RIS Setup Wizard -
When the Wizard has completed, click Done to close the RIS Setup Wizard window.
-
If the server you configured for RIS is not already an authorized DHCP server on your network you need to authorize from the DHCP console before it can start servicing client requests. Open the DHCP console, right-click in the root of the console, and select Manage Authorized Servers from the context menu. This opens the Manage Authorized Servers window, as shown in Figure 3.23.
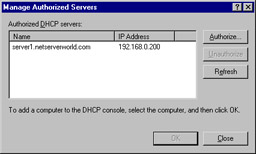
Figure 3.23: Managing Authorized Servers—Not Just for DHCP Anymore! -
Click Authorize, enter the IP address or server name for the RIS server, and then click OK to authorize the RIS server.
-
You can now perform any further configuration of your RIS server that you would like, including enabling it to respond to client requests and creating additional installation images, by opening the Active Directory Computers and Users console, locating the RIS server, right-clicking it, and selecting Properties. Switch to the Remote Install tab and you are in business. For a more detailed discussion of managing RIS, see the tutorial located at http://infocenter.cramsession.com/techlibrary/gethtml.asp?ID=1514.
If you have previously installed and configured a RIS server on your network and only need to create a new installation image for your slipstreamed Windows 2000 Professional Service Pack 3 files, Exercise 3.07 is for you.
Exercise 3.07: Creating a New RIS CD-Based Installation Image
-
Open the Active Directory Users and Computers console. Locate the RIS server of concern and right-click it. Select Properties from the context menu.
-
Switch to the Remote Install tab and click the Advanced Settings button. Switch to the Images tab. From here you can view all images hosted on the server.
-
To add a new image, click the Add button. This will start the Add Installation Image Wizard. Note that you can only add CD-based imaged from here; you need to run RIPrep to add a new RIPrep installation image.
-
Select Add A New Installation Image and click Next. Follow through the Add Installation Image Wizard to create the image and its associated answer file.
-
Click Finish to complete the Add Installation Image Wizard.
Now that you have an integrated RIS installation image created, you now just need to visit each computer (or have a trained user do it for you) and start the installation process. Your total time in front of each computer will be extremely short compared to the time you would spend if you weren't using a slipstreamed installation source and Remote Installation Services. Using an answer that provides all the required information during the GUI phase of setup, you can even further minimize the time required to perform each installation. Should you need to include fixes, updates, or patches in your installation source, see the tutorial located at http://infocenter.cramsession.com/techlibrary/gethtml.asp?ID=967 for a good walkthrough on how to properly locate them and prepare them for deployment.
Scripting Updates
Individual updates, fixes, and patches can be applied to your new computers quite easily using a script or batch file. Using the Qchain.exe tool, you can safely apply multiple updates, fixes, and patches to a computer without having to restart after each one—a problem that you most often face when attempting to manually install these updates. The Qchain.exe tool, which can be downloaded from www.microsoft.com/downloads/release.asp?ReleaseID=29821, allows you to install multiple updates at one time by preventing file-locking issues and incorrect file versions from being installed.
The following is an example of what could happen if you were to install two hotfixes without using Qchain.exe. When a hotfix is installed, it is placed in the Pending File Rename queue to be replaced after the computer has been restarted (hence the reason you must restart the computer following the installation). Because it has been placed in this queue, it is possible that you could potentially perform two updates that both target the same file. Say that you install hotfix 29 and hotfix 65 without restarting the computer in between, and both hotfixes update a specific file called problem_file.exe. Hotfix 29, which was applied first and will be processed first, contains version 3.1.5.33 of problem_file.exe. Hotfix 65, on the hand, contains an older version of the file, version 3.0.2.21. When each of the hotfixes is processed on the subsequent startup, they each (in turn) replace problem_file.exe with their respective versions. The net result is that the hotfix that is processed last will be the "winner," so to speak, in that its version of problem_file.exe will be the one that remains after all updates have been applied. Therein is the crux of the problem.
Using Qchain.exe, you can prevent such problems in most cases. Qchain.exe examines the changes made by each hotfix and applies the most recent file version in the event of a conflict. By doing so, Qchain.exe increases server and workstation uptime by preventing excessive restarts and by preventing file version problems.
If you have five updates to apply, you could use a script as follows to get them installed:
@echo off setlocal set FIXPATH=the_path_to_the_files %FIXPATH%\Q123456_w2k_sp2_x86.exe -z –m %FIXPATH%\Q234567_w2k_sp2_x86.exe -z –m %FIXPATH%\Q345678_w2k_sp2_x86.exe -z –m %FIXPATH%\Q456789_w2k_sp2_x86.exe -z –m %FIXPATH%\Q567890_w2k_sp2_x86.exe -z –m %FIXPATH%\qchain.exe
The –m switch turns on quiet mode, suppressing output; the –z switch instructs the hotfix executable not to restart after it has run. This script or batch file can then be saved to a network folder and placed in the Startup Scripts folder for a Group Policy object (see Figure 3.24). Figure 3.25 shows the actual directory for the specific GPO to which we have applied this batch file; yours will vary.
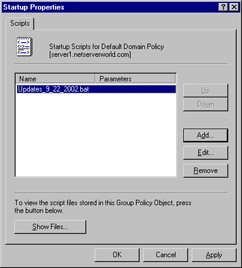
Figure 3.24: Placing the Qchain.exe Batch File in the Startup Scripts Folder of the Group Policy Object
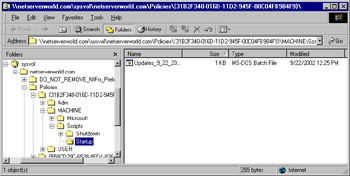
Figure 3.25: Locating the Startup Script Folder
| Exam Warning | Ensure that you completely understand the reasons for using Qchain and how it functions to prevent file version problems on your computers as well as increasing computer uptime by requiring only one restart. You should also make sure that you understand the types of updates Qchain is used for and how Qchain is typically used to deploy these updates. |
Should you need to apply only one hotfix or update, you can opt to directly apply it or to use a script as discussed here. Scripting using Qchain.exe also works quite well for existing network clients and should be considered for use on them as a first (and preferred) option.
Installing Updates in Isolated Networks
For computers in isolated areas, your installation options are somewhat limited. Your best option in this case is to provide a local administrator or power user with a slipstreamed Windows 2000 Setup CD-ROM that also contains an answer file and any required patches, fixes, or updates that came out after the service pack. See http://infocenter.cramsession.com/techlibrary/gethtml.asp?ID=967 for a good walkthrough on how to accomplish this sort of installation.
Deployment Updates to Existing Computers
Getting updates to your existing computers can be a somewhat more complicated process, depending on the size of your organization, the capacity of your network, and the location of the computers to be upgraded. For existing computers, you can choose from a variety of methods when it comes to deploying updates. Windows Update, the Windows Catalog, Software Update Services, Automatic Updates, and Systems Management Server are among the more common and well-known methods, although more than a handful of available third-party solutions will work, often with better results and easier management.
Windows Update
As we discussed earlier in this chapter, Windows Update is a very simple and easy-to-use method of updating one specific computer at a time. Therein lays its drawback: It can be used to update the local computer and requires that updates be downloaded from Microsoft for that computer. Using Windows Update is a good choice if the number of computers to be updated is relatively small or if you do not have Active Directory in your network. As the number of computers and sites increases, so does your workload, and very quickly Windows Update becomes a solution that is not viable. The exact number of computers at which this breaking point occurs is not fixed and can vary from organization to organization, but a good guideline is 10 computers. If you have 10 computers or fewer in your organization, you can, in most cases, get away with using Windows Update without too much administrative effort. Anything more than 10 and you should consider another means of keeping your computers up to date. Another concern with using Windows Update is that each computer will download the files it requires independently of what any other computer has previously downloaded; this can put quite a hit on your network bandwidth.
Should you need to use Windows Update, the process to scan for required updates was presented earlier in this chapter, in Exercise 3.03. Exercise 3.08 presents the basic process to select and download updates.
| Test Day Tip | Don't expect to be tested on a large amount of Windows Update knowledge during your exam. Most likely, you will only see to topic referenced lightly. What you need to take away from the discussion in this chapter is what Windows Update does, how it works, and why it is a limited solution not suitable for Enterprise use. |
Exercise 3.08: Updating a Single Computer Using Windows Update
-
After you've completed the Windows Update scan of your computer (refer back to Exercise 3.03), you will now need to select and download updates to be applied to your computer. Some updates are mutually exclusive of all other updates, meaning that they must be downloaded and installed separately from any other updates. Most often, this includes any updates to Internet Explorer, service packs, and any sort of security roll-up.
-
By default, Windows Update automatically places into your download "basket" any items it finds that fall into the Critical Updates and Service Packs category. This does not mean, however, that it can install them all at once or that you must install them at all. To see what items have been identified and selected as Critical Updates or Service Packs, click the Critical Updates or Service Packs link to get the page shown in Figure 3.26. Notice that Internet Explorer Service Pack 1 (the first item selected) is one of those items that is mutually exclusive and must be downloaded and installed separately from the rest of the selected items. In this case, you need to either remove all other items from your download list or remove the one specific item. We recommend checking the entire list to make sure that other items are not mutually exclusive and that the list contains only the items you want to download. You can read more about any item by clicking the Read more link at the end of the item's description.
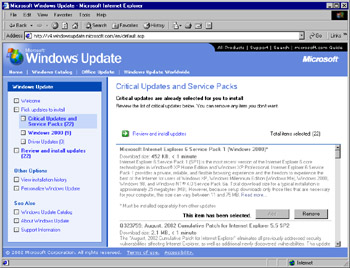
Figure 3.26: Examining the Critical Updates and Service Packs List -
The items identified as Windows 2000 updates are not automatically added to your list of selected items, but they might still be useful or needed for your computer. You should examine this list of items by clicking the Windows 2000 link and adding any updates you ant to have installed to your list.
-
If your scan reveals that you have updated drivers for your computer hardware, they will be listed under Driver Updates. You can add any of these updated drivers to your download list as well.
-
Once you have added all the updates that you want to your list (or that you can based on exclusions), click Review and install updates to progress to the next step of the Windows Update process (see Figure 3.27).
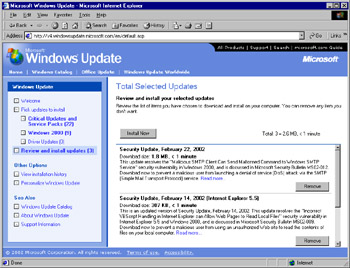
Figure 3.27: Reviewing Selected Updates -
Once again you will have the option to examine the selected updates you have chosen and remove them from your list. Once you are satisfied with your selections, click Install Now.
-
You will be presented with a supplemental licensing agreement like the one shown in Figure 3.28. You must click Accept to complete the process.
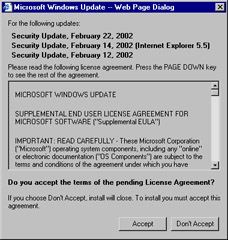
Figure 3.28: Accepting the Licensing Agreement -
Windows Update will now download (see Figure 3.29) and install the selected updates. More often than not, you will be required to restart the computer after the installation to complete the process. Restarting the computer allows files that were in use to be updated. That's all there is to using Windows Update to update a single computer.
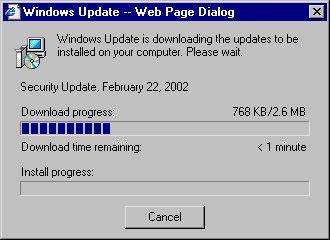
Figure 3.29: Windows Update Downloads and Installs the Updates
Using Windows Update is a simple, easy way to update a single computer or a few computers. But if you have more than a few computers to update or want to control when and how the updates are applied to your computers, you need to use one of the other methods we discuss in the next few sections.
Windows Update Catalog
The Windows Update Catalog and the Software Update Service have replaced what was once known as Corporate Windows Update. Corporate Windows Update allowed you to browse through all the available updates for your operating system, download the ones you wanted, and then deploy them using any available means such as scripting or Systems Management Server.
Windows Update Catalog pretty much performs the same function as the now defunct Corporate Windows Update site. Software Update Services (SUS) takes the concept a step further by automatically downloading the updates to the SUS server and staging them for you until you are ready to deploy them. We examine Software Update Services next, but for now let's see how the Windows Update Catalog can be used to locate and download updates of our choosing in Exercise 3.09.
Exercise 3.09: Getting Updates Using the Windows Update Catalog
-
Open Internet Explorer and enter http://windowsupdate.microsoft.com/catalog into the address bar. The Windows Update Catalog will open, as shown in Figure 3.30.
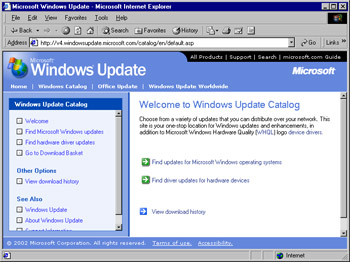
Figure 3.30: The Windows Update Catalog -
Click Find updates for Microsoft Windows operating systems to start the process of finding updates for your Windows 2000 computers.
-
Choose your operating system from the choices given (see Figure 3.31) to locate all available downloads. If you want to perform an advanced search and only locate specific items, such as service packs or recommended updates, click Advanced search options. After you have configured your search parameters, click Search to continue.
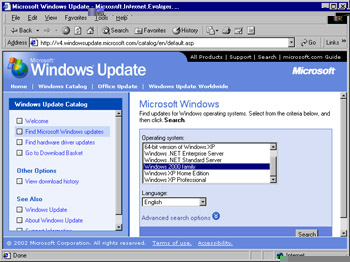
Figure 3.31: Selecting the Search Criteria -
Available updates will be enumerated by category in which you have chosen to search. Clicking Critical Updates and Service Packs in our case yields the output shown in Figure 3.32.
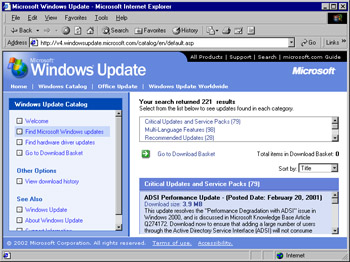
Figure 3.32: Listing the Updates -
Browse through the listing of updates in order to determine what you need. You can gain more information about a specific update by clicking the Read more link within the update's descriptive text. Click Add to place an update into your download basket. When you are done selecting updates, click Go to Download Basket.
-
The Download Basket (see Figure 3.33) shows all updates that you have chosen to download and allows you to configure a location to which to download the files. When you are ready to download your chosen files, click Download Now.
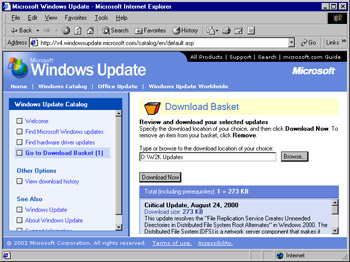
Figure 3.33: Preparing to Download the Selected Update Items -
When you're prompted to accept the licensing agreement, do so in order to complete the download.
-
Downloaded files can be tracked in the Download History, as shown in Figure 3.34. Now that you've gotten your updates, you can deploy them via your choice of methods.
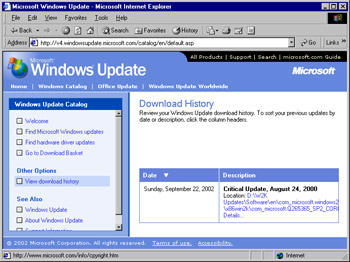
Figure 3.34: Keeping Track of Downloaded Updates
Now let's move on to the Software Update Service, a recent introduction in Windows 2000 that allows you to set up the equivalent of a Windows Update server inside your own intranet.
Software Update Service and Automatic Updates
The Software Update Service is the other half of the replacement for the now defunct Corporate Windows Update. Call it what you will, Software Update Service (when paired with the Automatic Updates client) is really just a Windows Update server that lives inside your private network. As the name of this section implies, it is a two-part process: You must install and configure the SUS in order to get available downloads from Microsoft, and then you must install and configure Automatic Updates so that available updates will be automatically installed on your client computers.
Before you can use SUS or Automatic Updates on your network, you need to download and install the required files. To get the SUS installer file, see www.microsoft.com/windows2000/downloads/recommended/susserver/default.asp. You should also consider downloading a very good SUS Deployment Guide at that location; it is full of excellent tips and best practices that will help you keep your SUS servers running smoothly. The Automatic Updates client can be downloaded from www.microsoft.com/windows2000/downloads/recommended/susclient/default.asp.
Exercise 3.10 walks you through the installation and configuration of your first SUS. It is important to know the restrictions for installing SUS before starting the procedure:
-
You must install SUS on a Windows 2000 Server Service Pack 2 (or later) or Windows .NET Server RC1 (or later).
-
The server SUS is installed on must be running IIS 5.0 or later.
-
The server SUS is installed on must be running Internet Explorer 5.5 or later.
-
Software Update Services must be installed on an NTFS 5 partition, and the system partition on the SUS server must also be using NTFS 5.
-
SUS cannot be installed on a domain controller.
Exercise 3.10: Installing and Configuring Software Update Services
-
Download the SUS package from www.microsoft.com/windows2000/downloads/recommended/susserver/default.asp.
-
Double-click the SUSSetup.msi file to begin the installation on your new SUS server.
-
Click Next to dismiss the opening page of the wizard.
-
After reading the End User License Agreement, select I accept the terms in the License Agreement and click Next to continue. You must agree to the terms in order to continue the installation of SUS.
-
From the Choose setup type page, click Custom in order to see all the configurable options available to you.
-
From the Choose file locations page (see Figure 3.35), you can configure the location to place the downloaded updates to instead direct clients to a Microsoft Windows Update server. After making your selections (which you can in most cases leave as the defaults), click Next to continue.
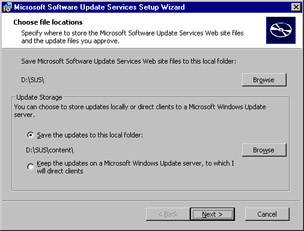
Figure 3.35: Selecting File Location Options -
From the Language Settings page, select the language option that you need. In most cases, you can simply select English only. This choice will also reduce the amount of space required for downloaded updates. After selecting your language, click Next to continue.
-
On the Handling new versions of previously approved updates page (see Figure 3.36), you are asked to make a seemingly small decision, but really it is a critical one. You should always select I will manually approve new versions of approved updates in order to avoid any problems with incompatibilities. Once you have adequately tested the newer version, you can turn it loose on the network. After making your selection, click Next to continue.
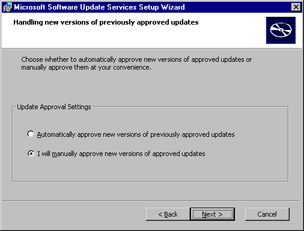
Figure 3.36: Selecting the Installation Method; Be Wary of Allowing Automatic Approvals -
The Ready to install page provides you with the URL that clients should be targeted toward when configuring the Automatic Updates client. When you are ready to complete the installation of SUS, click Install.
-
The setup process will run the IIS Lockdown tool on your Windows 2000 Server in order to secure it as part of its installation process. This includes installing the URLScan ISAPI filter as well.
-
When setup has completed, click Finish to close the wizard. You can now administer your SUS server from http://servername/SUSAdmin.
-
Open a browser and in the address box, enter the location that corresponds to your SUS server. You should see the SUS server admin page, shown in Figure 3.37.
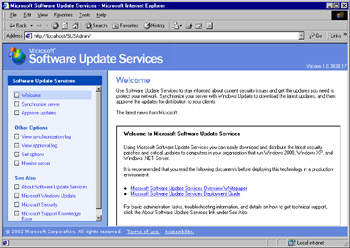
Figure 3.37: Administering the SUS Server -
To being, you need to synchronize your server. Click Synchronize server. You can, and should, configure a synchronization schedule for your server. You can perform this task by clicking the Synchronization Schedule button. This step opens the window shown in Figure 3.38.
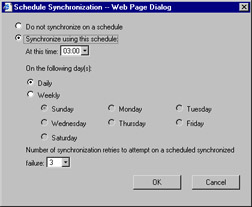
Figure 3.38: Configuring the Synchronization Schedule -
If you need to configure options related to a proxy server, click Set options from the left pane menu. When you are ready to force a synchronization of your new SUS server to update it, click the Synchronize Now button on the Synchronize server page.
-
Synchronization will run for some time (as shown in Figure 3.39), depending on the amount of updates that you need.
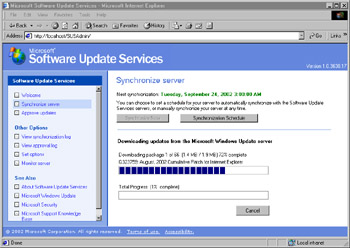
Figure 3.39: Downloading Required Updates -
After all updates have been downloaded, click OK. You are now prompted to test and approve updates. You can do this at your leisure.
-
When you have tested an update and you are ready to approve it, click Approve updates to open the Approve Updates window. Select all updates you are ready to approve (see Figure 3.40) and click Approve.
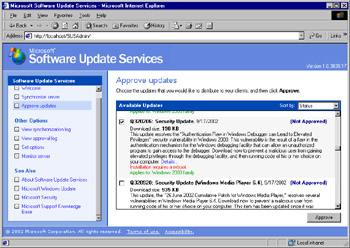
Figure 3.40: Selecting the Approved Updates -
You will be asked to verify that the list of updates you are approving is correct, since it will replace the existing approval list. Click Yes to allow the list of approved updates to be made available to Automatic Updates clients.
-
You will be presented once again with the familiar supplemental End User License Agreement. Click Accept to continue the approval process.
-
Click OK when you're informed that the list of updates has been made available to your clients. You have just performed the installation and basic configuration of your first SUS server.
Armed with a functional SUS server, you now need to install the Automatic Updates client software on all your client computers in order for them to take advantage of the service. You can install the Automatic Updates client via any of the traditional methods, including using IntelliMirror and Group Policy, using Systems Management Server (or any other software installation and management application), or by good, old-fashioned sneaker-net.
Since we are only going to install one Automatic Updates client in Exercise 3.11, we will use the sneaker-net method; however, your installation method should be based on the number and location of the client computers on which you want to install the software.
The Automatic Updates client software can be used on the following systems:
-
Windows 2000 Professional, Server, or Advanced Server (Service Pack 2 or later). Service Pack 3 includes the Automatic Updates client software.
-
Windows XP Home Edition or Professional. Service Pack 1 includes the Automatic Updates client software.
Exercise 3.11: Installing and Configuring the Automatic Updates Client
-
Download the Automatic Updates client installation package from www.microsoft.com/windows2000/downloads/recommended/susclient/default.asp.
-
Double-click the WUAU22.msi file to install the Automatic Updates client. When it completes, you will notice a new applet in the Control Panel (see Figure 3.41).
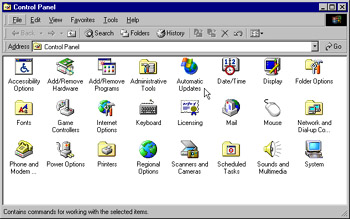
Figure 3.41: A New Applet Appears -
By default, the Automatic Updates client is not enabled. If it were (assuming you did no further configuration), it would be able to download updates from the Windows Update server. We are going to configure it to download approved updates from our SUS server instead.
-
Automatic Updates settings for SUS are configured through a special Group Policy administrative template that you must add to the Group Policy object you are editing. Since we are working with one local computer, we will use the Local Group Policy object. However, you can perform this process for any Group Policy object at any level of Active Directory, as you require.
-
Open the Local Group Policy window by typing gpedit.msc at the command line.
-
Open the Computer Configuration node, right-click Administrative Templates, and select Add/Remove Templates from the context menu, as shown in Figure 3.42.
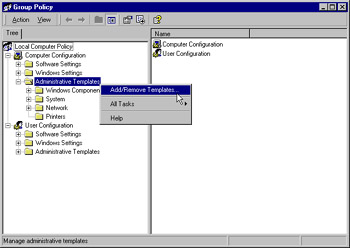
Figure 3.42: Adding a New Template -
Click Add and select the wuau.adm template, as shown in Figure 3.43. Click Open. Click Close to close the Add/Remove Templates window.
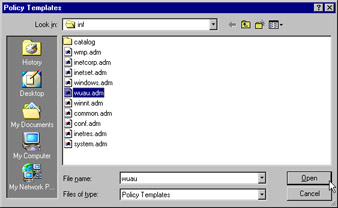
Figure 3.43: Selecting the New Template -
Expand the Administrative Templates node to the Windows Updates node.
-
Configure the Configure Automatic Updates and Specify intranet Microsoft update server location objects to your requirements, as shown in Figures 4.44 and 4.45.
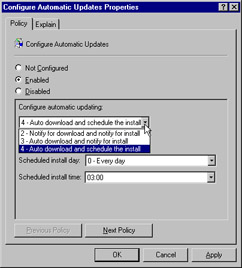
Figure 3.44: Configuring the Configure Automatic Updates Object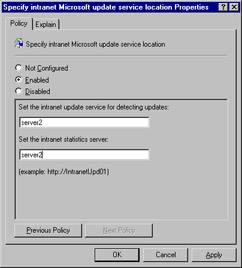
Figure 3.45: Configuring the Specify Intranet Microsoft Update Server Location Object -
After Group Policy has been replicated and taken effect, you will no longer be able to manually control Automatic Updates settings from the Control Panel applet. All available options will be grayed out.
-
Depending on your configuration, updates will either be installed silently according to the configured schedule or will require user intervention to complete the install. In this example, we elected to have updates automatically downloaded and installed. Figure 3.46 shows the result: The update that was approved (see Figure 3.40) was subsequently installed and now shows up in the Add/Remove Programs listing.
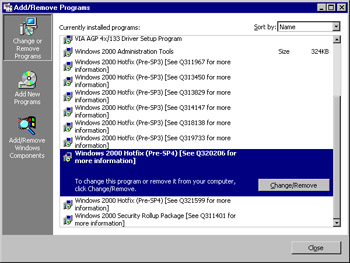
Figure 3.46: Inspecting the Work of the Automatic Updates Service
| Test Day Tip | Even though it is possible that you will see questions dealing with SUS and the Automatic Updates Client, you should not expect to see detailed installation and configuration questions on the exam. Expect to see questions more along the lines of what SUS and Automatic Updates are, how they work, and what you need to do to get them up and running. Remember, SUS is nothing more than a Windows Update server that you run on your internal network to provide your clients a location to automatically get and install required updates. |
Systems Management Server
It is quite likely that in an organization with a well-established software installation and inventory control system, you will instead use some other form of update distribution and installation. Microsoft's Systems Management Server (SMS) is an extremely powerful and popular software management and inventory control application that can be used to install, maintain, and inventory software across most all versions of the Windows operating system. Although a detailed discussion of SMS is beyond the scope of this book, you can find a wealth of information on using SMS to deploy and manage updates on your network at www.microsoft.com/smserver/techinfo/deployment/20/default.asp. SMS 2003 was in beta testing at the time this book went to press and promises to provide more robust Active Directory integration and several other new enhancements. For more information on SMS 2003, see www.microsoft.com/smserver/evaluation/future/default.asp.
Special Considerations for Updating Servers
When you stop to think about it, servers are the life's blood of your network. True, the network exists to provide clients with information and services they need in order to be useful to users, but servers make it all work. The importance of testing, testing, testing, and more testing of any update to be deployed to your servers cannot be emphasized enough. You absolutely must test all updates, no matter how small or seemingly trivial, that will be applied to your servers before they are deployed. After all, you don't want to be known as "that admin," do you? You know, the admin who brought the entire company's business to a grinding halt because he failed to adequately test an update before deploying it—oh guess what … the update was not meant for the server it was deployed to, and as a result the server crashed. Too bad that was the Exchange Server. You get the point.
Of course, after testing has been completed to your satisfaction, you are not ready to deploy updates to your servers just yet. You need a well-documented (and approved) upgrade plan that includes a backout plan in the event that things go south in a hurry. Only proceed to install updates after you have been granted approval from your supervisor and the backout plan is well documented. In this way, you provide yourself with an out should things not go according to plan. You also want to ensure that you have a solid, well-tested disaster recovery plan in place. Other solutions such as disk imaging or hot standby systems can also provide some amount of redundancy should things go wrong in a hurry.
The last special precaution that you should take when updating servers is to apply the required updates only to the required servers. Blindly applying all updates to all servers is not only a waste of time and bandwidth, it can also lead to unforeseen problems. Your update plan should be carefully prepared to specify exactly which updates will be applied to which servers in order to prevent this sort of issue. On that note, you might want to apply updates incrementally over a week or two in order to observe how real production servers respond to the update. No matter how much testing you do in the lab, you will never be able to truly recreate the real network conditions that exist in your organization.
| Exam Warning | On the exam, just as in real life, pay special attention to any scenarios dealing with performing updates on "critical" or "production" servers. |
|
|
EAN: 2147483647
Pages: 162