Exam 70-124: Objective 2.1: Identifying Required Updates
|
|
The process of keeping your servers and workstations up to date has to start somewhere—by identifying the updates you need for each of them. Updates typically come in two different varieties: service packs and hotfixes. (Hotfixes are sometimes known by a variety of other names, such as security hotfix, security fix, or update.) The bottom line is that there are two major types of updates you will need to worry about, differentiated by both size and scope. In the next section we look at the difference between service packs and hotfixes. After we've gotten a good understanding of them and where we can look to find them, we will move on to identifying and procuring required updates.
Types of Updates
As mentioned, you will need to apply two basic types of updates to your network computers over time: service packs and hotfixes. Both can be found at the Windows Update Web site, located at http://windowsupdate.microsoft.com/. They have very different purposes, reliability levels, and application means.
Service Packs
Service packs are large executables that Microsoft issues periodically (usually every 6 to 15 months) to keep the product current and correct problems and known issues. Often service packs include new utilities and tools that can extend a computer's functionality. For example, Windows 2000 Service Pack 3 includes the ability to remove shortcuts to Microsoft middleware products (Windows and MSN Messenger, Outlook Express, and the like) from your computer, if desired. Service packs also include updated drivers and files that have been developed for the product after its initial release. Windows 2000 service packs are all-inclusive and self-executing and typically contain all fixes and previous service packs that have been issued for the product.
| Note | Although the topic is beyond the scope of this exam, you might be wondering just why Microsoft would willingly allow you to remove shortcuts to its middleware products. This action is a result of the settlement of the Microsoft antitrust lawsuit with the U.S. Department of Justice. You can read more about the settlement terms on Microsoft's Press Pass Web site at www.microsoft.com/presspass/trial/nov02/11-12FinalJudgment.asp. |
Perhaps one of the greatest improvements in Windows 2000 service packs is that you can slipsteam them into the original installation source and create integrated installation media that can be used to install an update to Windows 2000 without the need to subsequently apply the latest service pack. These updated installation sources can be placed back onto a CD-ROM for "sneaker-net" installation methods or can be used for any form of remote installation, including Windows 2000 Remote Installation Services, or for disk cloning.
Although can you get service packs from the Windows Update Web site, the best location to get them is directly from the Microsoft Service Packs page at http://support.microsoft.com/default.aspx?scid=fh;EN-US;sp. From there you will be able to download the service pack without having to install it immediately, as you would if you were using Windows Update.
Hotfixes
Hotfixes, also known as security fixes, security patches, patches, or Quick Fix Engineering, are small, single-purpose executable files that have been developed to correct a specific critical problem or flaw in a product for which timing is critical. Hotfixes do not typically undergo the same level of testing as service packs do to ensure that they are stable and compatible and do not cause further critical issues. Some hotfixes are not made available to the general public and must be obtained directly from Microsoft Product Support. Others can be found and downloaded from various sources, such as Windows Update, at http://windowsupdate.microsoft.com/ or the TechNET Security page located at www.microsoft.com/technet/security/default.asp.
Hotfixes can be used to correct both client-side and server-side issues. Recently, a pretty even division of client and server hotfixes have been issued as new flaws and weaknesses have been discovered. Perhaps one of the most famous server-side issues that received a hotfix was the Code Red exploitation of IIS servers' indexing service. MS02-018 was issued to correct this problem and stop the propagation of the Code Red worm. You can rely on Windows Update to inform you of missing hotfixes, but you can also use the HFNetChk tool to perform this function for you. The benefit of using HFNetChk is that when it is run against an entire network with a script, it will quickly return the status of all network computers, thus allowing you to determine the computers that require particular hotfixes.
Get Those Hotfixes!
Because service packs are only issued once in a long while, hotfixes are going to be your primary means of correcting vulnerabilities and flaws in Windows. You need to make it a regular practice—at least weekly—to check your computers for missing updates. Once you have identified the missing updates, you need to acquire and test them as quickly as you can, but not so quickly that you miss something critical that could cause you new problems down the road. After testing has been completed to your satisfaction, you should take steps to deploy updates as quickly as possible. Sometimes keeping your computers safe from attacks and other vulnerabilities comes down to just a matter of days—perhaps even less. For example, when the Code Red worm struck, it was able to compromise over 250,000 vulnerable systems in less than nine hours. Locating, testing, and deploying required updates as soon as they become available can go great lengths toward keeping your network secure and protected. In the case of the Code Red worm, the vulnerability was known and the fix had been available for some time before the "need" to update and apply fixes and patches was shown to administrators.
| Exam Warning | As you read this text and through the rest of this chapter, remember the differences between a service pack and a hotfix in terms of what they are designed to do, how they are obtained, and how they are installed. You shouldn't expect to be asked directly what a service pack or hotfix is on the exam, but your understanding of each will be tested in other, more covert, ways. |
Analyzing Your Computers
Armed with your basic understanding of the types of updates that are available for Windows 2000, the first step you need to undertake to get your computers up to date (and thus more secure) is to determine their current state. Analyzing your computers can be a very simple task or a difficult one, depending on the size and complexity of your network. If you only are responsible for only five computers and they are all located in the same place, your job will be very easy. If you are responsible for several hundred (or thousand) computers spread out over several geographically distant locations, your job is not going to be so easy. The method you choose to analyze your computers will thus depend largely on these factors:
-
How many computers are you responsible for updating?
-
Where are your computers located?
-
What type of network connectivity do you have between locations?
-
Do you have knowledgeable help available to you at all of your locations?
Let's take a look at some of the methods available to analyze your computers, both manually and via automated methods.
Visiting Windows Update
The Windows Update Web site can be a great asset to you if the number of computers to be managed is relatively low—perhaps five or fewer. Since Windows Update requires you to physically be in front of each computer in order to analyze and download the required updates, this method can be both time and bandwidth intensive. Windows Update, however, could be your best option if the number of computers to be updated is few or if a group of computers are not connected to the company network and thus cannot be analyzed via any other method.
Using Windows Update to analyze a computer for required updates is extremely simple, as outlined in Exercise 3.01.
Exercise 3.01: Determining the Need for Updating Using Windows Update
-
Click Start | Windows Update to open an Internet Explorer window pointed to Windows Update. If the shortcut is missing, you can enter http://windowsupdate.microsoft.com/ into your browser address bar. The Internet Explorer window shown in Figure 3.1 will appear. If you are asked to download and install anything from Microsoft, accept the download; this is a critical part of the process.
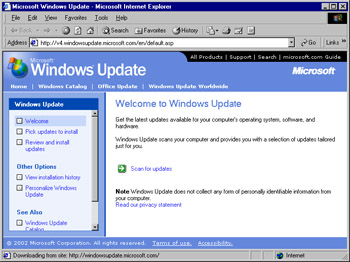
Figure 3.1: The Windows Update Web Site -
Click Scan for updates to start the analysis of your computer. After the analysis has completed, you will see the window shown in Figure 3.2.
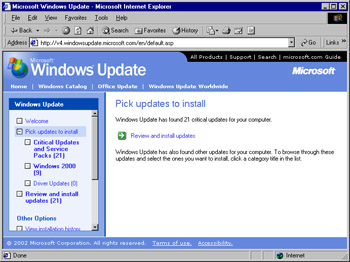
Figure 3.2: Selecting Required Updates -
You can navigate through the three categories of updates to determine the updates that Windows Update has found your computer needs. The categories are arranged from most important to least important in regard to computer security and safety; this is why drivers are at the bottom of the list.
-
Another useful tool to help you determine what you have previously applied using Windows Update is the View installation option. Clicking View installation history changes the display to that shown in Figure 3.3. (Your installed items will likely be different from those shown here.)
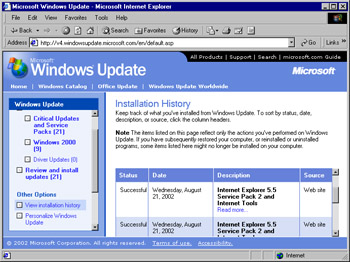
Figure 3.3: Checking Previously Installed Updates
That's all there is to analyzing your computer with Windows Update. Later in this chapter we examine the rest of the steps to use Windows Update to select and install updates onto the local computer.
The next method we examine is the Microsoft Network Security Hotfix Checker, commonly referred to as the HFNetChk tool.
The Microsoft Network Security Hotfix Checker
The Microsoft Network Security Hotfix Checker, HFNetChk, is a command-line tool that can be used to quickly analyze one or many computers to determine the installation status of required security patches. Unlike Windows Update, HFNetChk can scan for missing updates from more than one product. Products that HFNetChk currently scans include:
-
Windows 2000 Professional, Server, and Advanced Server
-
Windows XP Professional
-
Windows NT Workstation 4.0, Server 4.0, and Enterprise Edition Server 4.0
-
SQL Server 7.0
-
SQL Server 2000 Standard and Enterprise Server
-
Internet Information Server 4.0
-
Internet Information Server 5.0
-
Internet Explorer 5.01, 5.01 Service Pack 1, 5.01 Service Pack 2, 5.5, 5.5 Service Pack 1, 5.5 Service Pack 2 for Windows 2000
-
Internet Explorer 5.01, 5.01 Service Pack 1, 5.01 Service Pack 2, 5.5, 5.5 Service Pack 1, 5.5 Service Pack 2 for Windows NT 4.0
-
Microsoft Data Engine (MSDE) 1.0
When the HFNetChk tool is run, it uses an Extensible Markup Language (XML) file containing information about all available hotfixes as its data source. The XML file contains all pertinent information about each product's hotfixes, such as the security bulletin name and title, and other detailed information about the hotfixes, including the file version, registry keys applied by the hotfix, information about patches that supersede other patches, and various other important types of information about each hotfix.
If the XML file is not found in the directory from which the HFNetChk tool is run or is not specified in the arguments for the HFNetChk tool, it will be downloaded from the Microsoft Web site. The XML file comes in a digitally signed CAB format, and you will be asked to accept the download before the file is downloaded to your computer.
After the CAB file has been downloaded and decompressed, HFNetChk scans the selected computers to determine the operating systems, applications, and service packs you have installed. After this initial scan is completed, HFNetChk parses the XML file to identify any security patches that are required (and not installed) for the configuration of each computer scanned. If a patch is identified as being required but is not currently installed on a computer, HFNetChk returns output informing you so.
By default, HFNetChk only displays those patches and fixes that are necessary to bring your computers up to date. All other nonessential patches are not shown by default. In the event that roll-up packages exist, HFNetChk will not report the individual patches that the roll-up included as being required. When determining the installation status of patch on a computer, HFNetChk evaluates three distinct items: the file version and checksum of every file that is installed by the patch and the Registry key that is installed by the patch. If the Registry key is not found, HFNetChk assumes the patch is not installed. If the Registry key is found, HFNetChk looks for the files that correspond to that patch, comparing the file version and checksum to the XML file. If any one test fails, the output will be that the patch is not installed. You can, however, disable checking Registry keys as part of the analysis process, as we see later in this section.
The basic syntax of the HFNetChk tool is:
hfnetchk.exe [-h hostname] [-i ipaddress] [-d domainname] [-n] [-b] [-r range] [-history level] [-t threads] [-o output] [-x datasource] [-z] [-v] [-s suppression] [-nosum] [-u username] [-p password] [-f outfile] [-about] [-fh hostfile] [-fip ipfile]
Table 3.1 provides the function of each of the HFNetChk switches.
| Switch | Explanation |
|---|---|
| -h hostname | Specifies the NetBIOS name of the computer to be scanned. If not specified, the default is localhost. |
| -i ipaddress | Specifies the IP address of the computer to be scanned. If not specified, the default is the local computer. |
| -d domainname | Specifies the domain name to be scanned. All eligible computers in the domain will be scanned. |
| -n | Specifies that the local network is to be scanned. All eligible computers on the local network will be scanned. |
| -b | Compares the current status of fixes to that of a minimum secure baseline standard. |
| -r range | Specifies the inclusive IP address range that is to be scanned in the format start_IP-end_IP. For example, 192.168.0.100-192.168.0.199. |
| -history level | Displays an extremely verbose history of hotfixes as follows: |
| -t threads | Specifies the number of threads to be used for executing the scan. The allowable range is from 1 to 128, with the default being 64. |
| -o output | Specifies the desired output format at the completion of the scan. Tab outputs in tab-delimited format. Wrap outputs in a word-wrapped format. The default setting is wrap. |
| -x datasource | Specifies the XML data source containing the hotfix information. By default, this is the mssecure.cab file located at http://download.microsoft.com/download/xml/security/1.0/NT5/EN-US/mssecure.cab. This can be changed to any location on your network and can be an XML filename, compressed XML CAB file, or a URL. |
| -z | Specifies that Registry checking should not be performed. |
| -v | Displays all available details for "Patch NOT Found," "WARNING," and "NOTE" messages. When –o tab is used, this switch is enabled by default. |
| -s suppression | Specifies to suppress "NOTE" and "WARNING" messages as follows: |
| -nosum | Specifies that checksum checking is not to be performed. Performing the checksum test can use large amounts of network bandwidth. If speed or bandwidth usage is a concern, using this option speeds up the scan and reduces bandwidth usage. File version checking is still done. |
| -u username | Specifies an optional username to be used to log into remote computers if required in DOMAIN\Username format. CAUTION: This data is sent in clear text across the network! |
| -p password | Specifies the password to be used with the specified username. CAUTION: This data is sent in clear text across the network! |
| -f outfile | Specifies the filename to save the output results to. The default output is to the screen. |
| -about | Provides information about the version of HFNetChk in use. |
| -fh hostfile | Specifies the file containing a list of NetBIOS computer names to be scanned, one name per line with a maximum of 256 per file. |
| -fip ipfile | Specifies the file containing a list of IP addresses to be scanned, one IP address per line with a maximum of 256 per file. |
| Exam Warning | Take time to become familiar with the HFNetChk switches. Although you will most likely not be required to regurgitate them in bulk during your exam, you could be presented with one or more questions that will require you to display your understanding of the function of a particular switch and how it will or will not provide the desired solution to the problem at hand. |
Exercise 3.02 presents the process to perform a simple network scan, returning the results to a tab-delimited text output file.
Exercise 3.02: Using HFNetChk to Analyze for Updates
-
Download the HFNetChk tool from www.microsoft.com/downloads/release.asp?releaseid=31154 and to a computer in your network.
-
Extract the files to a location of your choosing by double-clicking the Nshc332.exe file. Click Yes when asked if you want to install the HFNetChk tool. Click Yes again to agree to the license. Enter the location to which you want to extract the files, as shown in Figure 3.4. Click OK after entering the location to continue.
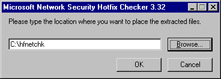
Figure 3.4: Selecting the Extraction Location for the HFNetChk Files -
Click OK after the files are extracted to acknowledge that you know what the HFNetChk tool was designed to do and how to execute it.
-
Open a command prompt and change directories to the location where you placed the extracted HFNetChk files.
-
From the HFNetChk directory, start the analysis process by entering hfnetchk –v –d domain_name –o tab –f hfnetchk_scan1.txt. Figure 3.5 shows an example command for a network. Press Enter to start the analysis.
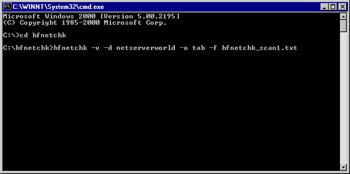
Figure 3.5: Starting the Analysis Process with HFNetChk -
You will be asked if you want to install the MSSecureXML file from Microsoft, as shown in Figure 3.6. You must have a copy of the XML file in order for HFNetChk to work. Note that the file is updated regularly as Microsoft posts new fixes and updates, so you might want to update it each time you run HFNetChk. Click Yes to install the XML file and allow the analysis to continue.
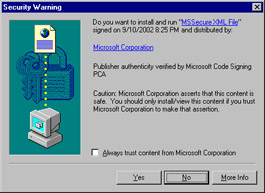
Figure 3.6: Getting the XML File -
Since we have directed the output of the scan to a tab-delimited text file, you should expect to see the output of Figure 3.7 at the conclusion of your scan.
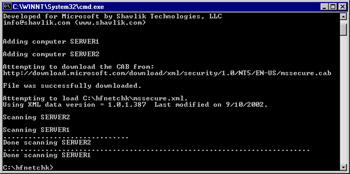
Figure 3.7: The Scan Is Complete -
An examination of the text output file reveals the situation for our computers. Figure 3.8 shows the tab-delimited file imported into Excel for easier viewing and comparison.
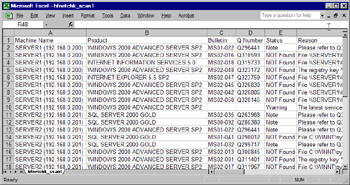
Figure 3.8: The Results of the HFNetChk Analysis -
Armed with this knowledge, we can now go about getting and installing the required fixes and patches on our computers. That is the topic of the "Deploying and Managing Updates" section later in this chapter.
Even though we performed a relatively simple scan in Exercise 3.2, you can use HFNetChk's various switches to perform very advanced scans on the specific computers of your choosing. By calling the scan from a batch file or script that is scheduled to run weekly, you can easily keep on top of any patches or fixes that your computers require. The only caveat to configuring HFNetChk to run as a scheduled event is that you must specify the location of the XML file—so a small amount of preplanning is required to make it work.
The next method of analyzing computers that we examine is the Microsoft Baseline Security Analyzer tool.
The Microsoft Baseline Security Analyzer
The Microsoft Baseline Security Analyzer (MBSA) is a GUI-based tool that Microsoft developed to detect common security misconfigurations and weaknesses. The MBSA tool can also be used from the command line if desired. The current version of MBSA, version 1.1, can be run on a Windows 2000, Windows XP, or Windows .NET Server computer; it scans for missing hotfixes, weaknesses, and vulnerabilities in the following Microsoft products:
-
Windows 2000 Professional, Server, and Advanced Server
-
Windows XP Professional
-
Windows NT Workstation 4.0, Server 4.0, and Enterprise Edition Server 4.0
-
SQL Server 7.0, 7.0 Service Pack 1, 7.0 Service Pack 2, 7.0
-
SQL Server 2000 Standard and Enterprise Server
-
Internet Information Server 4.0
-
Internet Information Server 5.0
-
Internet Explorer 5.01 and later
-
Office 2000
-
Office 2002 (XP)
MBSA uses a modified version of the HFNetChk tool to scan for missing hotfixes, service packs, and other updates. At the completion of the scan, an individual XML output report is created for each computer that has been scanned. This report can be viewed immediately after the completion of the scan or later. When MBSA is executed from the GUI, reports are placed in the SecurityScans folder, which is located in the profile of the user who ran the scan.
For example, if a user named Andrea ran the scan, she could expect to find scan reports located at C:\Documents and Settings\Andrea\SecurityScans or wherever her profile path is pointed. You can use the /f switch to change the location of the output file when you're running the MBSA tool from the command line.
In Exercise 3.3, we examine how to use the MBSA tool from the GUI to examine a local computer and determine its current status. In Exercise 3.4 we perform the same task, this time from the command line. Using the MBSA tool as part of a script or batch file, you could schedule a regular scan of all your network computers and then examine the results after the scan has completed. You should consider performing a scan such as this one at least once per week as your specific situation dictates.
The basic syntax of the MBSA tool from the command line is:
msbacli.exe [/c domainname\computername] [-i ipaddress] [-d domainname] [-r range] [/n IIS] [/n OS] [/n password] [/n SQL] [/n hotfix] [/o %domain% - %computername% (%date%)] [/e] [/l] [/ls] [/lr report name] [/ld report name] [/qp] [/qe] [/qr] [/q] [/f]
Table 3.2 details the function of each mbsacli.exe switch.
| Switch | Explanation |
|---|---|
| /c domainname\computername | Performs a scan on the selected computer. |
| -i ipaddress | Specifies the IP address of the computer to be scanned. If not specified, the default is the local computer. |
| -d domainname | Specifies the domain name to be scanned. All eligible computers in the domain will be scanned. |
| -r range | Specifies the inclusive IP address range that is to be scanned in the format start_IP-end_IP—for example, 192.168.0.100-192.168.0.199. |
| /n IIS | Specifies that IIS checks are to be skipped. The /n options can be added together, such as /n IIS+OS+SQL. |
| /n OS | Specifies that operating system checks are to be skipped. |
| /n password | Specifies that password checks are to be skipped. |
| /n SQL | Specifies that SQL checks are to be skipped. |
| /n hotfix | Specifies that hotfix checks are to be skipped. |
| /e | Lists errors from the latest scan. |
| /l | Lists all reports available for viewing. |
| /ls | Lists all reports from the latest scan. |
| /lr report name | Displays an overview of the specified report name. |
| /ld report name | Displays a detailed version of the specified report name. |
| /qp | Specifies that the progress of the scan is not to be shown. |
| /qe | Specifies that the error list is not to be shown. |
| /qr | Specifies that the report list is not to be shown. |
| /q | Specified that the progress of the scan, the error list, or the report list are not to be shown. |
| /f | Specifies that output is to be redirected to a file. |
| Exam Warning | As with the HFNetChk tool, taking some time to become familiar with the switches that can be used with the command-line version of MBSA could help you on exam day. You might be given one or more answers that will require you to know whether or not a particular switch will achieve the desired result. |
Exercise 3.03 presents the process to perform a single local computer scan with MBSA from the GUI.
Exercise 3.03: Using MBSA to Analyze for Updates from the GUI
-
Download the Microsoft Baseline Security Analyzer from www.microsoft.com/technet/security/tools/Tools/MBSAhome.asp.
-
Double-click the mbasetup.exe installer. Click Next to progress past the first page of the wizard.
-
Accept the license agreement and click Next to continue.
-
Enter the requested information as shown in Figure 3.9 and click Next to continue.
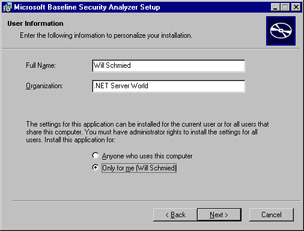
Figure 3.9: Configuring the Installation of MBSA -
On the Destination Folder page, either select a custom installation path or accept the default one and click Next to continue.
-
Choose your installation options from the Choose install options page and click Next to continue.
-
Click Next two more times to start the installation.
-
Click Finish to complete the installation process.
-
Launch the newly installed MBSA tool and select Scan a computer.
-
On the Pick a computer to scan page, configure the computer you want to scan and the scan options you want to use, as shown in Figure 3.10. When you're done, click Start scan.
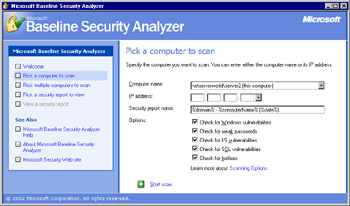
Figure 3.10: Configuring the Local Computer Scan Options -
You will be asked if you want to install the MSSecureXML file from Microsoft. You must have a copy of the XML file in order for MBSA to work. Note that the file is updated regularly as Microsoft posts new fixes and updates, so you might want to update it each time you run MBSA. Click Yes to install the XML file and allow the analysis to continue.
-
After the analysis has been completed, you will receive the results of the scan, as shown in Figure 3.11. It looks as though this server has some serious issues. To examine the specifics of an area, click Result Details. The details of the Windows Hotfixes area is shown in Figure 3.12.
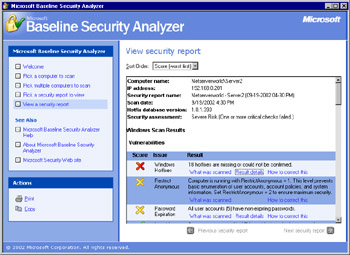
Figure 3.11: The MBSA Results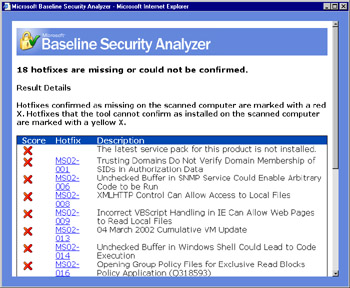
Figure 3.12: Examining Specific Items -
Armed with this knowledge, we can now go about getting and installing the required fixes and patches on our computers. That is the topic of the "Deploying and Managing Updates" section later in this chapter.
As mentioned previously, you can also run the MBSA tool from the command line, as demonstrated in Exercise 3.04. This method can be useful in working with scripts and batch files, although with the fairly powerful GUI mode available to the MBSA, you might find yourself shying away from using it at the command line in most cases.
Exercise 3.04: Using MBSA to Analyze for Updates from the Command Line
-
Open a command prompt and change to the location of the MBSA tool. By default, the tool is located in Program Files\Microsoft Baseline Security Analyzer.
-
Enter the following command to scan all computers in the domain: mbsacli /d domain_name (see Figure 3.13) or simply enter mbsacli to scan only the local machine. Other options are available for scanning, as detailed in Table 3.2. Press Enter after you have entered your scan command.
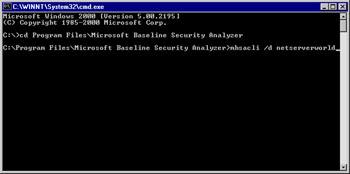
Figure 3.13: Starting an MBSA Scan from the Command Line -
You will be asked if you want to install the MSSecureXML file from Microsoft. You must have a copy of the XML file in order for MBSA to work. Note that the file is updated regularly as Microsoft posts new fixes and updates, so you might want to update it each time you run MBSA. Click Yes to install the XML file and allow the analysis to continue.
-
After the analysis has been completed, you will receive the results of the scan, as shown in Figure 3.14. You can then open the scan output file in the MBSA GUI version and see exactly what has been found, as shown in Figure 3.15.
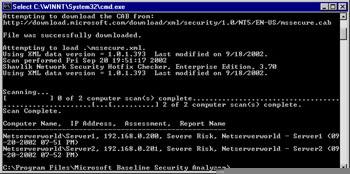
Figure 3.14: MBSA Command-Line Scan Is Complete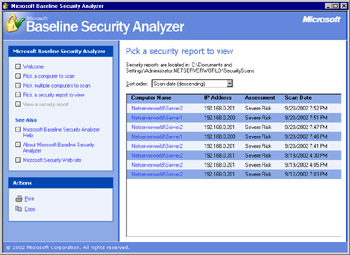
Figure 3.15: Viewing the MBSA Scan Results in the GUI -
Armed with this knowledge, we can now go about getting and installing the required fixes and patches on our computers. That is the topic of the "Deploying and Managing Updates" section later in this chapter.
You're Not Alone
Don't ever think for a moment that you are the only person who is analyzing your computers for missing updates, weaknesses, and vulnerabilities. Nothing could be further from the truth when it comes to computer networks that have active connections to the Internet.
Worms (such as Code Red, Code Red II, and Nimba) and autorooters (applications that actively scan entire blocks of IP addresses looking for any number of vulnerabilities and weaknesses) are constantly scanning the Internet and all accessible private network computers for targets of opportunity. What exactly makes a target of opportunity? It can be that one misconfigured firewall rule, that one vulnerable service, or even that unsecured Windows 9x computer you've got running.
The sad truth is that the odds are greatly in favor of the attacker in this game, because their tools are becoming increasingly simpler and simpler to use while gaining increased power and functionality. A single autorooter might be able to scan dozens of operating systems for thousands of known vulnerabilities across an entire Class B IP block and then automatically attack identified vulnerable systems without any human interaction past clicking Go in the GUI. Targets of opportunity, also known as "easy kills," are sought by the vast majority of attackers, but just the same, you could also find yourself under direct attack from a very skilled attacker looking for a specific vulnerability on a specific operating system.
No matter who is scanning and analyzing your computers, whether a beginner script kiddie or an advanced black hat, you are likely being probed and analyzed for vulnerabilities several times per day. If you think that you are safe just by virtue of the number of systems connected to the Internet, nothing could be further from the truth. If you want to get a very good introduction to who these people are and what they can do to your computers, visit the Honeynet Project at http://project.honeynet.org.
|
|
EAN: 2147483647
Pages: 162