Backing Up the IIS Configuration
|
Backing up the IIS configuration is an important part of any Web administrator’s job. Before you get started, take a moment to learn the key concepts that’ll help you every step of the way.
Understanding IIS Configuration Backups
IIS configuration backups contain metadata that describes the configuration settings used by Web sites and virtual servers. IIS uses the metadata to restore values for all resource properties, including security settings, virtual directory options, application pools, and Web service extensions. IIS also uses this information to maintain the run state of sites and virtual servers. So if you save the IIS configuration and then restore the configuration later, the IIS configuration settings are restored and the IIS resources are returned to their original state (running, paused, stopped, and so on) as well.
I recommend that you create an IIS configuration backup every time you make IIS configuration changes and before you make major changes that affect the availability of resources. Unlike previous versions of IIS, IIS 6.0 provides very granular control over the save and restore configuration feature. You can save configurations for:
-
An entire server
-
A set of related resources, such as all Web sites
-
An individual resource, such as a single File Transfer Protocol (FTP) site
-
An individual directory
Because IIS 6 uses Extensible Markup Language (XML) to format the metabase, all IIS configuration files are saved in XML format. With server, resource, and directory configuration files, you specify the name and save location. The default directory is %SystemRoot%\System32\Inetsrv. Files are saved with the .xml file extension. If you save the configuration of a server, the configuration is saved in the server’s %SystemRoot%\System32\Inetsrv as MetaBase.xml.
IIS configuration backups can help you in many situations. You can:
-
Recover deleted resources References to all site, application pool and virtual server instances running on the server are stored with the configuration backup. If you delete a site, application pool or virtual server, you can restore the necessary resource references.
-
Restore resource properties All configuration settings of sites, application pools and virtual servers are stored in the configuration backup. If you change properties, you can recover the previous IIS settings from backup.
-
Recover Internet Server Application Programming Interface (ISAPI) application configuration ISAPI application settings, including Application Mappings, Application Options, Process Options, and Application Debugging, are stored with the configuration backup. If you change the ISAPI application settings, you can recover the ISAPI application configuration.
-
Recover global service properties Global service properties and other top-level IIS settings are stored in configuration backups. This means you can recover default settings for new Web and FTP sites, bandwidth throttling settings, and Multipurpose Internet Mail Extensions (MIME) type mappings. You can’t, however, recover global properties for Web Service extensions.
-
Rebuild a damaged IIS installation If the IIS installation gets corrupted and you can’t repair it through normal means, you can rebuild the IIS installation. You do this by uninstalling IIS, reinstalling IIS, and then using the configuration backup to restore the IIS settings. See the section of this chapter entitled “Rebuilding Corrupted IIS Installations” for details.
If you were to open a backup file in a text editor, you’d find that it contains metabase keys and paths that are specific to the current server installation. The significance of this is that the metabase keys and paths allow you to restore IIS settings.
Understanding IIS Metabase History
IIS automatically maintains a change history for the metabase. The history feature works in the following manner: When IIS starts up, the MetaBase.xml and MBSchema.xml files are read into memory and each is assigned a unique version number. If the metabase is changed and those changes are saved to disk, the current metabase file’s version number is incremented and a copy of the old file is archived in the metabase history folder. Each archived file is then available for restoring the metabase from history.
Several metabase parameters control the history feature. These include:
-
EnableHistory Specifies whether the history featured is enabled. By default, the history feature is enabled. If you set the parameter to 0, the metabase history feature is disabled.
-
MaxHistoryFiles Specifies the maximum number of metabase history files to maintain. The default maximum is 10.
-
EnableEditWhileRunning Specifies whether the metabase can be updated directly while IIS is running. If you set the parameter to 1, the metabase can be updated directly based on changes to the in-memory metabase.
The Edit-While-Running feature is important because it allows you to quickly write to disk changes that you’ve made to the in-memory MetaBase.xml file. Here, any changes you make to the MetaBase.xml file are generally written to disk 60 seconds after the change is made. If Edit-While-Running isn’t enabled, changes you make to the MetaBase.xml file are written only when the IIS service is stopped or if you use an IIS administrative script or Windows script to make the changes to the MetaBase.xml file.
You can enable Edit-While-Running using the IIS snap-in as well. To do this, follow these steps:
-
In the IIS snap-in, right-click the computer node and then select Properties.
-
In the Server Properties dialog box, select Enable Direct Metabase Edit and then click OK.
Metabase history files are in the %SystemRoot%\System32\Inetsrv\History folder. Because errors and changes to metabase schema are tracked separately from changes to the metabase parameters and values, you’ll find three types of files:
-
Metabase History Metabase_MajorVersion_MinorVersion.xml, such as Metabase_0000000375_0000000000.xml
-
Metabase Schema History MBSchema_MajorVersion_MinorVersion.xml, such as MBSchema_0000000112_0000000000.xml
-
Metabase Error MetabaseError_Version.xml, such as MetabaseError_- 0000000000.xml
Note When you work with the metabase files, it’s important to that you shouldn’t use the Encrypting File System (EFS) to encrypt them. Sensitive values in the metabase are already encrypted, and if you encrypt the metabase files themselves, you’ll slow down IIS unnecessarily.
Creating IIS Configuration Backups
Each IIS server has a configuration that must be backed up to ensure that IIS can be recovered in case of problems. You can create backups at the server, site, or virtual directory level.
At the server level, you create a configuration backup of all sites and virtual servers on the server. To back up the IIS server configuration, follow these steps:
-
In the IIS snap-in, right-click the icon for the computer you want to work with. If the computer isn’t shown, connect to it as discussed in the section entitled “Connecting to Other Servers” in Chapter 2, “Core IIS Administration,” and then right-click it.
-
On the shortcut menu, choose All Tasks and then select Backup/Restore Configuration. This displays the Configuration Backup/Restore dialog box shown in Figure 16-1.
-
Click Create Backup, type a name for your backup file, and then click OK. IIS creates the backup file. By default, this file is stored in the %SystemRoot%\System32\Inetsrv\MetaBack directory.
Tip Do not enter the file extension. Enter the file name only, such as Config05-03-03. IIS will create two files using this name: a metabase schema file with the .SC0 extension and a metabase configuration file with the .MD0 extension, such as Config05-03-03.SCO and Config05- 03-03.MD0 respectively.
-
Click Close.
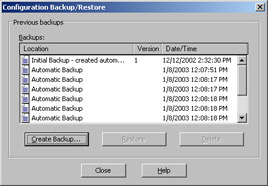
Figure 16-1: Use Configuration Backup/Restore to create, restore, and delete IIS configuration backups.
You can also create configuration backups at the Web sites, FTP sites, and Application Pools level. Here the backup contains configuation settings only for the type of resource you choose. To back up the configuration of sites, application pools or virtual directories, follow these steps:
-
In the IIS snap-in, select the Web Sites, FTP Sites or Application Pools mode (as appropriate for the type of configuration backup you want to create).
-
On the Action menu, choose All Tasks and then select Save Configuration To A File.
-
In the Save Configuration To A File dialog box, select a name for your backup file and then click OK. IIS creates the backup file. By default, this file is stored in the %SystemRoot%\System32\Inetsrv directory.
Restoring IIS Server Configurations
You can restore IIS from backup configuration files. When you do this, the previous property settings and state are restored. Recovering the configuration won’t repair a corrupted IIS installation. To repair a corrupted installation, follow the technique outlined in the section of this chapter entitled “Rebuilding Corrupted IIS Installations.”
Restoring IIS from a backup configuration causes Microsoft Windows Server 2003 to stop and then restart IIS services. Once you’ve notified users that IIS resources will be unavailable for several minutes, you can restore the IIS configuration by completing the following steps:
-
In the IIS snap-in, right-click the node for the computer you want to work with. If the computer isn’t shown, connect to it as discussed in the section entitled “Connecting to Other Servers” in Chapter 2, “Core IIS Administration,” and then right-click it.
-
On the shortcut menu, choose All Tasks and then select Backup/Restore Configuration. This displays the Configuration Backup/Restore dialog box shown previously in Figure 16-1.
-
The Backups panel shows the configuration backups that are available for the computer. The Location field provides the name of the file. The Date/ Time field provides a date/time stamp.
-
Select a backup file and then click Restore. When asked whether to restore your configuration settings, click Yes. When the restore is complete, click Close.
Rebuilding Corrupted IIS Installations
A corrupt IIS installation can cause problems with your IIS sites and virtual servers. Resources might not run. IIS might not respond to commands. IIS might freeze intermittently. To correct these problems, you might need to rebuild the IIS installation. Rebuilding the IIS installation is a lengthy process that requires a complete outage of IIS sites and virtual servers. The outage can last from 5 to 15 minutes or more.
| Caution | IIS configuration backups are machine-specific and instance- specific. You can’t restore a backup of an entire IIS server configuration on other machines, and you can’t restore these configuration settings after reinstalling the operating system. You can however, use configuration backups created at the Web sites, FTP sites, or Application Pools level or below as the basis of new sites or application pools on other servers. To do this, copy the necessary configuration backup file to the desired server and then restore the resource as discussed in this chapter. |
You rebuild a corrupt IIS installation by completing the following steps:
-
Log on locally to the computer on which you want to rebuild IIS. Make sure you use an account with Administrator privileges.
-
Click Start, choose Control Panel and then Add Or Remove Programs. This displays the Add Or Remove Programs dialog box.
-
Start the Windows Components Wizard by clicking Add/Remove Windows Components.
-
In the Components list, select Application Server and then click Details.
Caution Be careful not to clear the check box for Application Server when selecting it, which is easy to do accidentally.
-
In the Sub Components Of Application Server list, clear the Internet Information Services (IIS) check box, click OK, and then click Next. After Setup makes the configuration changes you requested, click Finish. If you have services that are dependent on IIS, such as POP3 or ASP.NET, you will be prompted to remove these services as well. You must remove these services and then reinstall them, as described below.
-
In the Add Or Remove Programs dialog box, click Add/Remove Windows Components. This restarts the Windows Component Wizard.
-
Reinstall IIS by selecting the Application Server check box, clicking Details, and then selecting the Internet Information Services check box. If necessary, click Details and then select IIS subcomponents. You can also reinstall any additional components that you previously had to uninstall by selecting them. For example, if you had to uninstall the POP3 Service, you can reinstall it now by selecting the E-Mail Services checkbox.
-
When you’re ready to continue, click OK, then Next. After Setup reinstalls IIS, click Finish.
-
Click Close to close the Add Or Remove Programs dialog box and then start the IIS snap-in.
-
In the Services snap-in, right-click the local computer entry in the left pane and then select Backup/Restore Configuration.
-
In the Configuration Backup dialog box, select the backup file that contains the correct IIS settings and then click Restore. When asked whether to restore your configuration settings, click Yes. When the restore is complete, click Close.
Restoring Site Configurations
You restore individual sites using the backup of the Web Sites or FTP Sites node. You can also use this feature to create new instances of a site on the current server or another server.
You can restore individual sites by completing the following steps:
-
In the IIS snap-in, right-click the Web Sites or FTP Sites node, choose New, and then select Web Site (From File) or FTP Site (From File). This displays the Import Configuration dialog box shown in Figure 16-2.
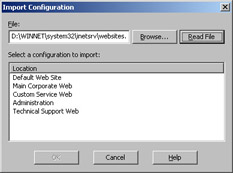
Figure 16-2: Use the Import Configuration dialog box to create and restore sites from backups. -
In the File field, enter the file path to the Web Sites or FTP Sites configuration backup you previously created, or click Browse to search for the backup.
-
Click Read File to display a list of sites that are stored in the configuration backup.
-
Select the site you want to create or restore in the Location list and then click OK.
-
You can now select Create A New Site or Replace The Existing Site. Click OK to complete the operation.
Restoring Virtual Directory Configurations
You restore virtual directories using the backup of the Web Sites or FTP Sites node. You can also use this feature to create new instances of a virtual directory.
You can restore virtual directories by completing the following steps:
-
In the IIS snap-in, right-click the site on which you wish to restore a virtual directory, choose New, and then select Virtual Directory (From File). This displays the Import Configuration dialog box shown previously in Figure 16-2.
-
In the File field, enter the file path to the Web Sites or FTP Sites configuration backup you previously created, or click Browse to search for the backup.
-
Click Read File to display a list of virtual directories that are stored in the configuration backup of the site selected in Step 1.
-
Select the virtual directory you want to create or restore in the Location list and then click OK.
-
You can now select Create A New Virtual Directory or Replace The Existing Virtual Directory. If you choose to create a new virtual directory, you can provide a new name for the directory by entering it in the Alias field.
-
Click OK to complete the operation.
Restoring Application Pool Configurations
You restore application pools using the backup of the Application Pools node. You can also use this feature to create new instances of an application pool.
You can restore application pools by completing the following steps:
-
In the IIS snap-in, right-click Application Pools, choose New, and then select Application Pool (From File). This displays the Import Configuration dialog box shown previously in Figure 16-2.
-
In the File field, enter the file path to the Application Pools configuration backup you previously created, or click Browse to search for the backup.
-
Click Read File to display a list of application pools that are stored in the configuration backup of the site selected in Step 1.
-
Select the application pool you want to create or restore in the Location list and then click OK.
-
You can now select Create A New Application Pool or Replace The Existing Application Pool. If you choose to create a new application pool, you must provide a new name for the application pool by entering it in the Application Pool ID field.
-
Click OK to complete the operation.
Deleting Server Backup Configurations
Over time, you’ll gather quite a collection of IIS configuration backups. If you find that you don’t need old backups anymore, you can delete them using the Configuration Backup dialog box. To do this, complete the following steps:
-
In the IIS snap-in, select the icon for the computer you want to work with. If the computer isn’t shown, connect to it as discussed in the section entitled “Connecting to Other Servers” in Chapter 2, “Core IIS Administration,” and then select it.
-
On the Action menu, select Backup/Restore Configuration.
-
The Backups panel shows the configuration backups that are available for the computer. The Location field provides the name of the file. The Date/ Time field provides a date/time stamp.
-
Select the backup file or files you want to delete and then click the Delete button. When asked whether to delete the files, click Yes.
Caution The backup files are permanently deleted at this point. You can’t recover the files from the Recycle Bin.
|