Configuring Logging for HTTP, SMTP, and FTP
|
Now that you know how log files are used and created, let’s look at how you can enable and configure logging. The following sections examine each of the available logging formats.
Configuring NCSA Common Log File Format
The NCSA common log file format is used with HTTP and SMTP sites only. Use the common log file format when your reporting and tracking needs are basic. With this format, log entries are small, which reduces the amount of storage space required for logging.
You enable logging and configure the common log file format by completing the following steps:
-
Start the IIS snap-in and then, in the left pane (Console Root), click the plus sign (+) next to the computer you want to work with. If the computer isn’t shown, connect to it as discussed in the section entitled “Connecting to Other Servers” in Chapter 2, “Core IIS Administration.”
-
Right-click the HTTP or SMTP site you want to manage and then select Properties.
-
Select Enable Logging to start logging, and then set the Active Log Format to NCSA Common Log File Format.
-
Click Properties to display the NCSA Logging Properties dialog box shown in Figure 14-1.
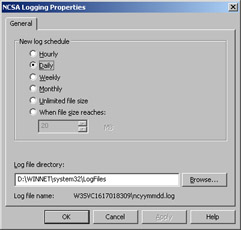
Figure 14-1: Use the common log format when you have basic logging requirements. -
In the New Log Schedule frame, select one of the following time period options:
-
Hourly IIS creates a new log each hour.
-
Daily IIS creates a new log daily at midnight.
-
Weekly IIS creates a new log file each Saturday at midnight.
-
Monthly IIS creates a new log file at midnight on the last day of the month.
-
Unlimited File Size IIS doesn’t end the log file automatically. You must manage the log file.
-
When File Size Reaches If you select this option, you must set a maximum log file size in megabytes. When the log file reaches this size, a new log file is created.
-
-
By default, log files are located in a subdirectory under \%WinDir%\ System32\Logfiles. If you want to change the default logging directory, type the directory path in the Log File Directory field or click Browse to look for a directory that you want to use.
-
Click OK twice. The service directory and log file are created automatically, if necessary. If IIS doesn’t have Read/Write permission on the logging directory, an error is generated.
Configuring Microsoft IIS Log File Format
You can use the Microsoft IIS log file format with HTTP, SMTP, and FTP sites. Use the IIS format when you need a bit more information from the logs but don’t need to tailor the entries to get detailed information. With this format, log entries are compact, and this reduces the amount of storage space required for logging.
You enable logging and configure the IIS log file format by completing the following steps:
-
Start the IIS snap-in and then, in the left pane (Console Root), click the plus sign (+) next to the computer you want to work with. If the computer isn’t shown, connect to it as discussed in the “Connecting to Other Servers” section of Chapter 2.
-
Right-click the HTTP, FTP, or SMTP site you want to manage and then select Properties.
-
Select Enable Logging to start logging, and then set the Active Log Format to Microsoft IIS Log File Format.
-
Click Properties to display the Microsoft Logging Properties dialog box shown in Figure 14-2.
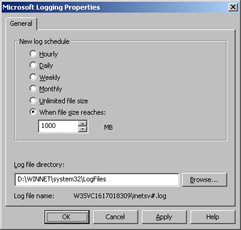
Figure 14-2: Use the IIS log format when you have additional logging requirements but don’t need to customize settings. -
In the New Log Schedule frame, select one of the following time period options:
-
Hourly IIS creates a new log each hour.
-
Daily IIS creates a new log daily at midnight.
-
Weekly IIS creates a new log file each Saturday at midnight.
-
Monthly IIS creates a new log file at midnight on the last day of the month.
-
Unlimited File Size IIS doesn’t end the log file automatically. You must manage the log file.
-
When File Size Reaches If you select this option, you must set a maximum log file size in megabytes. When the log file reaches this size, a new log file is created.
-
-
By default, log files are located in a subdirectory under \%WinDir%\ System32\Logfiles. If you want to change the default logging directory, type the directory path in the Log File Directory field or click Browse to look for the directory that you want to use.
-
Click OK twice. The service directory and log file are created automatically, if necessary. If IIS doesn’t have Read/Write permission on the logging directory, an error might be generated.
Configuring W3C Extended Log File Format
You can use the W3C extended log file format with HTTP, FTP, and SMTP sites. Use the extended format when you need to customize the information tracked and obtain detailed information. With this format, log entries can become large, which greatly increases the amount of storage space required. Recording lengthy entries can affect the performance of a busy server as well.
You enable logging and configure the W3C extended log file format by completing the following steps:
-
Start the IIS snap-in and then, in the left pane (Console Root), click the plus sign (+) next to the computer you want to work with. If the computer isn’t shown, connect to it as discussed in the “Connecting to Other Servers” section of Chapter 2.
-
Right-click the HTTP, FTP, or SMTP site you want to manage and then select Properties.
-
Select Enable Logging to start logging, and then set the Active Log Format to W3C Extended Log File Format.
-
Click Properties to display the Logging Properties dialog box shown in Figure 14-3.
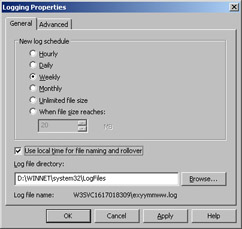
Figure 14-3: Use the extended log file format when you need to customize the logging process. -
In the New Log Schedule frame, select one of the following time period options:
-
Hourly IIS creates a new log each hour.
-
Daily IIS creates a new log daily at midnight.
-
Weekly IIS creates a new log file each Saturday at midnight.
-
Monthly IIS creates a new log file at midnight on the last day of the month.
-
Unlimited File Size IIS doesn’t end the log file automatically. You must manage the log file.
-
When File Size Reaches If you select this option, you must set a maximum log file size in megabytes. When the log file reaches this size, a new log file is created.
-
-
By default, the extended format uses GMT to determine when to create new log files. This means daily, weekly, and monthly logs are generated at midnight GMT unless you specify otherwise. To use local time for determining when to create new logs, select Use Local Time For File Naming And Rollover.
-
By default, log files are located in a subdirectory under \%WinDir%\ System32\Logfiles. If you want to change the default logging directory, type the directory path in the Log File Directory field, or click Browse to look for a directory that you want to use.
-
Select the Advanced Properties tab and then select the properties that you want to log. The fields you’ll want to track in most cases are
-
Date
-
Time
-
Client IP Address
-
Server IP Address
-
Method
-
URI Stem
-
URI Query
-
Protocol Status
-
Protocol Substatus
-
Bytes Sent
-
Bytes Received
-
User Agent
-
Cookie
-
Referrer
Note The more fields you track, the larger the log entries.
-
-
Click OK twice. The service directory and log file are created automatically, if necessary. If IIS doesn’t have Read/Write permission on the logging directory, an error might be generated.
Configuring ODBC Logging
You can configure ODBC Logging for HTTP, FTP, and SMTP sites. Use the ODBC format when you want to write access information directly to an ODBC- compliant database. With ODBC logging, you’ll need tracking software capable of reading from a database. Entries are compact, however, and data can be read much more quickly than from a standard log file.
To use ODBC logging, perform the following tasks:
-
Create a database using ODBC-compliant database software. As long as IIS can connect to the database using an ODBC connection, the database doesn’t have to reside on the IIS server. Access can be used for small to medium-sized sites with moderate traffic. For large or busy sites, use a more robust solution, such as SQL Server 2000.
-
Within the database, create a table for logging access entries. This table must have the field names and data types listed in Table 14-8. You can use the Logtemp.sql script to create this table.
-
Create a DSN that IIS can use to connect to the database. You’ll probably want to use a system DSN to establish the database connection. With SQL Server, you must specify the technique that should be used to verify the authenticity of the logon identification (ID). With Microsoft Windows NT authentication, the account you specify when configuring IIS must have permission to write to the database. With SQL Server authentication, you can specify a SQL Server logon ID and password to use.
-
Complete the process by enabling logging for the site and setting the active log format to ODBC logging. When you configure logging, you’ll need to specify the DSN name, the table name, and the logon information.
The following sections describe how you can use SQL Server 2000 and IIS to configure ODBC logging. These sections assume that you have a fair amount of knowledge of SQL Server 2000 and database administration. If you need more assistance, refer to the Microsoft SQL Server 2000 Administrator’s Pocket Consultant.
Creating a Logging Database and Table in SQL Server 2000
You can use SQL Server 2000 as your logging server. To do this, you must create a database and configure a logging table. To create a database, complete the following steps:
-
Start Enterprise Manager and then, in the left pane (Console Root), click the plus sign (+) next to Microsoft SQL Servers, and then the one next to the server group you want to work with.
-
Click the plus sign (+) next to the server you want to work with again, and then, if necessary, authenticate yourself, establish a connection, or both.
-
Right-click the Databases folder and then select New Database from the shortcut menu. This opens the Database Properties dialog box.
-
Select the General tab and type LoggingDB as the database name in the Name field.
-
Click OK, and SQL Server creates the database.
Next, locate the Logtemp.sql script, which is located in the \%WinDir%\ System32\Inetsrv directory on the IIS server. Edit the script so that it sets the table name you want to use for the site’s log entries. For example, if you wanted to name the table HTTPLog, you’d update the script as shown in the following listing:
use LoggingDB create table HTTPLog ( ClientHost varchar(255), username varchar(255), LogTime datetime, service varchar(255), machine varchar(255), serverip varchar(50), processingtime int, bytesrecvd int, bytessent int, servicestatus int, win32status int, operation varchar(255), target varchar(255), parameters varchar(255))
After you update the script, start Query Analyzer. In Query Analyzer you can access scripts by clicking the Load SQL Script button on the toolbar and then entering the script’s location. Run the script by clicking Execute Query. When the script completes, a new table should be created in the LoggingDB database. If necessary, make sure you connect to the SQL server using an account with database administrator privileges.
Creating a DSN for SQL Server 2000
Once you create the logging database and the input table, you can configure IIS to connect to the database. IIS connects to the database using a DSN. You must create the DSN on the IIS server. To do this, complete the following steps:
-
Start Data Sources (ODBC) from the Administrative Tools menu.
-
On the System DSN tab, click Add. This displays the Create New Data Source dialog box.
-
Select SQL Server on the Driver selection list and then click Finish. As shown in Figure 14-4 on the following page, you should now see the Create A New Data Source To SQL Server dialog box.
-
In the Name field, type the name of the DSN, such as IISDB.
-
In the Description field, type a descriptive name for the DSN.
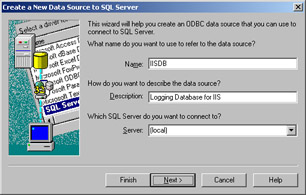
Figure 14-4: Use the Create A New Data Source To SQL Server dialog box to configure the data source. -
In the Server field, type the name of the SQL Server to which you want to connect, or select (Local) if SQL Server is running on the same hardware as IIS. Click Next.
-
As shown in Figure 14-5, specify the technique that should be used to verify the logon ID’s authenticity. If you use Windows NT authentication, the account you specify when configuring IIS must have permission to write to the logging database. If you use SQL Server authentication, you can specify a SQL Server logon ID and password to use.
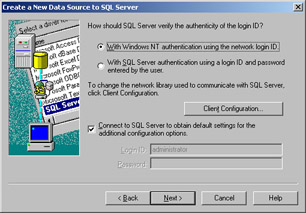
Figure 14-5: Set the authentication method for the DSN connection. -
Click Next, and then select the Change The Default Database To check box. From the enabled drop-down list, select the database you created using the Logtemp.sql script.
-
Click Finish to complete the process. If Windows is unable to establish a connection to the database, you might need to recheck the information you’ve entered to ensure that it’s correct. You also might need to confirm that the account you’re using has the appropriate permissions in the database.
Enabling and Configuring ODBC Logging in IIS
To complete the configuration process, you must enable and configure ODBC logging in IIS. Complete the following steps:
-
Start the IIS snap-in and then, in the left pane (Console Root), click the plus sign (+) next to the computer you want to work with. If the computer isn’t shown, connect to it as discussed in the “Connecting to Other Servers” section of Chapter 2.
-
Right-click the HTTP, FTP, or SMTP site you want to manage and then select Properties.
-
Select Enable Logging to start logging and then set the Active Log Format to ODBC Logging.
-
Click Properties to display the ODBC Logging Properties dialog box shown in Figure 14-6.
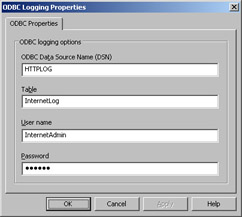
Figure 14-6: Use ODBC logging when you need to write to a database. -
Type the name of the DSN in the ODBC Data Source Name (DSN) field. The DSN name must be exactly as you defined it.
-
Type the name of the logging table in the Table field.
-
If you’re using Windows authentication, set the User Name and Password fields to the appropriate values for the account you want to use to log on to the database.
-
Click OK. If prompted, confirm the password you just entered, click OK, and then click OK again to save your settings.
Configuring Centralized Binary Logging
Before you implement centralized binary logging, you should consider many issues, including how using this format will affect the server and what tools you’ll use to read the raw binary logs. After planning, you should set up a test installation and determine if it’s feasible to switch to centralized binary logging and obtain the information your organization needs from the raw binary log files. You should enable binary logging only when you’re certain that this format will work for you.
When you’re ready to implement centralized binary logging, complete the following steps:
-
Start a command prompt, navigate to the %SystemDrive%\InetPub\AdminScripts folder, and then type the following command:
cscript adsutil.vbs SET W3SVC/CentralBinaryLoggingEnabled 1
-
If you typed the command correctly, you should see the following:
CentralBinaryLoggingEnabled : (BOOLEAN) True
-
Now you need to stop and then start the WWW Service, so type the following at the command prompt:
net stop w3svc net start w3svc
-
The first time a site on the Web server is accessed, a raw binary log is created in the %WinDir%\System32\LogFiles\W3SVC directory.
If you decide that you no longer want to use centralized binary logging, you can disable this feature by typing the previous command, replacing the “1” with a “0,” as follows:
cscript adsutil.vbs SET W3SVC/CentralBinaryLoggingEnabled 0
This will produce the following text:
CentralBinaryLoggingEnabled : (BOOLEAN) False
Disabling Logging
If you don’t plan to generate reports from access logs for a particular site, you might not want to log user access to the site. In this case you can disable logging for the site by completing the following steps:
-
Start the IIS snap-in and then, in the left pane (Console Root), click the plus sign (+) next to the computer you want to work with. If the computer isn’t shown, connect to it as discussed in the “Connecting to Other Servers” section of Chapter 2.
-
Right-click the HTTP, FTP, or SMTP site you want to manage, and then select Properties.
-
Clear Enable Logging and then click OK.
|