Securing Outgoing Connections
|
As with incoming connections, you can control outgoing connections to external SMTP virtual servers in several ways. You can do the following:
-
Require authentication for outgoing connections
-
Restrict concurrent connections and set connection time-out values
-
Configure message limits
-
Handle non-delivery, bad mail, and unresolved recipients
-
Set relay restrictions for message delivery
Each of these tasks is discussed in the following sections.
Configuring Outbound Security
By default, SMTP virtual servers deliver messages to other servers without authenticating themselves. This mode of authentication is referred to as anonymous. You can also configure SMTP virtual servers to use basic authentication or integrated Windows authentication. However, you’ll rarely use an authentication method other than anonymous with SMTP virtual servers.
One time when you’ll use basic authentication or integrated Windows authentication with outgoing connections is if the SMTP virtual server must deliver all e-mail to a specific server or e-mail address in another domain. In other words, the server delivers mail to only one destination and doesn’t deliver mail to other destinations. If you need to configure authentication for e-mail delivered to a particular server and need to deliver mail to other servers, you should configure a remote service domain to send mail to that specific server and use anonymous authentication for all other mail.
To view or change the outbound security settings for an SMTP virtual server, complete the following steps:
-
In the IIS snap-in, right-click the SMTP virtual server that you want to work with and then select Properties.
-
In the Delivery tab, click Outbound Security. To use standard delivery for outgoing messages, select Anonymous Access.
-
To set basic authentication for outgoing messages, select Basic Authentication and then, in the User Name and Password fields, type the user name and password that are required to connect to the remote server.
-
To set Windows authentication for outgoing messages, select Integrated Windows Authentication and then, under Account and Password, type the Windows account name and password that are required to connect to the remote server.
-
When you require authentication, you can also require encryption. To do this, select TLS Encryption.
Note When you select TLS encryption, the destination servers must support smart cards or X.509 certificates. If the servers don’t, all messages sent to noncompliant servers are returned with a non- delivery report.
-
Click OK and then click OK again to save your settings.
Controlling Outgoing Connections
With SMTP virtual servers, you have much more control over outgoing connections than you do over incoming connections. You can limit the number of simultaneous connections and the number of connections per domain. These limits set the maximum number of simultaneous outbound connections. By default, the total number of connections is limited to 1000, and the total number of connections per domain is limited to 100. To improve performance, you should optimize these values based on the capacity of your Web server.
You can set a connection time-out that determines when idle connections are disconnected. Normally, outbound connections time out after they’ve been idle for 10 minutes. Sometimes you’ll want to increase the time-out value, and this primarily relates to times when you’re experiencing connectivity problems and messages aren’t getting delivered.
You can also map outbound SMTP connections to a Transmission Control Protocol (TCP) port other than port 25. If you’re connecting through a firewall or proxy, you might want to map outgoing connections to a different port and then let the firewall or proxy deliver the mail over the standard SMTP port (port 25).
You set outgoing connection controls by completing the following steps:
-
In the IIS snap-in, right-click the SMTP virtual server that you want to work with and then select Properties.
-
On the Delivery tab, click Outbound Connections. This displays the Outbound Connections dialog box shown in Figure 11-4.
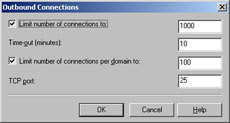
Figure 11-4: As with incoming connections, limits and time-outs on outbound connections can help reduce server load and resolve connection problems. -
To remove outgoing connection limits, clear Limit Number Of Connections To. To set an outgoing connection limit, select Limit Number Of Connections To and then type the limit value.
-
The Time-Out field controls the connection time-out. Type the new time-out value in minutes. In most cases you’ll want to use a time-out value between 10 minutes and 30 minutes.
-
To set an outgoing connection limit per domain, select Limit Number Of Connections Per Domain To and then type the limit value. You can remove the per domain limit by clearing Limit Number Of Connections Per Domain To.
-
To map outgoing connections to a different port, type the outbound port that the firewall or proxy expects in the TCP Port field.
-
Click OK and then click OK again to save your settings.
Configuring Outgoing Message Limits for SMTP
You can use outgoing message limits to control SMTP usage and to improve throughput for message delivery. You can set the maximum allowable message size for incoming messages. Clients attempting to send messages larger than this size get a non-delivery report that states that the message exceeds this limit. The default limit is 2048 KB (2 MB).
You can set the maximum size of all messages that can be sent in a single connection. The session limit should always be set so that it’s several times larger than the message size limit. The default limit is 10,240 KB (10 MB). Clients attempting to send multiple messages in sessions whose total size exceeds this limit receive a non-delivery report stating that the maximum session size has been exceeded.
You can control the number of messages that can be sent in a single connection. When the number of messages exceeds this value, the SMTP service starts a new connection and transfer continues until all messages are delivered. Optimizing this value for your environment can improve server performance, especially if users typically send large numbers of messages to the same external domains. The default is 20. So, if you had 50 messages queued for delivery to the same destination server, the SMTP service would open three connections and use these connections to deliver the mail. Because message delivery would take less time if you optimize the number of connections, you can considerably enhance the SMTP service’s performance.
You can also control the number of recipients for a single message. When the number of recipients exceeds this value, the SMTP service opens a new connection and uses this connection to process the remaining recipients. The default is 100. Using the 100-recipient limit, a message queued for delivery to 300 recipients would be sent over three connections. Again, because message delivery would take less time if you optimize the number of connections, you can considerably enhance the SMTP service’s performance.
You set outgoing connection controls by completing the following steps:
-
In the IIS snap-in, right-click the SMTP virtual server that you want to work with and then select Properties.
-
Select the Messages tab, as shown in Figure 11-5.
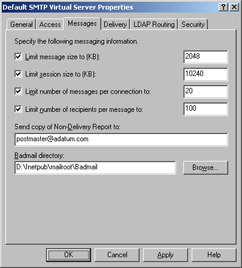
Figure 11-5: You can use messaging limits to control SMTP usage and to improve performance. -
Use the message size limit to strictly control the maximum message size. To disable this limit, clear Limit Message Size To. Otherwise, select the Limit Message Size To check box and use the related field to set a message size limit.
-
Use session limits to strictly control the maximum size of all messages that can be sent in a single session. To disable this limit, clear Limit Session Size To. Otherwise, select the Limit Session Size To check box and use the related field to set a session size limit.
-
Use the messages per connection limit to force the SMTP service to open new connections when messages queued for delivery to the same destination exceed the messages per connection limit. To disable this limit, clear Limit Number Of Messages Per Connection To. Otherwise, select the Limit Number Of Messages Per Connection To check box and use the related field to set a limit.
-
Use recipient limits to force the SMTP service to open new connections when the number of messages addressed to multiple recipients exceeds the recipients-per-connection limit. To disable this limit, clear Limit Number Of Recipients Per Message To. Otherwise, select the Limit Number Of Recipients Per Message To check box and use the related field to set a limit.
-
Click OK.
Handling Non-Delivery, Bad Mail, and Unresolved Recipients
When a message is undeliverable or a fatal error occurs during delivery, the SMTP service generates a non-delivery report that it attempts to deliver to the sender. SMTP virtual server options provide several ways to handle non-delivery.
For tracking purposes, you can send a copy of all non-delivery reports to a specific e-mail address. The e-mail address specified is also placed in the non-delivery report’s Reply To field. This allows users to respond to the error message and potentially reach someone who can help resolve the problem.
If a non-delivery report can’t be delivered to the sender, a copy of the original message is placed in the Badmail folder. Messages placed in the Badmail folder can’t be delivered or returned. You can use the Badmail folder to track potential abuse of your messaging system. By default, the Badmail folder is located at Inetpub\Mailroot\Badmail. You can change the Badmail folder’s location at any time, as long as you use a local drive.
You can configure these non-delivery options by completing the following steps:
-
In the IIS snap-in, right-click the SMTP virtual server that you want to work with and then select Properties.
-
Select the Messages tab, as shown previously in Figure 11-5.
-
In the Send Copy Of Non-Delivery Report To field, type the e-mail address of the organization’s postmaster account or other account that should receive a copy of non-delivery reports.
-
In the Badmail Directory field, type the full path to the directory in which you want to store bad mail. If you don’t know the full path, click Browse, and then use the Browse For Folder dialog box to find the folder you want to use.
-
Click OK.
Setting and Removing Relay Restrictions
Mail relaying can occur when users outside the organization use your mail system to send messages bound for another organization. The SMTP service normally prevents unauthorized users and computers from relaying mail through your organization—and you typically should use this setting. In this way only users and computers that are able to authenticate themselves can use your mail system to relay messages.
If necessary, you can grant or deny relaying permissions to specific computers, networks, and domains, overriding the default configuration. To do this, follow these steps:
-
In the IIS snap-in, right-click the SMTP virtual server that you want to work with and then select Properties.
-
Select the Access tab and then click Relay. You should now see the Relay Restrictions dialog box shown in Figure 11-6.

Figure 11-6: If necessary, you can grant or deny computers, groups of computers, or domains the right to relay mail through your organization. -
To grant relay rights to specific computers and deny relay rights to all others, click Only The List Below.
-
To deny relaying for specific computers and grant all others the right to relay, click All Except The List Below.
-
Create the Access list. Click Add and then, in the Computer dialog box, specify Single Computer, Group Of Computers, or Domain. When you have specified the computer or group, click OK.
-
With a single computer, enter the IP address for the computer, such as 192.168.5.50.
-
With a group of computers, enter the subnet address, such as 192.168.5.0, and the subnet mask, such as 255.255.255.0.
-
With a domain name, enter the FQDN, such as eng.domain.com.
Caution When you grant or deny relaying by domain, the SMTP service must perform a reverse DNS lookup on each connection to determine if the connection comes from the domain. These reverse lookups can severely affect the performance of the SMTP service, and this performance impact increases as the number of concurrent users and connections increases.
-
-
If you want to remove an entry from the Access list, select the entry in the Computers list and then click Remove.
-
By default, any computer that can authenticate itself is permitted to relay messages through the SMTP virtual server. To change this behavior and strictly control relaying using the authorization list, clear the Allow All Computers Which Successfully Authenticate To Relay, Regardless Of The List Above option.
-
Click OK, and then click OK again to save your settings.
|