Managing Message Delivery
|
SMTP delivery options determine how mail is delivered once a connection has been established and the receiving computer has acknowledged that it’s ready to receive the data transfer. This section shows you how to use the configuration options that determine how message delivery and transfer occur.
You can set the following options to control message delivery:
-
Outbound retry intervals
-
Outbound and local delay notification
-
Outbound and local expiration time-out values
-
Message hop count
-
Domain name options
-
Reverse DNS lookups
-
External DNS server lists
Setting Outbound Retry Intervals, Delay Notification, and Expiration Time-Out
Once a connection has been established and the receiving computer has acknowledged that it’s ready to receive the data transfer, the SMTP service attempts to deliver messages queued for delivery to the computer. If a message can’t be delivered on the first attempt, the SMTP service tries to send the message again after a specified time. The SMTP service keeps trying to send the message at the intervals you’ve specified until the expiration time-out is reached. When the time limit is reached, the message is returned to the sender with a non-delivery report. The default expiration time-out value is two days.
After each failed attempt to deliver a message, a delay notification is generated and queued for delivery to the user who sent the message. Notification doesn’t occur immediately after failure. Instead, the delay notification message is sent only after the notification delay interval, and then only if the message hasn’t been delivered already. The default delay notification value is 12 hours.
The SMTP service handles delay notification and expiration time-out values differently, depending on whether the message originated within the organization or outside the organization. Messages that originate within the organization are handled using the local delay notification and expiration time-out values. Messages that originate outside the organization are handled using the outbound delay notification and expiration time-out values. By default, both the local and outbound delay notification and expiration time-outs are set to the same values.
You can view or change the retry interval, delay notification, and expiration time-out values by completing the following steps:
-
In the IIS snap-in, right-click the SMTP virtual server that you want to work with and then select Properties.
-
Select the Delivery tab as shown in Figure 11-7, and then use the following options to set the retry values:
-
First Retry Interval Sets the amount of time to wait after the first delivery attempt. The default is 15 minutes.
-
Second Retry Interval Sets the amount of time to wait after the second delivery attempt. The default is 30 minutes.
-
Third Retry Interval Sets the amount of time to wait after the third delivery attempt. The default is 60 minutes.
-
Subsequent Retry Interval Sets the amount of time to wait after the fourth and subsequent delivery attempts. The default is 240 minutes.
-
-
With the Delivery tab still selected, you can set the outbound delay notification and expiration time-out values using the Delay Notification and Expiration Timeout fields in the Outbound frame. These values can be set in minutes, hours, or days, and they apply to messages addressed to remote domains and other external locations.
-
Set the local delay notification and expiration time-out values using the Delay Notification and Expiration Timeout fields in the Local frame. These values can be set in minutes, hours, or days, and they apply to messages addressed to local and alias service domains.
-
Click OK.
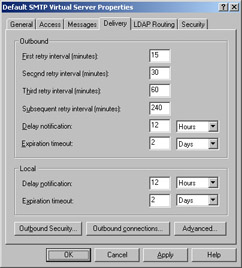
Figure 11-7: Use the options in the Delivery tab to control message delivery in the organization.
Setting Message Hop Count
Messages can be routed through many different servers before reaching their final destination. The number of servers a message passes through is called the hop count. As an administrator, you can control the maximum allowable hop count, and you’ll usually want to do this to prevent a message from being misrouted repeatedly.
The default maximum hop count is 15, which works well for most network configurations. However, if users frequently get non-delivery reports that state that the maximum hop count was reached and the message wasn’t delivered, you might want to consider increasing the maximum allowable hop count. The number of Received: lines in the message header determines the total hops.
| Caution | Don’t automatically increase the hop count without first examining the SMTP routing on your network. Non-delivery reports due to the hop count can also indicate SMTP routing problems. |
You can view or set the maximum hop count by completing the following steps:
-
In the IIS snap-in, right-click the SMTP virtual server that you want to work with and then select Properties.
-
In the Delivery tab, click Advanced. This displays the Advanced Delivery dialog box.
-
If you want to change the hop count, type a new value in the Maximum Hop Count field. Valid values are between 10 and 256.
-
Click OK and then click OK again to save your settings.
Setting Domain Name Options
Domain names play an important role in determining how mail is delivered, and you have two options for configuring domain name usage. You can set a masquerade domain, and you can set a FQDN for the SMTP virtual server.
A masquerade domain replaces the local domain name in any Mail From: lines in the message header. Mail From information is used to determine the address for sending non-delivery reports and doesn’t replace the From: lines in the message body that are displayed to mail clients. The name replacement occurs only on the first hop.
The virtual server’s FQDN is used in mail delivery. The server must have an FQDN, and this FQDN is associated with an e-mail domain through a DNS mail exchanger (MX) record. You have two options for specifying an FQDN:
-
You can use the name specified in the Computer Name tab of the System Properties dialog box.
-
You can specify a unique FQDN for the SMTP virtual server you’re configuring.
The name in the Computer Name tab is used automatically. If you change the name in this tab, the new name is used the next time the computer is rebooted. No action is required to update the FQDN for the virtual server. However, if you want to override the setting in the Computer Name tab, you can do so by specifying a unique FQDN for the SMTP virtual server.
You can set the masquerade domain name or override the default FQDN by completing the following steps:
-
In the IIS snap-in, right-click the SMTP virtual server that you want to work with and then select Properties.
-
On the Delivery tab, click Advanced. This displays the Advanced Delivery dialog box shown in Figure 11-8.
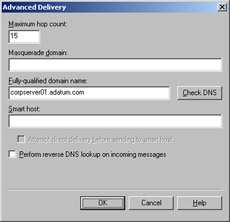
Figure 11-8: Domain name options play an important role in determining how mail is delivered. -
In the Masquerade Domain field, type the domain name where you’d like non-delivery reports to be sent. This will replace the default domain name in outgoing message headers.
-
If you want to override the default FQDN, type a new value in the Fully- Qualified Domain Name field. Click Check DNS to ensure that you’ve entered the correct value and that DNS resolution is configured properly.
-
Click OK and then click OK again to save your settings.
Configuring Reverse DNS Lookups
With reverse lookups enabled, the SMTP service attempts to verify that the mail client’s IP address matches the host and domain submitted by the client in the start session command. If the IP and DNS information match, the SMTP service passes the message through without modifying its contents. If the IP and DNS information can’t be verified, the SMTP service modifies the message header so that the key word “unverified” is inserted into the message header’s Received: line.
As stated previously, reverse lookups can severely affect the performance of the SMTP service, and this performance impact increases as the number of concurrent users and connections increases. Because of this, you’ll want to be very cautious of enabling reverse lookups.
To enable reverse DNS lookups, complete the following steps:
-
In the IIS snap-in, right-click the SMTP virtual server that you want to work with and then select Properties.
-
In the Delivery tab, click Advanced. This displays the Advanced Delivery dialog box shown previously in Figure 11-8.
-
To enable reverse lookups, select Perform Reverse DNS Lookup On Incoming Messages. Clear this option to disable reverse lookups.
-
Click OK and then click OK again to save your settings.
Routing Outgoing Messages to Smart Hosts
You can route all outgoing messages through a smart host instead of sending them directly to the destination domain. This allows you to route messages to a specific server that can relay or deliver the messages. The goal is to route messages over a connection that might be more direct or less costly than the standard route.
You can add or remove a smart host for a remote domain by completing the following steps:
-
In the IIS snap-in, right-click the SMTP virtual server that you want to work with, and then select Properties.
-
In the Delivery tab, click Advanced. This displays the Advanced Delivery dialog box shown previously in Figure 11-8.
-
To add a smart host, type the IP address or DNS name of the smart host in the Smart Host field. If you want the SMTP service to attempt direct delivery before using the smart host, select Attempt Direct Delivery Before Sending To Smart Host.
Tip If you use an IP address to identify a smart host, enclose the IP address in brackets [ ] to prevent the SMTP service from attempting to perform a DNS lookup on the address. also that smart host settings for remote domains override smart host settings configured for the SMTP virtual server itself.
-
To remove a smart host, delete the contents of the Smart Host field.
-
Click OK and then click OK again to save your settings.
|