More Tips for Enhancing Web Server Security
|
Your Web server is only as secure as you make it. To improve your server’s security, read the additional tips provided here and apply the ones that make sense for your server environment.
Using Firewalls
Maintaining your Web server’s security is an ongoing task that requires continual vigilance. To shield your Web servers from attacks, you need a firewall, such as the Microsoft Internet Security and Acceleration (ISA) Server or a hardware- based firewall solution. When you install a firewall, close all ports that you aren’t using and open only ports that are needed.
The ports you’ll want to open depend on the types of IIS resources you’re using. FTP uses ports 20 and 21. SMTP uses port 25 and might require port 53 for DNS resolution. HTTP uses ports 80 and 443. NNTP uses ports 119 and 563.
Renaming the Administrator Account
The Administrator account is a known account that has extensive privileges on your Web server. Malicious users often target this account in an attempt to take control of the server. You can deter malicious users by changing the name of this account. Simply select a new name for the account and then rename it using either Active Directory Users and Computers or the Computer Management console, depending on your environment. You might want to tell other administrators in your company the new name for the administrator account.
Disabling the Default Web Site
In IIS 6, the default Web site normally doesn’t have the open security issues that were in previous versions and caused most administrators to delete the default site and create a new one. Here, the default site is installed with good security precautions in mind. As a result, you probably don’t need to delete the default Web site as you would with previous IIS installations.
If you want, however, you can still disable the default site. To do this, follow these steps:
-
In the IIS snap-in, right-click the default Web site, and then select Stop.
-
Exit the IIS snap-in to save this configuration state.
-
From now on, the default Web site should be stopped when you or other administrators access the IIS snap-in.
Note You can also delete the default Web site to prevent its use in the future.
Disabling Remote Administration from the Web
As you know from previous discussions, Web sites can be managed remotely through a browser. Administrators connect to IIS through the Administration Web site. If you want to tightly control access to your server, you should disable remote administration from the Web and allow access to the server only through the IIS snap-in.
To disable remote administration from the Web, you should do the following:
-
In the IIS snap-in, right-click the Administration Web site and then select Stop.
-
Exit the IIS snap-in to save this configuration state.
-
From now on, the Administration site should be stopped when you or other administrators access the IIS snap-in.
Disabling Directory Browsing
Directory browsing allows users to see the contents of directories. Most users don’t need to see directory contents, so you should disable directory browsing globally. To do this, clear this Web server permission in the Web Sites Properties dialog box.
Creating Legal Notices
Every user who logs on to the Web server locally or through a telnet session should see a legal notice that tells the user that this is a private computer system and its use is restricted to authorized personnel only. Legal notices have a caption and message text. You set the caption using the Registry key:
HKEY_LOCAL_MACHINE \Software \Microsoft \Windows \CurrentVersion \Policies \System \LegalNoticeCaption
You set the message text using the Registry key:
HKEY_LOCAL_MACHINE \Software \Microsoft \Windows \CurrentVersion \Policies \System \LegalNoticeText
You can modify both keys using the Registry Editor, a Windows script, or configured local or domain policies. You might want to use text, as in the following example:
This is a private system. Use of this system is restricted to authorized personnel only. Violators will be prosecuted!
Applying Service Packs, Hot Fixes, and Templates
Microsoft regularly provides service packs and hot fixes for the Windows operating system. To maintain the server’s security, you should apply the service packs and hot fixes to production servers as soon as you’ve had a chance to review and test these updates on similarly configured test servers.
Microsoft also publishes security templates that you can apply to your Web servers. Security templates are available in all Windows Server 2003 installations. You can preview existing templates and create your own templates using the Security Templates snap-in. You apply a template and analyze its security constraints using the Security Configuration And Analysis snap-in. You can access these snap-ins by completing the following steps:
-
Open the Run dialog box by clicking Start and then clicking Run.
-
Type MMC in the Open field and then click OK. This opens the Microsoft Management Console (MMC).
-
In MMC, click File and then click Add/Remove Snap-In. This opens the Add/ Remove Snap-In dialog box.
-
On the Standalone tab, click Add.
-
In the Add Standalone Snap-In dialog box, click Security Templates and then click Add.
-
Click Security Configuration And Analysis and then click Add.
-
Close the Add Standalone Snap-In dialog box by clicking Close and then click OK.
The security templates that you’ll want to use are securews and hisecws. Securews is a template for Web servers that need strong security. Hisecws is a template for Web servers that need very strong security. As shown in Figure 7-13, these templates configure security for the following:
-
Password, account lockout, and Kerberos policies
-
Auditing, user rights assignment, and security options policies
-
Event logs, system services, and file system permissions
-
Registry keys for the local machine and the current user
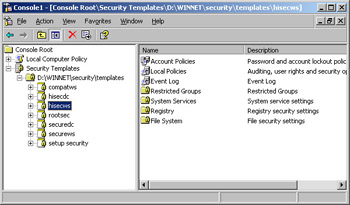
Figure 7-13: Use the Security Templates snap-in to access existing security templates and to create new ones.
After you select the template that you want to use, you should go through each setting that the template will apply and evaluate how the setting will affect your environment. If a setting doesn’t make sense, you should modify or delete it as appropriate. When you’re ready to configure and analyze the settings, complete the following steps:
-
Access the Security Configuration And Analysis snap-in in an MMC.
-
Right-click the Security Configuration And Analysis node and then select Open Database. This displays the Open Database dialog box.
-
Type a new database name in the File Name field and then click Open.
-
The Import Template dialog box is displayed. Select the security template that you want to use and then click Open.
-
Right-click the Security Configuration And Analysis node and then choose Analyze Computer Now. When prompted to set the error log path, click OK. The default path should work just fine.
-
Wait for the snap-in to complete the analysis of the template. Afterward, review the findings and update the template as necessary. You can view the error log by right-clicking the Security Configuration And Analysis node and choosing View Log File.
-
When you’re ready to apply the template, right-click the Security Configuration And Analysis node and choose Configure Computer Now. When prompted to set the error log path, click OK. The default path should be just fine.
-
View the configuration error log by right-clicking the Security Configuration And Analysis node and choosing View Log File. Note any problems and act as necessary.
Checking for Malicious Input in Forms and Query Strings
The text that users type into forms might contain values designed to cause problems on your system. If you pass this input directly to a script or ASP page, you might allow a malicious user to gain access to the system and cause problems. To prevent this, you should check all input before passing it to a script or ASP page.
One way to ensure that input contains only text and numbers is to remove characters that aren’t alphanumeric. You can do this with the following Microsoft Visual Basic Scripting Edition (VBScript) example:
'Start a regular expression Set reg = New RegExp 'Check for characters that aren't 0-9a-zA-Z or '_' reg.Pattern = "\W+" 'Remove invalid characters from input stringgoodString = reg.Replace(inputString, "")
If you want users to be able to enter punctuation but don’t want to permit possible malicious input, you should check for and remove the pipe character (|). The pipe character is used to string commands together, which could allow a user to execute a command on your server. The following command removes the pipe character and all text that follows it from an input string:
'Start a regular expression Set reg = New RegExp 'Check for the pipe characterreg. Pattern = "^(.+)\|(.+)" 'Remove pipe character and any text after it goodString = reg.Replace(inputString, "$1")
Many other techniques for checking user input before using it are available. See the Microsoft TechNet at http://www.microsoft.com/technet/ for more information.
Removing Unused Application Mappings
Application mappings are used to specify the Internet Server Application Programming Interface (ISAPI) extensions and CGI programs that are available to applications. IIS is preconfigured to support many common ISAPI applications, including ASP, Internet Database Connector, and Index Server. If your Web site doesn’t use some of these ISAPI applications, you can enhance security by prohibiting all related extensions of a specific type or by removing individual application mappings that are not needed.
To prohibit a specific type of application extension from being used, select the extension type in the Web Service Extensions node of the IIS snap-in and then click Prohibit.
To remove individual application mappings globally for all Web sites on a server, follow these steps:
-
In the IIS snap-in, right-click the Web Sites node and then select Properties. This displays a Properties dialog box.
-
Select the Home Directory tab and then click Configuration in the Application Settings frame. This displays the Application Configuration dialog box.
-
In the Mappings tab, under Application Extensions, select the application mappings that you want to remove and then click Remove. When prompted to confirm the action, click Yes.
-
Click Apply.
|