Working with Application Pools
|
Application pools set boundaries for applications and define the configuration settings that applications they contain use. Every application pool has a set of one or more worker processes assigned to it. These worker processes define the memory space that applications use. By assigning an application to a particular application pool, you’re specifying that the application:
-
Can run in the same context as other applications in the application pool All applications in a particular application pool use the same worker process or processes, and these worker processes define the isolation boundaries. These applications must use the same version of ASP.NET. If applications in the same application pool use different versions of ASP.NET, errors will occur and the worker processes might not run.
-
Should use the application pool configuration settings Configuration settings are applied to all applications assigned to a particular application pool. These settings control recycling of worker processes, failure detection and recovery, CPU monitoring, and much more. Application pool settings should be optimized to work with all applications they contain.
The sections that follow provide techniques for creating, configuring, and optimizing application pools.
Creating Application Pools
Application pools specify the isolation boundaries for Web applications. You can use application pools to optimize the performance, recovery, and monitoring of Web applications. An application’s scope can range from an entire Web site to a single virtual directory. This means you can define default applications for Web sites that your IIS server hosts and you can define Web applications with very specific scopes.
To create an application pool, follow these steps:
-
In the IIS snap-in, right-click Application Pools, choose New, and then click Application Pool. This displays the Add New Application Pool dialog box shown in Figure 6-3.
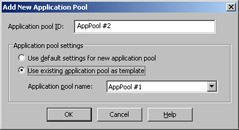
Figure 6-3: Use the Add New Application Pool dialog box to set the name of the application pool and determine how the default settings are obtained. -
In the Application Pool ID field, type the name of the application pool. The name should be short but descriptive.
Tip You might want to number the application pools to identify them uniquely. For example, you might create AppPool #1, AppPool #2, and so on. Or you might want to identify the purpose of the application pool in the name. For example, you might have CustRegPool, ProdCatPool, and TechNetPool.
-
You can now select Use Default Settings For New Application Pool or Use Existing Application Pool As Template. If you previously created an application pool and you want to apply those same settings to this pool, choose the latter option and then use the Application Pool Name drop-down list to choose the application pool to use.
-
Click OK. Right-click the node for the application pool you just created and then select Properties. Use the Properties dialog box to view or change the application pool configuration.
Assigning Applications to Application Pools
Applications assigned to the same pool share the same configuration settings. These settings control recycling of worker processes used by applications in the pool, worker process failure detection and recovery, the identity under which the worker processes run, and more. You should assign applications to the same pool only when they have similar requirements. If an application has unique requirements, you might want to assign it to a separate application pool that’s used only by that application.
To assign an application to an application pool, follow these steps:
-
In the IIS snap-in, expand the Web Sites node, right-click the application that you want to assign to an application pool, and then click Properties.
-
In the Home Directory, Virtual Directory, or Directory tab, verify that the Application Name field is set. If it isn’t, click Create, and then type the application name.
-
You use the Application Pool drop-down list to set the application pool for the application. Select the name of the application pool you want to use and then click OK.
Caution Applications assigned to the same application pool can’t use different versions of ASP.NET. If you assign applications that use different ASP.NET versions to the same pool, the worker process might not run at all.
Configuring Application Pool Identities
The application pool identity determines the account under which the application pool’s worker processes run. In most cases this identity is the Network Service account, which has limited permissions and privileges. If a particular application needs additional permissions or privileges, it’s a good idea to create a separate application pool for that application and then configure the application pool identity to use an account that has those permissions. In most cases you should use one of the other predefined accounts, such as Local Service or Local System, but you can also use the IWAM account or any other account that you configure.
To configure the application pool identity, follow these steps:
-
In the IIS snap-in, expand Application Pools, right-click the application pool that you want to configure and then select Properties.
-
Select the Identity tab as shown in Figure 6-4.
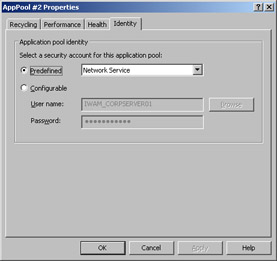
Figure 6-4: Use the options of the Identity tab to set the application pool identity to a predefined or previously configured account. -
If you want to use the built-in Network Service, Local Service, or Local System accounts, select Predefined and then select the appropriate account using the drop-down list provided. Click OK and skip the remaining steps.
-
If you want to specify a user account, select Configurable. By default, the account information is filled for the IWAM account. If you don’t want to use this account, click Browse and then use the Select User dialog box to choose the account that you want to use.
Security Alert If you decide to configure an account other than the IWAM account, keep in mind that the account must be a member of the IIS_WPG group and should have been assigned only the permissions and privileges necessary for the application to run properly. If the account is assigned additional permissions and privileges, malicious users might be able to compromise the system. For detailed information on working with the Network Service, Local Service, Local System, and IWAM accounts, see the section entitled “IIS User and Group Essentials” in Chapter 7.
-
If you specified an account other than the IWAM account, type the password for this account.
-
Click OK.
Note If IIS is configured to use Kerberos authentication, the application pool identity account must be a recognized Service Principal Name (SPN). If it isn’t, Kerberos authentication will fail. To resolve this problem, you must use the Set SPN tool (Setspn.exe) to register the identity account as an arbitrary SPN. Set SPN is installed with the Windows Server 2003 Support Tools, as discussed in the section entitled “Installing Administration Tools” in Chapter 1, “Overview of Microsoft Web Services.”
Starting, Stopping, and Recycling Worker Processes Manually
Sometimes you might want to restart or recycle the worker processes that an application pool is using. You might want to do this if you suspect an application is leaking memory or is otherwise affecting server performance or if users are experiencing undetermined or intermittent problems.
Starting and Stopping Worker Processes Manually
When you stop worker processes for an application pool, the related IIS 6 processes (W3wp.exe) are terminated and, as a result, all resources used by the worker processes are freed. This also means, however, that any requests currently being processed will fail and that new requests for the applications aren’t processed until you start the application pool again, at which time Http.sys looks for requests in the application pool queue and then starts new worker processes as necessary to handle any pending requests.
The WWW service can stop an application pool as well. Typically, this occurs when rapid-fail protection is triggered, meaning that there were a certain number of worker process failures in a specified time period. In the standard configuration, five worker process failures within a five-minute interval trigger rapid- fail protection. Application pools can also be stopped when they’re incorrectly configured to use a nonexistent identity or if different applications use different versions of ASP.NET.
To stop and then start an application pool, follow these steps:
-
In the IIS snap-in, expand Application Pools. Right-click the application pool that you want to stop and then select Stop.
-
Worker processes used by applications in the application pool are terminated. To start request processing for applications in the pool, right-click the application pool and then select Start.
Tip Clients trying to access an application in a stopped application pool might see an HTTP Error 503: Service Unavailable message. If users tell you they’re seeing this message and you haven’t stopped the application pool, definitely check to see if the application pool is started. If it isn’t, start it and then check the error logs to determine what happened while closely monitoring for additional failures.
Recycling Worker Processes Manually
An alternative to abruptly terminating worker processes used by an application pool is to mark them for recycling. Worker processes that are actively processing requests continue to run while IIS starts new worker processes to replace them. Once the new worker processes are started, Http.sys directs incoming requests to the new worker processes and the old worker processes are able to continue handling requests until they shut down. With this approach, you minimize any service interruptions while ensuring that any resources used by old worker processes are eventually freed.
With recycling, the startup and shutdown processes can be limited by the Start- up Time Limit and Shutdown Time Limit values set for the application pool. If IIS can’t start new worker processes within the time limit set, a service interruption would occur because IIS would be unable to direct requests to the new processes. If IIS stops old worker processes when the shutdown time limit is reached and those processes are still handling requests, a service interruption would occur because the requests wouldn’t be processed further.
To recycle the worker processes used by an application pool, follow these steps:
-
In the IIS snap-in, expand Application Pools.
-
Right-click the application pool that you want to recycle and then click Recycle.
Configuring Worker Process Startup and Shutdown Time Limits
Whenever IIS starts or shuts down worker processes, it attempts to do so within prescribed time limits. The goal is to ensure timely startup of worker processes so that Http.sys can direct incoming requests to new worker processes and shut down old worker processes after they complete the processing of existing requests.
Graceful startup and shutdown of worker processes, however, is dependent on the amount of time allowed for startup and shutdown. If these values are set too low, service might be interrupted: A new worker process might not get started in time to accept incoming requests, or an old worker process might be terminated before it can finish processing requests. If these values are set too high, system resources might be tied up waiting for a transition that isn’t possible: An existing worker process might be nonresponsive, or the server might be unable to allocate additional resources to start new worker processes while the old processes are still running.
| Real World | Listen carefully to user complaints about failed requests, time-outs, and other errors. Frequent complaints can be an indicator that you need to take a close look at the worker process recycling configuration as discussed in the section of this chapter entitled “Configuring Worker Process Recycling.” If you believe you’ve optimized worker process recycling and users are still experiencing problems, take a look at the startup and shutdown time limits. Ideally, you’ll select a balanced startup and shutdown time that reflects the server’s load and the importance of the applications in the application pool. By default, the startup and shutdown time limits are both set to 90 seconds. Here are some rules of thumb for setting startup and shutdown time limits:
|
To configure worker process startup and shutdown time limits, complete the following steps:
-
In the IIS snap-in, expand Application Pools, right-click the application pool that you want to configure, and then select Properties.
-
On the Health tab, use the Startup Time Limit and Shutdown Time Limit fields to set the maximum time allowed for worker process startup and shutdown respectively (in seconds).
-
Click OK.
|