Redirecting Browser Requests
|
Browser redirection is a useful technique to prevent errors when you rename or delete content within a Web site. When you redirect requests, you tell a browser to take the following actions:
-
Look for files in another directory
-
Look for files on a different Web site
-
Look for files on another computer
-
Look for a specific file instead of a set of files
-
Run an ISAPI application instead of accessing the requested files
Each of these redirection techniques is examined in the sections that follow. Tips for creating customized redirection routines are examined in the “Customizing Browser Redirection” section of this chapter.
Redirecting Requests to Other Directories or Web Sites
If you rename or delete a directory, you can redirect requests for files in the old directory to the new directory, another directory, or even another Web site. When a browser requests the file at the original location, the Web server instructs the browser to request the page using the new location. You redirect requests to other directories or Web sites as follows:
-
In the IIS snap-in, click the plus sign (+) next to the Web site you want to work with.
-
Right-click the directory you want to redirect and then select Properties.
-
Select the Virtual Directory or Directory tab as appropriate, and then select A Redirection To A URL, as shown in Figure 4-2.
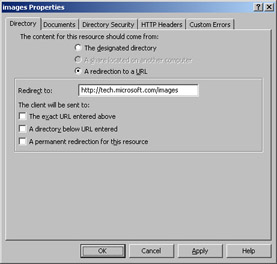
Figure 4-2: You can redirect requests for files in one directory to another directory. -
In the Redirect To field, type the Uniform Resource Locator (URL) of the destination directory or Web site. For example, to redirect all requests for files in the /Docs directory to the /CorpDocs directory, type /CorpDocs. To redirect all requests for files located at http://www.microsoft.com/Docs to techsupport.microsoft.com/CorpDocs, type http://techsupport.microsoft.com/ CorpDocs.
-
Click OK. Now all requests for files in the old directory are mapped to files in the new directory. For example, if the browser requested http:// www.microsoft.com/Docs/adminguide.doc/ and you redirected requests to http://techsupport.microsoft.com/CorpDocs/, the browser would request http://techsupport.microsoft.com/CorpDocs/adminguide.doc/.
Redirecting All Requests to Another Web Site
If you stop publishing a Web site but don’t want users to reach a dead end if they visit, you should redirect requests for the old Web site to a specific page at the new site. You redirect requests to a specific page at another site by completing the following steps:
-
In the IIS snap-in, right-click the Web site you want to work with and then select Properties.
-
Select the Home Directory tab and then select A Redirection To A URL, as shown in Figure 4-3.
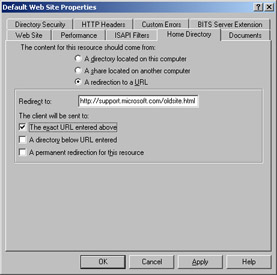
Figure 4-3: Another redirection technique is to redirect all requests for files to a specific location at another Web site. -
In the Redirect To field, type the complete URL path to the page at the new site, such as http://www.microsoft.com/oldsite.html.
-
In The Client Will Be Sent To section, select The Exact URL Entered Above, and then click OK. Now all requests for files at the old site are mapped to a specific page at the new site.
Retrieving Files from a Network Share
IIS can retrieve files from a network share instead of the local hard disk drive. To configure this, complete the following steps:
-
In the IIS snap-in, right-click the Web site you want to work with and then select Properties.
-
Select the Home Directory tab and then select A Share Located On Another Computer, as shown in Figure 4-4.
-
Type the Universal Naming Convention (UNC) path to the network share in the Network Directory field. The path should be in the form \\ServerName\ SharedFolder, such as \\Gandolf\CorpWWW. Afterward, click Connect As.
-
In the Network Directory Service Credentials dialog box that appears, clear the Always Use The Authenticated User’s Credentials When Validating Access To The Network Directory check box, and then type the user name and password that should be used to connect to the shared folder.
-
Click OK. Now all requests for files on the Web site are mapped to files on the specified network share.
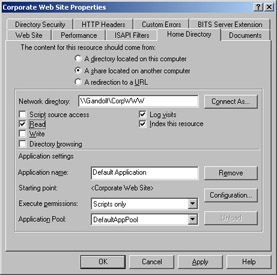
Figure 4-4: Network shares can be used as source directories for content. To map to a share, you must use redirection.
Redirecting Requests to Applications
If your organization’s development team has created a custom application for the Web site, you can redirect all requests for files in a particular directory (or for the entire site, for that matter) to an application. Parameters passed in the URL can also be passed to the application; the technique you use to do this is as follows:
-
In the IIS snap-in, click the plus sign (+) next to the Web site you want to work with.
-
Right-click the directory you want to redirect and then select Properties. If you want to redirect all requests for the site, right-click the Web site entry and then select Properties.
-
Select the Home Directory, Virtual Directory, or Directory tab as appropriate, and then select A Redirection To A URL.
-
In the Redirection To field, type the application’s URL, including any variables needed to pass parameters to the program, such as /CorpApps/ Login.exe?URL =$V+PARAMS=$P, where $V and $P are redirection variables. A complete list of redirect variables is provided in Table 4-1.
-
In The Client Will Be Sent To section, select The Exact URL Entered Above and then click OK. Now all requests for files in the directory or site are mapped to the application.
Customizing Browser Redirection
The previous sections looked at basic redirection techniques. Now it’s time to break out the power tools and customize the redirection process. You can customize redirection anytime you select the A Redirection To A URL option.
In all of the previous discussions, when you selected A Redirection To A URL, additional options were displayed in The Client Will Be Sent To section. Without selecting additional options, all requests for files in the old location were mapped automatically to files in the new location. You can change this behavior by selecting any of the following options in The Client Will Be Sent To section:
-
The Exact URL Entered Above Redirects requests to the destination URL without adding any other portions of the original URL. You can use this option to redirect an entire site or directory to one file. For example, to redirect all requests for the /Downloads directory to the file Download.htm in the home directory, select this option and then type /Download.htm in the Redirect To field.
-
A Directory Below URL Entered Redirects a parent directory to a child directory. For example, to redirect your home directory (designated by /) to a subdirectory named /Current, select this option and then type /Current in the Redirect To field.
-
A Permanent Redirection For This Resource Sends a 301—Permanent Redirect message to the client. Without using this option, redirections are considered temporary, and the client browser receives the 302—Temporary Redirect message. Some browsers can use the 301—Permanent Redirect message as the signal to permanently change a URL stored in cache or in a bookmark.
You can customize redirection using redirect variables as well. As Table 4-1 shows, you can use redirect variables to pass portions of the original URL to a destination path or to prevent redirection of a specific file or subdirectory.
| Variable | Description | Example |
|---|---|---|
| $S | Passes the matched suffix of the requested URL. The server automatically performs this suffix substitution; you use the $S variable only in combination with other variables. | If /Corpapps is redirected to /Apps and the original request is for /Corpapps/ Login.exe, then /Login.exe is the suffix. |
| $P | Passes the parameters in the original URL, omitting the question mark used to specify the beginning of a query string. | If the original URL is /Scripts / Count.asp?valA=1&valB=2, then the string “valA=1&valB=2” is mapped into the destination URL. |
| $Q | Passes the full query string to the destination. | If the original URL is /Scripts / Count.asp?valA=1&valB=2, then the string “?valA=1&valB=2” is mapped into the destination URL. |
| $V | Passes the requested path without the server name. | If the original URL is //Gandolf /Apps/ Count.asp, then the string “/Apps/ Count.asp” is mapped into the destination URL. |
| $0 through $9 | Passes the portion of the requested URL that matches the indicated wildcard character. | If the original URL is //Gandolf/Apps/ Data.htm, $0 would be Gandolf, $1 would be Apps, and $2 would be Data.htm. |
| ! | Use this variable to prevent redirecting a subdirectory or an individual file. |
The final way you can customize redirection is to use redirect wildcard characters. Use redirect wildcard characters to redirect particular types of files to a specific file at the destination. For example, you can use redirect wildcard characters to redirect all .htm files to Default.htm and all .asp files to Default.asp. The syntax for wildcard character redirection is
*;*.EXT;FILENAME.EXT[;*.EXT;FILENAME.EXT...]
where .EXT is the file extension you want to redirect and FILENAME.EXT is the name of the file to use at the destination. As shown, begin the destination URL with an asterisk and a semicolon and separate pairs of wildcard characters and destination URLs with a semicolon. Be sure to account for all document types that users might request directly, such as .htm, .html, and .asp documents.
You can use wildcard character redirection by completing the following steps:
-
In the IIS snap-in, click the plus sign (+) next to the Web site you want to work with.
-
Right-click the directory you want to redirect and then select Properties. If you want to redirect all requests for the site, right-click the Web site entry, and then select Properties.
-
Select the Home Directory, Virtual Directory, or Directory tab as appropriate, and then select A Redirection To A URL.
-
In the Redirection To field, type the wildcard character redirection values. For example, if you want to redirect wildcards to redirect all .htm files to Default.htm and all .asp files to Default.asp, you’d enter:
*;*.HTM;DEFAULT.HTM;*.ASP;DEFAULT.ASP
-
In The Client Will Be Sent To section, select The Exact URL Entered Above and then click OK. Now all requests for files in the directory or site are mapped using wildcard characters, if possible.
|