Web Administration Tools and Techniques
|
Web administrators will find that there are many ways to manage Web and application servers. The key administration tools and techniques are covered in the following sections.
Managing Resources with Key Administration Tools
Many tools are available for managing Web resources. Key tools you’ll use are shown in Table 1-1. Most of these tools are available on the Administrative Tools menu. Click Start and choose All Programs, Administrative Tools, and then the tool you want to use. You can use all the tools listed in the table to manage local and remote resources. For example, you can connect to a new computer in the IIS snap-in and then, afterward, you can remotely manage all its sites and services from your system.
| Administration Tool | Purpose |
|---|---|
| Active Directory Users and Computers | Manages domain user, group, and computer accounts. |
| Certification Authority | Manages certificate services for public key X.509 certificates. |
| Computer Management | Manages services, storage, and applications. The Services And Applications node provides quick access to Indexing Service catalogs and IIS sites and servers. |
| Data Sources | Configures and manages Open Database Connectivity (ODBC) data sources and drivers. Data sources link Web front ends with database back ends. |
| DNS | Public Internet sites must have fully qualified domain names (FQDNs) to resolve properly in browsers. Use the Domain Name System (DNS) administrative snap-in to manage the DNS configuration of your Windows Server DNS servers. |
| Event Viewer | Manages events and system logs. |
| Internet Information Services Snap-In | Manages Web and application server resources using a Microsoft Management Console (MMC) snap-in. |
| Remote Administration | Manages Web and application server resources using a browser-based interface. Formerly called Internet Services Manager. |
| Performance | Tracks system performance, pinpoints performance problems, and configures system event logs and alerts. |
| POP3 Service | Used to view and manage POP3 e-mail domains and mailboxes. |
| Services | Views service information; starts and stops system services; configures service logons and automated recoveries. |
Installing Administration Tools
When you add services to a server, the tools needed to manage those services are automatically installed. If you want to manage these servers remotely, you might not have these tools installed on your workstation. In this case you need to install the administration tools on the workstation you’re using.
To install the Windows administration tools, follow these steps:
-
Log on to the workstation using an account with administrator privileges.
-
Insert the Windows Server CD-ROM into the CD-ROM drive.
-
When the Autorun screen appears, click Perform Additional Tasks, and then click Browse This CD. This starts Windows Explorer.
-
Double-click the I386 folder, and then double-click Adminpak.msi. The complete set of Windows Server management tools is installed on your workstation or server.
Real World The Windows 2000 Administration tools are incompatible with Windows XP Professional and Windows Server 2003. If you upgrade to Windows XP Professional from Windows 2000 Professional, you’ll find that many of the Windows 2000 administration tools won’t work and you’ll encounter errors frequently. You should uninstall these tools and instead install the Windows Server Administration Tools Pack (Adminpak.msi) on the Windows XP Professional systems that administrators use. The Windows Server administration tools are compatible with both Windows 2000 and Windows Server 2003.
While you’re working with the distribution CD-ROM, you might want to install the Windows Support Tools. The support tools are a collection of utilities for handling everything from system diagnostics to network monitoring. You can install the support tools by completing the following steps:
-
Insert the Windows Server CD-ROM into the CD-ROM drive.
-
When the Autorun screen appears, click Perform Additional Tasks, and then click Browse This CD. This starts Windows Explorer.
-
In Windows Explorer, double-click Support and then double-click Tools.
-
Double-click Suptools.msi. This starts the Windows Support Tools Setup Wizard. Click Next.
-
Read the End User License Agreement, and then, if you agree and want to continue, click I Agree and then click Next.
-
Enter your user information and then click Next.
-
Select the destination directory for the support tools. The default location is %ProgramFiles%\System Tools. If you don't want to use the default location, type a new directory path or click Browse to search for a location. The tools use about 23 MB of disk space.
-
Click Install Now.
Note %ProgramFiles% refers to the ProgramFiles environment variable. The Windows operating system has many environment variables, which are used to refer to user-specific and system-specific values. I’ll often refer to environment variables using this syntax: %Variable Name%.
Web Administration Techniques
Web administrators have many options for managing IIS. The key administration tools are:
-
Internet Information Services snap-in
-
Remote Administration (formerly Internet Services Manager)
-
IIS Administration objects (which are manipulated by the administration scripts)
-
Administration scripts
The IIS snap-in provides the standard administration interface for IIS. Figure 1-2 shows the main window for the IIS snap-in. To start the IIS snap-in, click Start and choose All Programs, Administrative Tools, and then Internet Information Services (IIS) Manager.
When started, the IIS snap-in automatically connects to the local IIS installation, if it’s available. Once you connect to remote IIS installations, the IIS snap-in automatically connects to these installations upon startup as well. You can change this behavior by disconnecting from the remote server while in the snap-in. See Chapter 3 for more information on using the IIS snap-in.
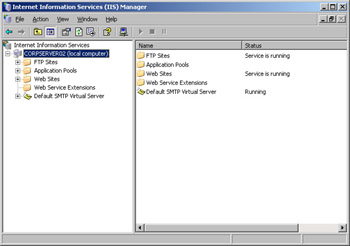
Figure 1-2: Use the IIS snap-in to manage local and remote IIS installations.
Remote Administration uses the administration Web site to access remote IIS installations using a secure HTTP connection. You can allow or disallow remote browser-based administration by starting or stopping the Administration Web site. When installed, IIS randomly selects two Transmission Control Protocol (TCP) port numbers from 2000 to 9999 and assigns these port numbers to the administration Web site. One TCP port is used for standard, not secure, connections and the other for secure connections to the administration Web site. The default configuration is to allow only secure connections for administration.
The site responds to browser requests for all permitted domains, but the administrator must specify the port number because it differs from the default HTTPS port 443. For example, if the server’s domain name is primary.microsoft.com and the administrative port is 9394, you can connect to the administration Web site by typing the following URL into your browser window: https://primary.microsoft.com:9394/.
Figure 1-3 shows the main window for Remote Administration. By default, basic authentication is configured. Since you’re required to use a secure connection (HTTPS), this setting is adequate, but you might want to consider using another authentication technique. With basic authentication, you’re prompted for a user name and password when the site is accessed. If you provide the proper logon information and are a member of the Windows Administrators group, you’ll be permitted to administer IIS remotely through the administration Web site.
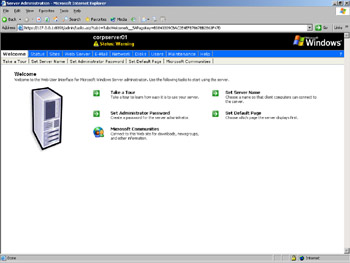
Figure 1-3: Use Remote Administration to manage remote IIS installations.
In previous versions of IIS, you could designate Web site operators who could remotely administer IIS. Web site operators were a special group of users who had elevated privileges on individual Web sites. IIS 6 doesn’t allow you to designate operators. But that’s okay because most of the time operator accounts weren’t used.
You can also manage IIS settings and configuration through Windows Script Host (WSH)—and you’ll be happy to know that you no longer need to use Active Directory Service Interface (ADSI) to manage the metabase. Because the metabase is now formatted as XML and stored in plaintext files, you can say goodbye to complex key paths and all that other stuff that went along with it!
The IIS Windows scripts are stored in the %SystemRoot%\System32 directory. Table 1-2 provides an overview of each of the scripts. These scripts are all written using VBScript.
| Administration Script | Purpose |
|---|---|
| Iisapp.vbs | Reports process IDs and application pool IDs for currently running worker processes. These processes run as W3wp.exe. |
| Iisback.vbs | Allows you to back up or restore the IIS configuration. You can also list backups or delete individual backups. |
| Iiscnfg.vbs | Imports, exports, or copies the IIS configuration. |
| Iisext.vbs | Configures the Web Server Extensions. |
| Iisftp.vbs | Manages and lists available FTP sites. |
| Iisftpdr.vbs | Manages and lists virtual directories for an FTP site under a given root. |
| Iisvdir.vbs | Manages and lists virtual directories for a Web site under a given root. |
| Iisweb.vbs | Manages and lists available Web sites. |
The scripts are designed to work with the command-line Windows Script Host, Cscript.exe. This host must be registered as the default scripting host on the computer you’re using to execute the scripts. You can ensure that Cscript.exe is registered as the default host by entering the following command in a command prompt:
cscript //H:cscript
Because the IIS scripts are stored in the %SystemRoot%\System32 directory, you can run a script from any directory on the server by typing the script name on the command-line, such as:
iisweb /query
Type the script name followed by /? on the command-line to display basic help information.
|