| Share permissions set the maximum allowable actions available within a shared folder. By default, when you create a share, everyone with access to the network has read access to the share's contents. This is an important security change ”in previous editions the default permission was full control. With NTFS volumes you can use file and folder permissions and ownership to further constrain actions within the share as well as share permissions. With file allocation table (FAT) volumes , share permissions provide the only access controls. The Different Share Permissions Share permissions available, from the most restrictive to the least restrictive , are: -
No Access No permissions are granted for the share. -
Read With this permission, users can -
View file and subfolder names . -
Access the subfolders of the share. -
Read file data and attributes. -
Run program files. -
Change Users have Read permissions and the additional ability to -
Create files and subfolders. -
Modify files. -
Change attributes on files and subfolders. -
Delete files and subfolders. -
Full Control Users have Read and Change permissions, as well as the following additional capabilities on NTFS volumes: You can assign share permissions to users and groups. You can even assign permissions to implicit groups. For details on implicit groups, see the section entitled "Implicit Groups and Special Identities" in Chapter 8 , "Understanding User and Group Accounts." Viewing Share Permissions To view share permissions, follow these steps: -
In Computer Management, connect to the computer on which the share is created. -
In the console tree, expand System Tools and Shared Folders, and then select Shares. -
Right-click the share you want to view, and then select Properties. -
In the Share Properties dialog box, select the Share Permissions tab, shown in Figure 14-4. You can now view the users and groups that have access to the share and the type of access they have. Figure 14-4. The Share Permissions tab shows which users and groups have access to the share and what type of access they have. 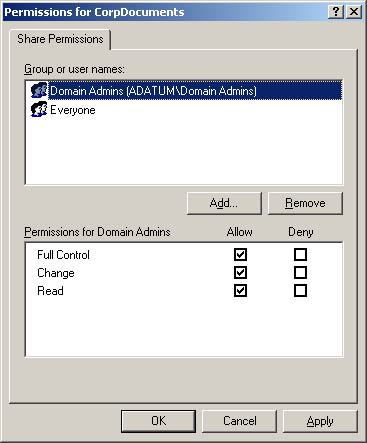 Configuring Share Permissions In Computer Management, you can add user, computer, and group permissions to shares by completing the following steps: -
Right-click the share you want to manage and then select Properties. -
In the Share Properties dialog box, select the Share Permissions tab. -
Choose Add. This opens the Select Users, Computers, Or Groups dialog box shown in Figure 14-5. -
Type the name of a user, computer, or group in the current domain and then click Check Names. -
If a single match is found, the dialog box is automatically updated as appropriate and the entry is underlined . -
If no matches are found, you've either entered an incorrect name part or you're working with an incorrect location. Modify the name and try again or click Locations to select a new location. -
If multiple matches are found, select the name(s) you want to use and then click OK. To add additional users, computers, or groups, type a semicolon ( ; ), and then repeat this step. Note The Locations button allows you to access account names from other domains. Click Locations to see a list of the current domain, trusted domains, and other resources that you can access. Because of the transitive trusts in Windows Server 2003, you can usually access all the domains in the domain tree or forest.
Figure 14-5. Add users and groups to the share using the Select Users, Computers, Or Groups dialog box. 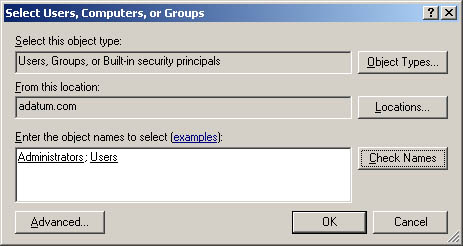 -
Click OK. The users and groups are added to the Name list for the share. -
Configure access permissions for each user, computer, and group by selecting an account name and then allowing or denying access permissions. Keep in mind that you're setting the maximum allowable permissions for a particular account. -
Click OK when you're finished. To assign additional security permissions for NTFS, see the section of this chapter entitled "File and Folder Permissions." Modifying Existing Share Permissions You can change the share permissions you assign to users, computers, and groups by using the Share Properties dialog box. In Computer Management, follow these steps: -
Right-click the share you want to manage, and then select Properties. -
In the Share Properties dialog box, select the Share Permissions tab. -
In the Name list box, select the user, computer, or group you want to modify. -
Use the fields in the Permissions area to allow or deny permissions. -
Repeat for other users, computers, or groups, and then click OK when you're finished. Removing Share Permissions for Users and Groups You also remove share permissions assigned to users, computers, and groups with the Share Permissions dialog box. In Computer Management, follow these steps: -
Right-click the share you want to manage and then select Properties. -
In the Share Properties dialog box, select the Share Permissions tab. -
In the Name list box, select the user, computer, or group you want to remove, and then choose Remove. -
Repeat for other users or groups, as necessary, and then click OK when you're finished. |