| The sections that follow explain how to set commonly used printer properties. Once you install network printing, you can use the Properties dialog box to set its properties. You access the Properties dialog box by doing the following: -
Access the Printers And Faxes folder on the computer you want to work with. -
Right-click the icon of the printer you want to configure and then, from the pop-up menu, select Properties. -
This opens the dialog box shown in Figure 17-6. You can now set the printer properties. Figure 17-6. Set printer properties with the Properties dialog box for the printer you want to configure. 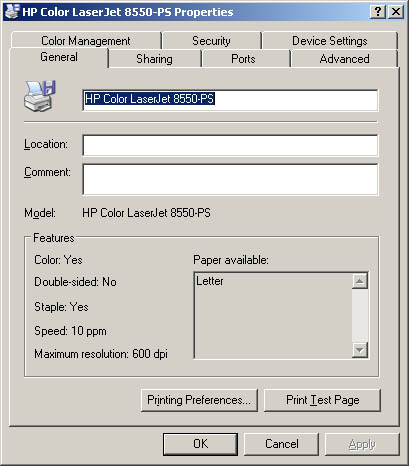 Adding Comments and Location Information To make it easier to determine which printer to use when, you can add comments and location information to printers. Comments provide general information about the printer, such as the type of print device and who is responsible for it. Location describes the actual site of the print device. Once set, applications can display these fields. For example, Microsoft Word displays this information when you select Print from the File menu in the Comment and Where fields, respectively. You can add comments and location information to a printer by using the fields in the General tab of the printer's Properties dialog box. Type your comments in the Comment field. Type the printer location in the Location field. Managing Printer Drivers In a Windows Server 2003 domain, you should configure and update printer drivers only on your print servers. You don't need to update printer drivers on Windows clients . Instead, you configure the network printer to provide the drivers to client systems, as necessary. Updating a Printer Driver You can update a printer's driver by doing the following: -
Open the printer's Properties dialog box and select the Advanced tab. -
The Driver field lets you select the driver from a list of currently installed drivers. Use the Driver drop-down list to select a new driver from a list of known drivers. -
If the driver you need isn't listed or if you obtained a new driver, click New Driver. This starts the Add Printer Driver Wizard. Click Next. Choose Have Disk to install the new driver from a file or disk. -
Click Next and then click Finish. Configuring Drivers for Network Clients After you install a printer or change drivers, you might want to select the operating systems that should download the driver from the print server. By allowing clients to download the printer driver, you provide a single location for installing driver updates. This way, instead of having to install a new driver on all the client systems, you install the driver on the print server and allow clients to download the new driver. You can allow clients to download the new driver by doing the following: -
Right-click the icon of the printer you want to configure and then select Properties. -
Select the Sharing tab and then click Additional Drivers. -
Use the Additional Drivers dialog box to select operating systems that can download the printer driver. As necessary, insert the Windows Server 2003 CD or printer driver disks, or both, for the selected operating systems. The Windows Server 2003 CD has drivers for most Windows operating systems. Setting a Separator Page and Changing Print Device Mode Separator pages have two uses on Windows Server 2003 systems: -
They can be used at the beginning of a print job to make it easier to find a document on a busy print device. -
They can be used to change the print device mode, such as whether the print device uses PostScript or Printer Control Language (PCL). To set a separator page for a print device, follow these steps: -
Access the Advanced tab of the printer's Properties dialog box and then click Separator Page. -
In the Separator Page dialog box, click Browse, and then select one of the three available separator pages: -
Pcl.sep Switches the print device to PCL mode and prints a separator page before each document. -
Pscript.sep Sets the print device to PostScript mode but doesn't print a separator page. -
Sysprint.sep Sets the print device to PostScript mode and prints a separator page before each document. To stop using the separator page, access the Separator Page dialog box and remove the filename. Changing the Printer Port You can change the port used by a print device at any time by using the Properties dialog box for the printer you're configuring. Open the Properties dialog box and then select the Ports tab. You can now either add a port for printing by selecting its check box or remove a port by clearing its check box. To add a new port type, click Add Port. Afterward, select the port type and then click New Port. To remove a port permanently, select it and then click Delete Port. Scheduling and Prioritizing Print Jobs You use the Properties dialog box for the printer you're configuring to set default settings for print job priority and scheduling. Open the dialog box and then select the Advanced tab. You can now set the default schedule and priority settings using the fields shown in Figure 17-7. Each of these fields is discussed in the sections that follow. Figure 17-7. You configure print job scheduling and priority using the Advanced tab. 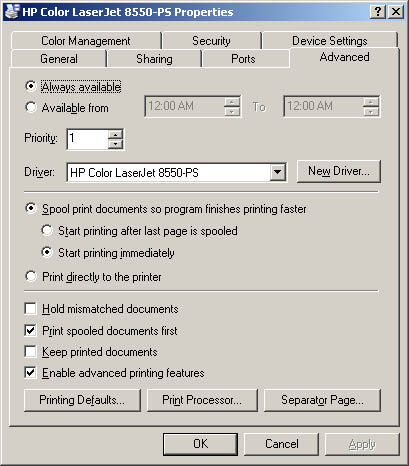 Scheduling Printer Availability Printers are either always available or available only during the hours specified. You set printer availability using the Advanced tab. Access the Advanced tab, and then select Always Available to make the printer available at all times or select Available From to set specific hours of operation. Setting Printer Priority Use the Priority box of the Advanced tab to set the default priority for print jobs. Print jobs always print in order of priority. Jobs with higher priority print before jobs with lower priority. Configuring Print Spooling For print devices attached to the network, you'll usually want the printer to spool files rather than print files directly. Print spooling makes it possible to use a printer to manage print jobs. Enabling Spooling To enable spooling, use one of the following options: -
Spool Print Documents So Program Finishes Printing Faster Select this option to spool print jobs. -
Start Printing After Last Page Is Spooled Select this option if you want the entire document to be spooled before printing begins. This option ensures that the entire document makes it into the print queue before printing. If for some reason printing is canceled or not completed, the job won't be printed. -
Start Printing Immediately Select this option if you want printing to begin immediately when the print device isn't already in use. This option is preferable when you want print jobs to be completed faster or when you want to ensure that the application returns control to users as soon as possible. Other Spooling Options You can disable spooling by selecting the Print Directly To The Printer option button. Additional check boxes let you configure other spooling options. You use these check boxes as follows : -
Hold Mismatched Documents If selected, the spooler holds print jobs that don't match the setup for the print device. Selecting this option is a good idea if you frequently have to change printer form or tray assignments. -
Print Spooled Documents First If selected, jobs that have completed spooling will print before jobs in the process of spooling ”regardless of whether the spooling jobs have higher priority. -
Keep Printed Documents Normally, documents are deleted from the queue after they're printed. To keep a copy of documents in the printer, select this option. Use this option if you're printing files that can't easily be recreated. In this way you can reprint the document without having to recreate it. For details, see the section of this chapter entitled "Pausing, Resuming, and Restarting Individual Document Printing." -
Enable Advanced Printing Features When this option is enabled, you can use advanced printing options (if available), such as Page Order and Pages Per Sheet. If you note compatibility problems when using advanced options, you should disable the advanced printing features by clearing this check box. Starting and Stopping Printer Sharing You use the Properties dialog box of the printer you're configuring to set printer sharing. Right-click the icon of the printer you want to configure and then select Sharing. You can use this tab to change the name of a network printer as well as to start sharing or stop sharing a printer. Printer sharing tasks that you can perform include: -
Sharing a local printer (thus making it a network printer) To share a printer, select Share This Printer and then specify a name for the shared resource in the Share Name field. Click OK when you're finished. -
Changing the shared name of a printer To change the shared name, simply type a new name in the Share Name field and click OK. -
Stopping the sharing of a printer To quit sharing a printer, select the Do Not Share This Printer option button. Click OK when you're finished. Setting Printer Access Permissions Network printers are a shared resource, and, as such, you can set access permissions for them. You use the Properties dialog box of the printer you're configuring to set access permissions. Open the dialog box and then select the Security tab. Permissions that can be granted or denied for printers are Print, Manage Documents, and Manage Printers. Table 17-1 summarizes the capabilities of these permissions. Table 17-1. Printer Permissions Used by Windows Server 2003 | Permission | Print | Manage Documents | Manage Printers | | Print documents | X | X | X | | Pause, restart, resume, and cancel own documents | X | X | X | | Connect to printers | X | X | X | | Control settings for print jobs | | X | X | | Pause, restart, and delete print jobs | | X | X | | Share printers | | | X | | Change printer properties | | | X | | Change printer permissions | | | X | | Delete printers | | | X | The default settings of the Printer Permissions dialog box are used for any new network printer you create. These settings are as follows: -
Administrators, Print Operators, and Server Operators have full control over printers by default. This allows you to administer a printer and its print jobs. -
Creator or Owner of the document can manage his or her own document. This allows the person who printed a document to change its settings and to delete it. -
Everyone can print to the printer. This makes the printer accessible to all users on the network. As with other permission sets, you create the basic permissions for printers by combining special permissions into logical groups. Table 17-2 shows special permissions used to create the basic permissions for printers. Using Advanced permission settings, you can assign these special permissions individually, if necessary. Table 17-2. Special Permissions for Printers | Special Permissions | Print | Manage Documents | Manage Printers | | Print | X | | X | | Manage Documents | | X | | | Manage Printers | | | X | | Read Permissions | X | X | X | | Change Permissions | | X | X | | Take Ownership | | X | X | Auditing Print Jobs Windows Server 2003 lets you audit common printer tasks. To do this, follow these steps: -
Open the printer's Properties dialog box and then select the Security tab. Open the Access Security Settings dialog box by clicking Advanced. Note Actions aren't audited by default. You must first enable auditing by establishing a group policy to audit the printer.
-
In the Auditing tab, add the names of users or groups you want to audit with the Add button and remove names of users or groups with the Remove button. -
Select the events you want to audit by selecting the check boxes under the Successful and Failed headings, as appropriate. -
Click OK when you're finished. Setting Document Defaults Document default settings are used only when you print from non-Windows applications, such as when you print from the MS-DOS prompt. You can set document defaults by doing the following: -
In the Printers And Faxes folder, select or double-click the printer's icon. -
In the Printer Management window, from the Printer menu, select Printing Preferences. -
Use the fields in the Layout tab and the Paper/Quality tab to configure the default settings. |