Troubleshooting and Testing Network Settings
| Windows Server 2003 includes many tools for troubleshooting and testing TCP/IP connectivity. This section looks at a few basic tests that you should perform every time you install or modify a computer's network settings. It then goes on to examine techniques for performing more thorough troubleshooting. Performing Basic Network TestsWhenever you install a new computer or make configuration changes to the computer's network settings, you should test the configuration. The most basic TCP/IP test is to use the Ping utility to test the computer's connection to the network. Ping is a command-line utility and is used as follows : ping host where host is the host computer you're trying to reach. On Windows Server 2003, there are several ways to test the configuration using Ping:
You might also want to test network browsing for the computer. If the computer is a member of a Windows Server 2003 domain and computer browsing is enabled throughout the domain, log on to the computer and then use the Windows Explorer or My Network Places to browse other computers in the domain. Afterward, log on to a different computer in the domain and try to browse the computer you just configured. These tests tell you if the DNS resolution is being handled properly in the local environment. If you can't browse, check the configuration of the DNS services and protocols. Releasing and Renewing DHCP SettingsDHCP servers can assign many network configuration settings automatically. These include IP addresses, default gateways, primary and secondary DNS servers, primary and secondary WINS servers, and more. When computers use dynamic addressing they're assigned a lease on a specific IP address. This lease is good for a specific time period and must be renewed periodically. When the lease needs to be renewed, the computer contacts the DHCP server that provided the lease. If the server is available, the lease is renewed and a new lease period is granted. You can also renew leases manually as necessary on individual computers or using the DHCP server itself. Problems can occur during the lease assignment and renewal process that prevent network communications. If the server isn't available and can't be reached before a lease expires , the IP address can become invalid. If this happens, the computer might use the alternate IP address configuration to set an alternate address, which in most cases has settings that are inappropriate and prevent proper communications. To resolve this problem, you'll need to release and then renew the DHCP lease. Another type of problem occurs when users move around to various offices and subnets within the organization. While moving from location to location, their computers might obtain DHCP settings from the wrong server. When the users return to their offices, the computer might seem sluggish or might perform incorrectly due to the settings assigned by the DHCP server at another location. If this happens, you'll need to release and then renew the DHCP lease. You can use the Ipconfig command-line utility to renew and release settings by following these steps:
Registering and Flushing DNSThe DNS resolver cache maintains a history of DNS lookups that have been performed when a user accesses network resources using TCP/IP. This cache contains forward lookups, which provide host name to IP address resolution, and reverse lookups, which provide IP address to host name resolution. Once a DNS entry is stored in the resolver cache for a particular DNS host, the local computer no longer has to query external servers for DNS information on that host. This allows the computer to resolve DNS requests locally, which provides a quicker response. How long entries are stored in the resolver cache depends on the Time to Live (TTL) value assigned to the record by the originating server. To view current records and see the remaining TTL value for each record, type ipconfig /displaydns at the command line. These values are given as the number of seconds that a particular record can remain in the cache before it expires. These values are continually being counted down by the local computer. When the TTL value reaches zero, the record expires and is removed from the resolver cache. Occasionally, you'll find that the resolver cache needs to be cleared out to remove old entries and allow computers to check for updated DNS entries before the normal expiration and purging process takes place. Typically, this happens because server IP addresses have changed and the current entries in the resolver cache point to the old addresses rather than the new ones. Sometimes the resolver cache itself can get out of sync, particularly when DHCP has been misconfigured.
In most cases you can resolve problems with the DNS resolver cache by either flushing the cache or reregistering DNS. When you flush the resolver cache, all DNS entries are cleared out of the cache and new entries aren't created until the next time the computer performs a DNS lookup on a particular host or IP address. When you reregister DNS, Windows Server 2003 attempts to refresh all current DHCP leases and then performs a lookup on each DNS entry in the resolver cache. By looking up each host or IP address again, the entries are renewed and reregistered in the resolver cache. You'll generally want to flush the cache completely and allow the computer to perform lookups as needed. Reregister DNS only when you suspect that there are problems with DHCP and the DNS resolver cache. To flush or register DNS entries using Ipconfig, complete the following tasks :
Performing Detailed Network DiagnosticsFew things are more complicated than trying to troubleshoot network problems. Because there are so many interdependencies between services, protocols, and configuration settings, finding the problem area can be difficult. Fortunately, Windows Server 2003 includes a powerful network diagnostics toolkit for pinpointing network problems that relate to the following:
You can, for example, use the network diagnostics toolkit to find out quickly that a network adapter has failed or that another computer is using the IP address you've configured for the current system. To run the diagnostics tests using the default setup, follow these steps:
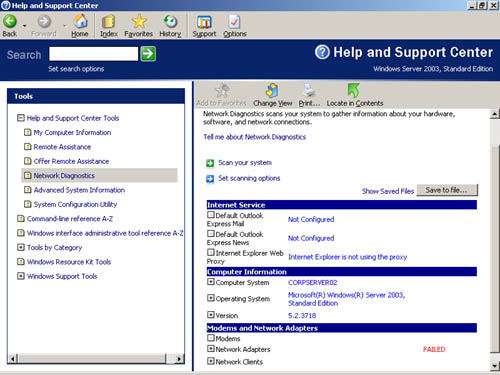
During testing, the Help And Support Services console is displayed with a progress bar showing the progress and status of the diagnostics tests. Default tests that are conducted include ping tests to determine if the network is reachable ; connectivity tests over the configured modems and network adapters; and Internet service tests for e-mail, newsgroups, and proxies. The tests also return information about the computer system, operating system configuration, and operating system version. When complete, you'll see the results of the testing, as shown in Figure 16-11. As you examine the results, look for items that are labeled Not Configured or Failed, as these might point to problem areas. If you see items with these or other labels that indicate problems, click the plus sign (+) to the left of the entry to examine the related diagnostics information. Continue to navigate through the information provided until you find the problem area. For example, on a test system, the DNS server entries were misconfigured and the servers were unreachable. The failure to ping the DNS servers showed up as a failure of the primary network adapter. When I expanded the adapter entry, the DNSServerSearchOrder entry was flagged as Failed. By continuing to expand the entries, I found that the computer was unable to send packets to the DNS servers because the primary and secondary DNS server IP addresses were set incorrectly on the DHCP server. After updating the settings on the DHCP server and renewing the DHCP lease, the computer was again able to resolve DNS properly. Figure 16-11. Use network diagnostics to pinpoint network configuration problems. If you want to conduct more extensive testing, click Set Scanning Options and then select additional test actions and categories, such as DNS, DHCP, and Default Gateways. Then rerun the diagnostics tests by clicking Start. Note any problems and resolve them as necessary. |
EAN: N/A
Pages: 141