Section 11.6. Planning and Managing Active Directory Sites
11.6. Planning and Managing Active Directory SitesSites and subnets are considered to be the physical components of Active Directory. Use physical components to manage network traffic and replication between physical locations or subnets. 11.6.1. Understanding SitesEvery Active Directory implementation has at least one site. A site is a group of IP subnets that are connected by reliable, high-speed links. A subnet is a subdivision of an IP network. Sites are connected to each other via site links. A site link is a logical, transitive connection between two or more sites. Site structure reflects the physical environment and is separate from the logical representation of the network, which is represented by forests, domains, and organizational units. Sites are used to designate replication boundaries and isolate logon authentication traffic between physical network locations. Typically, individual sites represent the individual LANs within an organization, and the WAN links between business locations mark site boundaries. Domain and site boundaries are separate. With respect to domains, a single site can contain resources from multiple domains, and a single domain can extend across multiple sites. With respect to subnets, a single site can have multiple subnets, but a single subnet can be a part of one site only. Key reasons to create additional sites at a single physical location are as follows:
When designing site topology, you should keep the following in mind:
This design should help reduce traffic between sites and ensure faster logon, authentication, and resource access. Use connectivity between network segments to determine where site boundaries should be located. Subnets connected with fast connections should be a part of the same site unless you have specific requirements to control replication or the logon process. Subnets connected with limited bandwidth or unreliable links should be part of different sites. 11.6.2. Understanding ReplicationActive Directory replicates data within sites using a different technique than it uses to replicate data between sites. Replication within a site is referred to as intrasite replication . Replication between sites is referred to as intersite replication . Sites isolate logon traffic. If a user logs in to her home domain, a domain controller within the local site authenticates the logon. If a user logs in to a domain other than her home domain, a domain controller in the local site forwards the logon request to a domain controller in the user's home domain. Tip: Actions such as creating, deleting, modifying, and moving objects trigger replication between domain controllers. The domain controller on which a change is made replicates the changes with its replication partners. As Table 11-1 shows, intrasite and intersite replication is very different. Intrasite replication is designed to ensure that domain controllers are notified rapidly of changes. Intersite replication is designed to reduce traffic over Wide Area Network (WAN) links.
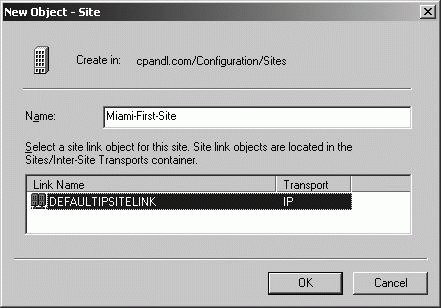
Replication topology is dependent on domain controller availability and configuration. The Knowledge Consistency Checker (KCC) running on each domain controller monitors domain controller availability and configuration, and updates replication topology as changes occur. The Inter-Site Topology Generator (ISTG) performs similar monitoring to determine the best way to configure intersite replication. With intrasite replication, the replication topology is automatically generated and optimized by the Knowledge Consistency Checker (KCC) running on each domain controller. The KCC maintains replication topology on a per-directory partition basis by automatically creating connection objects between domain controllers hosting a particular directory partition. These connection objects represent the inbound-only connection to a domain controller, and can be manually created as well force replication between specific domain controllers. When the organization has multiple geographic locations connected over WAN links, it is important to keep in mind that all domain controllers in the same forest replicate information with each other. The schema and configuration partitions are replicated to all domain controllers in a forest. If you make a change to the forest-wide configuration or schema partitions, those changes are replicated to all domain controllers in all the domains of the forest. When a change is made to a domain partition, the change is replicated to all domain controllers in the domain. If an attribute of an object tracked by the global catalog was changed, the change is replicated to all global catalog servers in all domains of the forest. When multiple sites are involved, a designated domain controller in the site where the changes were made forwards the changes to a domain controller in another site. The receiving domain controller in turn stores the changes, and then forwards the changes to all the domain controllers in its site. The domain controllers responsible for forwarding changes between sites are referred to as bridgehead servers. A bridgehead server is the contact point for replication between sites. The Inter-Site Topology Generator (ISTG) automatically designates a domain controller in each site to be the bridgehead server and automatically creates connection objects between these bridgehead servers. Only one bridgehead server is designated and active in a site. If this server fails, the ISTG designates another bridgehead server automatically. You can also designate a preferred bridgehead server. Typically, you do this if you want to ensure that a particular domain controller handles the additional intersite replication workload, which can be considerable for a large network because data compression requires processor time. Multiple preferred bridgehead servers can be specified. Tip: Although multiple preferred bridgehead servers can be specified, as before, only one is active at any one time. If the current preferred server fails, failover to another preferred server is automatic. However, if you designate preferred servers and all preferred servers fail, replication does not occur to that site. 11.6.3. Configuring and Maintaining SitesWhen you install Active Directory on the first domain controller in a site, the Active Directory Installation Wizard (DCPROMO.EXE) creates a default site and a default site link. The default site is named Default-First-Site-Name, and the default site link is called DEFAULTIPSITELINK. The default site and site link can be renamed. You must create subsequent sites and site links manually. To configure a site, you must complete these tasks:
These tasks are discussed in the sections that follow. 11.6.3.1. Creating sitesYou can create an additional site by completing these steps:
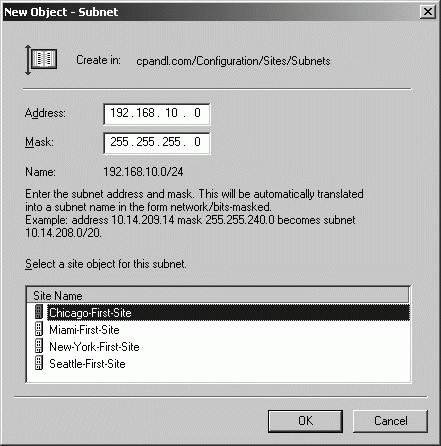
11.6.3.2. Creating subnetsAfter you create a site, you must tell Active Directory about the network segments that belong to the site. Do this by creating the required subnets and associating them with the site. Any computer with an IP address on a network segment associated with a site is considered to be located in the site. While a site can have multiple subnets associated with it, each subnet can be associated with one site only. You can create a subnet and associate it with a site by completing these steps:
To change the site association for the subnet, double-click the subnet in the Subnets folder, and then, in the General tab, use the Site selection list to change the site association. 11.6.3.3. Associating domain controllers with sitesEach site should have at least one domain controller associated with it. If this domain controller is also a global catalog server, you can ensure that directory searches and authentication traffic are isolated to the site. To provide fault tolerance and redundancy, you should have at least two domain controllers in each site. After you associate subnets with a site, any domain controllers you install will be located in the site automatically if the domain controller's IP address is within the valid range of IP addresses for a particular subnet. However, any domain controllers installed before you establish the site and associated subnets will not be associated with the site automatically. You must manually associate any existing domain controllers with the appropriate site by moving the domain controller object into the site. Before you can move a domain controller from one site to another, you must determine in which site the domain controller is currently located. One way to do this would be to use examine the Servers nodes for each site in Active Directory Sites And Services. Another way to do this is to type the following command at a command prompt: dsquery server -s DomainControllerName | dsget server -site where DomainControllerName is the fully qualified domain name of the domain controller, such as: dsquery server -s engsvr38.domain.local | dsget server -site The output of this command is the name of the site in which the designated domain controller is located. You can move a domain controller object from one site to another site by completing the following steps:
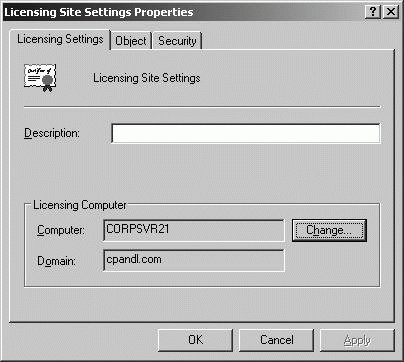
Tip: Only move a domain controller to a site if it is on a subnet associated with the site. If you change subnet and site associations, you need to move domain controllers in the affected subnets to the appropriate site containers. 11.6.3.4. Specifying a site license server for a siteEvery site must have a site license server associated with it. For the default site, the default site license server is the first domain controller created in the site. The site license server does not have to be a domain controller, however. You can determine the site-licensing server by completing the following steps:
You can change the site-licensing server by completing the following steps:
11.6.4. Configuring and Maintaining Intersite ReplicationAs discussed previously, sites are groups of IP subnets that are connected by reliable, high-speed links. Typically, but not always, all subnets on a LAN will be part of the same site. On a network with multiple sites, the sites are connected via site links. Site links are logical, transitive connections between two or more sites. Each site link has a replication schedule, replication interval, a link cost, and a replication transport. To configure and maintain intersite replication, you must complete these tasks:
These tasks are discussed in the sections that follow. 11.6.4.1. Creating site linksBecause site links are used over WAN links, the primary consideration when configuring site links in most cases is bandwidth usage. By default, replication is scheduled to occur over the site link 24 hours a day, 7 days a week, at an interval of at least 180 minutes. If you have limited bandwidth, you may need to alter the schedule to allow user traffic to have priority during peak usage times. When you have multiple links between sites, you need to consider the relative priority of each link. Assign priority based on availability and reliability of the connection. The default link cost is set to 100. If there are multiple possible routes to a site, the route with the lowest site link cost is used first. With site links, you can use one of two transport protocols:
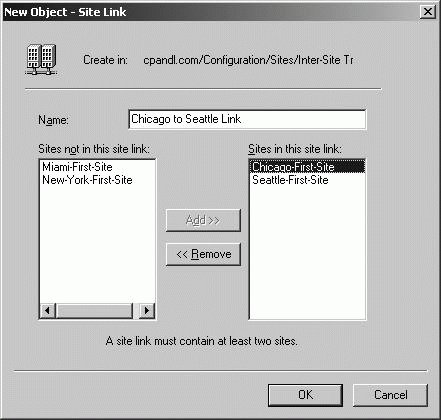
Tip: The RPC and SMTP replication transport protocols are also referred to as DS-RPC and ISM-SMTP respectively. While intrasite replication uses only RPC over IP, intersite replication may use RPC over IP or SMTP. Use of SMTP is limited to DCs in different domains. DCs in same domains must use RPC over IP. To create a site link between two or more sites, you can use the following technique:
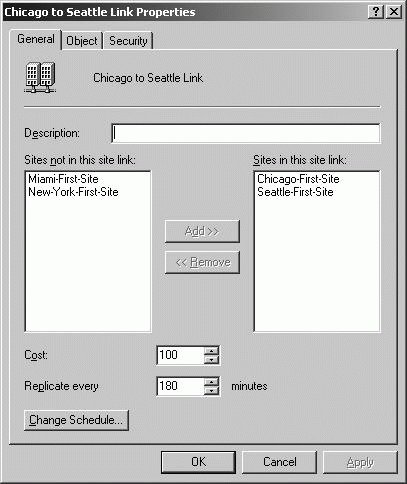
After you create a site link, you should configure the link's properties. This allows you to specify the link cost, replication schedule, and replication interval. To configure site link properties, follow these steps:
You can change the sites associated with a site link at any time. To do this, follow these steps:
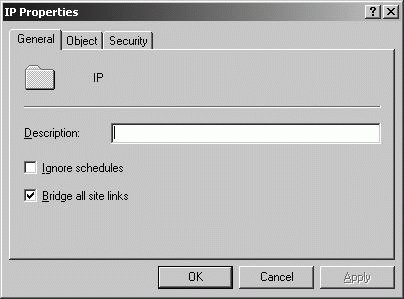
11.6.4.2. Configuring site link bridgesBy default, site link transitivity is enabled. When more than two sites are linked for replication and use the same transport, sites links are bridged, allowing links to be transitive between sites. This means any two domain controllers can make a connection across any consecutive series of links. For example, a domain controller in Site A could connect to a domain controller in Site C through Site B. The link path that domain controllers choose for connections across sites is largely determined by the site link bridge cost. The site link bridge cost is the sum of all the links included in the bridge, and generally the path with the lowest total site link bridge cost is used. If you know the costs of links and link bridges, you can calculate the effects of a network link failure and determine the paths that will be used when a connection is down. For example, a domain controller in Site A would normally connect to a domain controller in Site C through Site B. However, if the connection to Site B is down, the two domain controllers would choose an alternate path automatically if one is available, such as going through Site D and Site E to establish a connection. Tip: By default, intersite replication topology is optimized for a maximum of three hops. In large site configurations, this can have unintended consequences, such as the same replication traffic going over the same link several times. In this case, disable automatic site link bridging and manually configure site link bridges. With an Active Directory forest, site link transitivity is enabled or disabled on a per-transport protocol basis. This means all site links that use a particular transport either use site link transitivity or they don't. You can enable or disable transitive site links for a transport protocol by completing these steps:
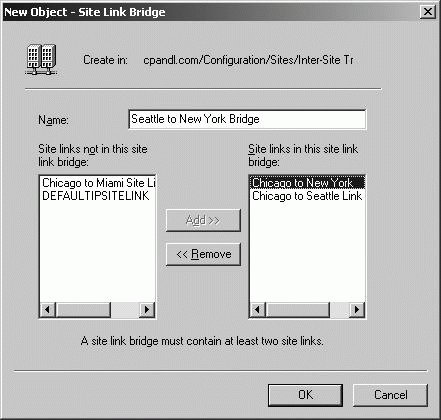
Once you've disabled transitive links, you can manually create a site link bridge between two or more sites by completing the following steps:
11.6.4.3. Determining the Inter-Site Topology GeneratorThe Inter-Site Topology Generator (ISTG) in a site is responsible for generating the intersite replication topology. When calculating the replication topology, the ISTG can use considerable processing power, especially as the size of the network grows. Because of this, you should closely monitor the ISTGs in each site to ensure they are not overloaded. You can determine the ISTG by completing the following steps:
11.6.4.4. Determining and configuring site bridgehead serversReplication between sites is performed by bridgehead servers. A bridgehead server is a domain controller designated by the ISTG to perform intersite replication. When two sites are connected by a site link, the ISTG selects one bridgehead server in each site and creates inbound-only connection objects between the servers. These connections are used for intersite replication. The ISTG configures a bridgehead server for each Active Directory partition that needs to be replicated and maintains a separate replication topology for each type of partition. Although a single bridgehead server can be responsible for replicating multiple directory partitions, the replication topology for each partition is maintained separately. On a per-site basis, this means there is:
Operating as a bridgehead server adds to the workload of the domain controller. The workload increases with the number and frequency of replication changes. As with the ISTG, you'll want to closely monitor designated bridgehead servers to ensure that they do not become overloaded. You can list the bridgehead servers in a site by entering the following command at a command prompt: repadmin /bridgeheads site:SiteName where SiteName is the name of the site, such as: repadmin /bridgeheads site:Seattle-First-Site Tip: If you omit the site: option, the details for the current site are returned. Note also there should be no space between site: and the site name. If current bridgehead servers are overloaded or you have domain controllers that you would prefer to be bridgehead servers, you can designate preferred bridgehead servers to use. Once you designate a preferred bridgehead server for a site, the ISTG uses only the preferred bridgehead server for intersite replication. If the preferred bridgehead server goes offline or is unable to replicate for any reason, intersite replication stops until the server is again available for replication or you change the preferred bridgehead server configuration options. If you designate a single preferred bridgehead server in a site, you have a single point of failure. To avoid possible problems with intersite replication, you can designate multiple preferred bridgehead servers. The ISTG then chooses one of the servers you've designated as the preferred bridgehead server. If this server fails, the ISTG then chooses another server from the list of preferred bridgehead servers. You must configure a bridgehead server for each partition that needs to be replicated. This means you must configure at least one domain controller with a replica of each directory partition as a bridgehead server. If you don't do this, replication of the partition fails and the ISTG logs an event in the Directory Services event log detailing the failure. When you've designated preferred bridgehead servers, you can recover from replication failure by performing the following tasks:
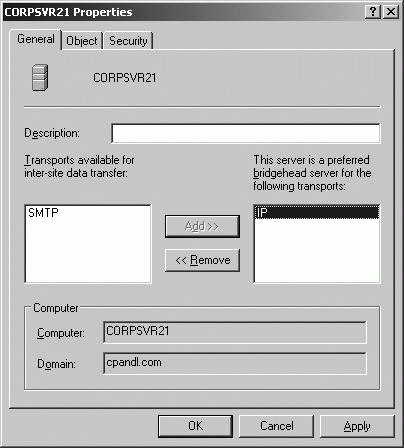
You can configure a domain controller as a preferred bridgehead server by completing the following steps:
Tip: To stop a server from being a preferred bridgehead for a particular transport protocol, select the transport protocol in the This Server Is A Preferred Bridgehead Server list, and then click Remove. |

EAN: 2147483647
Pages: 95