11.7. Maintaining Active Directory Infrastructure As discussed earlier in the chapter, Active Directory has many physical and logical components, which need to be maintained to ensure proper operations. Beyond these components, Active Directory maintenance extends to managing trust relationships, monitoring Active Directory and File Replication Service, and performing Active Directory restores. 11.7.1. Managing Trust Relationships As part of maintenance, you'll also need to manage Active Directory trusts periodically. Every domain in a forest has two-way transitive trusts between them. Other types of trusts can be created as well, including external, shortcut, realm, and forest trusts. 11.7.1.1. Understanding trust relationships In Windows NT 4, you created one-way trusts when you had separate account and resource domains. The establishment of the trust allowed users in the account domain to access resources in the resource domain. In Windows 2000 and later, all domains in a forest have automatic two-way transitive trusts between parent and child domains. Because trusts are automatic, you do not need to create them. Because trusts are two-way, a user in any domain in a forest can access resources in any other domain in the forest, providing he has the appropriate access permissions. Because trusts are transitive, they are not bound by the domains in the trust relationship, and users can access resources across any consecutive series of domains in a forest. For example, a user in Domain A could access a shared folder in Domain C through Domain B. Windows Server 2003 uses Kerberos version 5 (by default) or NT LM for authentication and establishment of trusts. Kerberos is used with Windows 2000 or later clients and servers. NT LM is used with pre-Windows 2000 clients and servers. Within forests, trust trees are used. When a user attempts to access a resource in another domain, a trust tree is used and the user's request passes through one domain controller in each domain between the user and the resource. The request is then authenticated in the domain where the resource resides. Authentication across domain boundaries also occurs when a user with an account in one domain logs on to a computer in another domain. When a forest has many domains and domain trees, the trust tree can grow quite large. Each domain tree in the forest has a tree-root trust, which is established when you add a new tree root domain to a forest. All authentication requests between domain trees must pass from the source domain through parent-child trusts to the tree-root, and then through parent-child trusts to the destination domain. Thus, a user's authentication request might have to pass through several domains to reach the domain tree-root where it is then passed through several additional domains to reach a domain controller in the domain where the resource the user is trying to access is located. To avoid a lengthy referral process, you can establish an explicit shortcut trust between domains. For example, if users in a child domain of a particular domain tree frequently access resources in a child domain of another domain tree, you can establish a shortcut trust between the domains to establish an authentication shortcut between the domains. The domain controller in the first child domain is then able to forward authentication requests directly to a domain controller in the second child domain, allowing for more rapid authentication. In addition to parent-child trusts, tree-root trusts, and shortcut trusts, Windows Server 2003 allows you to establish three additional types of trusts:
External trusts External trusts are non-transitive trusts that must be explicitly established by administrators. An external trust can be one-way or two-way, and is applicable only to the domains for which the trust is established. Users in other domains cannot make use of the trust because it is non-transitive. External trusts are provided for backward compatibility with Windows NT domains or for connecting to domains in other forests that could not otherwise be reached.
Forest trusts Forest trusts are one-way or two-way transitive trust between forest root domains that must be explicitly established by administrators. Forest trusts are used to share resources and to authenticate users between forests. Before you can use forest trusts, all domain controllers in all domains of both forests must be upgraded to Windows Server 2003. Forest trusts are transitive between two forests only.
Realm trusts Realm trusts are trusts between Windows domains and Kerberos realms that must be explicitly established by administrators. Realm trusts are provided for interoperability with Kerberos Version 5 realms and can be non-transitive, transitive, two-way, or one-way. Out of these three additional trusts, the ones you'll work with the most are forest trusts. Forest trusts allows authentication across two forests for when a user account is in one forest and resources are in another trusted forest. As part of authentication across forests, administrators can select users and groups from trusted forests for inclusion in local groups. This ensures the integrity of the forest security boundary while allowing trust between forests. When you connect two or more forests using forest trusts, the implementation is referred to as a federated forest. A federated forest is most useful when you need to join two separate Active Directory structures, such as could occur if your organization has a major restructuring or merges with another company. When forest trusts are two way, users in Forest A can access resources in Forest B and users in Forest B can access resources in Forest A. 11.7.1.2. Viewing Current Trust Relationships Using Active Directory Domains And Trusts, you can view available domains and existing trusts. To start and work with Active Directory Domains And Trusts, follow these steps: Start Active Directory Domains And Trusts from the Administrative Tools menu. Available domains are listed in the console tree. To view the existing trusts for a domain, right-click the domain node and select Properties. In the domain's Properties dialog box, click the Trust tab as shown in Figure 11-25. The Trust tab is organized into two panels:
Domains Trusted By This Domain (Outgoing Trusts) Shows the domains that establish trust with the selected domain. Domains that establish trust with another domain are referred to as trusting domains.
Domains That Trust This Domain (Incoming Trusts) Shows the domains that trust this domain. Domains that trust other domains are referred to as trusted domains. Figure 11-25. Viewing established trusts to a domain. 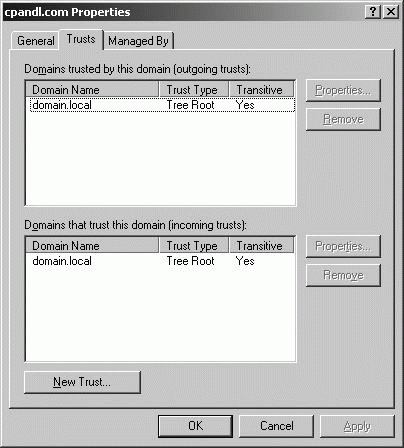 To view more information about a trust, click it and then click Properties. As Figure 11-26 shows, the Properties dialog box contains the following information: Figure 11-26. Viewing the properties of an established trust. 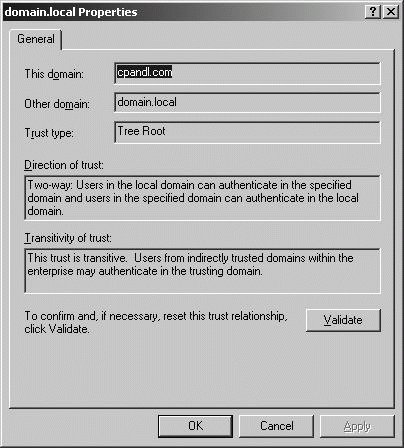
This Domain Shows the domain with which you are working.
Other Domain Shows the domain with which the trust is established.
Trust Type Shows the type of trust.
11.7.1.3. Establishing explicit trust relationships Windows Server 2003 uses two default trust types: Tree-Root and Parent And Child. When a new domain is added to a new domain tree within the forest, the default trust is a tree-root trust. When a new domain is a subdomain of a root domain, the default trust is a parent and child trust. All default trusts are established as two-way, transitive trusts, which allow access to indirectly trusted domains. For all trusts there are two sides: an incoming trust and an outgoing trust. To establish a trust, you must be able to configure both sides of the trust, or you must configure one side of the trust and have another administrator configure the other side of the trust. When establishing explicit trust relationships, keep the following in mind: With domain trusts, you need two accounts: one that is a member of the Domain Admins group in the first domain, and one that is a member of the Domain Admins in the second domain. If you don't have appropriate accounts in both domains, you can establish one side of the trust and allow another administrator in the other domain to establish the other side of the trust. With forest trusts, you need two accounts: one that is a member of the Enterprise Admins group in the first forest and one that is a member of the Enterprise Admins group in the second forest. If you don't have appropriate accounts in both forests, you can establish one side of the trust and allow another administrator in the other forest to establish the other side of the trust. With realm trusts, you need to establish the trust separately for the Windows domain and the Kerberos realm. If you don't have appropriate administrative access to both the Windows domain and the Kerberos realm, you can establish one side of the trust and allow another administrator to establish the other side of the trust.
Tip: When only a one-way trust is established, either incoming or outgoing, users on one side of the forest are not able to access resources on the other side of the forest.
To establish an explicit trust relationship, follow these steps: Start Active Directory Domains And Trusts from the Administrative Tools menu. Right-click the domain for which you want to establish an explicit trust, and then select Properties. For a forest trust, this must be the forest root domain in one of the participating forests. In the domain's Properties dialog box, click the Trust tab and click the New Trust button. Click Next. On the Trust Name page, type the DNS name of the target domain (see Figure 11-27). For a forest trust, this must be the DNS name of the forest root domain in the second forest. Figure 11-27. Specify the DNS name of the target domain. 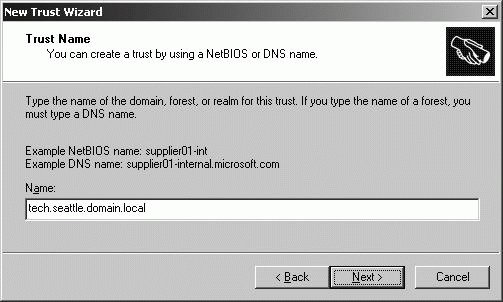 Click Next. The wizard tries to connect to the specified domain. Your options depend on the type of domain to which you are connecting: If the domain is in another Windows forest, you can create an external trust that is nontransitive or a forest trust that is transitive. Choose either External Trust or Forest Trust as appropriate, and then click Next to display the Direction Of Trust page. If the domain is in the same forest, it is assumed you are creating a shortcut trust, and the wizard displays the Direction Of Trust page. If the domain is a non-Windows domain, you can create a realm trust with a Kerberos v5 realm. Click Realm Trust and then click Next. On the Transitivity Of Trust page, select either Nontransitive or Transitive, and then click Next to display the Direction Of Trust page.
On the Direction Of Trust page, choose the direction of Trust as "Two-Way," "One-way: Incoming," or "One-way: Outgoing," and then click Next. For shortcut or forest trusts, the Sides Of Trust page is displayed next. To begin using a trust, both sides of the trust must be created. You have the option of setting the sides of the trust for This Domain Only or for Both This Domain And The Specified Domain: If you are only creating one side of the trust, select This Domain Only, and then click Next. If you are setting both sides of the trust, select Both This Domain And The Specified Domain, and then click Next. When prompted, type the name and password of an appropriate account in the other domain or forest and then click OK.
On the Trust Password page, type and then confirm the initial password for the trust.
Tip: The initial password is arbitrary but must be at least eight characters and contain a combination of upper- and lowercase characters and also have either numerals or special characters. Once the trust is established, the password is maintained automatically.
For domain or realm trusts, click Next twice to begin the trust creation process. For forest trusts, you can set the outgoing trust authentication level as either Domain-Wide Authentication or Selective Authentication. With domain-wide authentication, users in the trusted domain are automatically authenticated for all resources in the trusting domain (and any trusted domains). With Selective Authentication, only the users or groups for which you explicitly grant permissions can access resources in the trusting domain. Click Next twice. On the Completing The New Trust Wizard page, verify the trust, and then click Finish.
11.7.1.4. Troubleshooting trusts Windows Server 2003 validates all incoming trusts automatically. If the credentials used to establish the trust are no longer valid, the trust fails verification. For external trusts, realm trusts, and forest trusts, failure of the trust means that users are not able to access resources in the external domain, realm, or forest. You can re-validate the trust by providing new credentials or by specifying that incoming trusts should not be validated. To re-validate and, if necessary, reset a trust relationship, follow these steps: Start Active Directory Domains And Trusts from the Administrative Tools menu. Right-click the domain for which you want to validate trusts. In the domain's Properties dialog box, select the Trust tab and click the Validate button. To stop validation of the incoming trust, click No, Do Not Validate The Incoming Trust. To re-validate the incoming trust, click Yes, Validate The Incoming Trust. Type the user account and password for an administrator account in the other domain. Click OK. For a two-way trust, repeat this procedure for the other domain.
If re-validating and resetting the trust doesn't resolve the issue, you may have a deeper problem. Here are some general tips for troubleshooting: With external trusts to Windows NT 4 domains, a PDC emulator must be available to reset and verify the external trust. In Windows domains, Windows 2000 domain controllers must be running Service Pack 3 or later for trust validation to work properly. System time on clients and servers trying to authenticate must not be more than five minutes off, which is the default maximum time difference allowed for Kerberos authentication. After upgrading a Windows NT 4.0 domain with existing trusts to Active Directory domains, you must delete and recreate all the preexisting trusts. These trusts are not automatically upgraded.
11.7.2. Monitoring and Troubleshooting Active Directory Monitoring is a key part of maintenance. You need to monitor domain controllers, global catalog servers, bridgehead servers, and site links. When you suspect there are problems with Active Directory, one of the first areas you should examine is replication. If Active Directory data is not being replicated properly, Active Directory will have problems. By configuring monitoring of Active Directory intrasite and intersite replication, you can diagnose and resolve the problem. Active Directory replication has several key service dependencies including: These Windows services must be functioning properly to allow directory updates to be replicated. Additionally, for replication of files in the System Volume (SYSVOL) shared folders on domain controllers, Active Directory uses the File Replication Service (FRS). This service must be running and properly configured to replicate System Volume files. During replication, Active Directory relies on various TCP and UDP ports being open. Table 11-2 lists the ports and the components that use them. If servers, LAN connections, or WAN connections are protected by firewalls, these ports must be open. Table 11-2. TCP and UDP ports used in replicationService | TCP port | UDP port |
|---|
LDAP | 389 | 389 | LDAP SSL | 686 | | Global Catalog (LDAP) | 3268 | | Kerberos v5 | 88 | 88 | DNS | 53 | 53 | SMB over IP | 445 | 445 |
Changes to Active Directory are tracked using Update Sequence Numbers (USNs). Anytime a change is made to the directory, the domain controller processing the change assigns the change a USN. Each domain controller maintains its own local USNs and increments the value each time a change occurs. The domain controller also assigns the local USN to the object attribute that changed. Each object has a related attributed called uSNChanged, which is stored with the object and identifies the highest USN that has been assigned to any of the object's attributes. Each domain controller tracks its local USN and also the local USNs of other domain controllers. During replication, domain controllers compare the USN values received to what is stored. If the current USN value for a particular domain controller is higher than the stored value, changes associated with that domain controller need to be replicated. If the current value for a particular domain controller is the same as the stored value, changes for that domain controller do not need to be replicated. The Windows Support Tools includes several tools for monitoring and troubleshooting replication issues. The tools you'll use the most are Replication Administrator (Repadmin) and Replication Monitor (Replmon). Both tools provide similar functionality. Repadmin is a command-line utility and Replmon is its GUI counterpart. For Repadmin, most command-line parameters accept a list of the domain controllers that you want to work with, called DCList. The values for DCList can be specified as follows:
* This is used as a wildcard to include all domain controllers in the enterprise.
PartialName* PartialName is a partial server name that includes a wildcard to match the remainder of the server name.
Site:SiteName SiteName is the name of the site for which you want to include domain controllers.
Gc: This is used to include all global catalog servers in the enterprise. The Repadmin commands you'll work with the most are:
repadmin /bridgeheads DCList [/verbose] Displays the bridgehead servers that match the DClist.
repadmin /failcache DCList Displays failed replication events that were detected by the Knowledge Consistency Checker (KCC).
repadmin /kcc DCList [/async] Forces the KCC to recalculate the intrasite replication topology for a specified domain controller. By default, this recalculation occurs every 15 minutes. Use /async to start the KCC and not wait for the calculation to complete.
repadmin /latency DCList [/verbose] Displays the amount of time between intersite replications using the ISTG Keep Alive timestamp.
repadmin /queue DCList Displays the tasks waiting in the replication queue.
repadmin /replsummary DCList Displays a summary of the replication state.
repadmin /showcert DCList Displays the server certificates loaded on the specified domain controllers.
repadmin /showconn DCList Displays the connection objects for the specified domain controllers. Defaults to the local site.
repadmin /showctx DCList Displays the computers that have opened sessions with a specified domain controller.
repadmin /showrepl DCList Displays the replication partners for each directory partition on the specified domain controller.
repadmin /showtrust DCList Displays all domains trusted by a specified domain.
repadmin istg DCList [/verbose] Displays the name of the ISTG for a specified site.
repadmin /showoutcalls DCList Displays the calls made, but not yet answered, by the specified server to other servers. Replmon can perform many of the same tasks as Repadmin. You can start this tool by typing replmon at a command prompt. Once you start Replmon, you must add the domain controllers that you want to monitor. To specify a domain controller to monitor, follow these steps: Right-click the Monitored Servers node in the console tree, and then click Add Monitored Server. In the Add Monitored Server Wizard, you have the option to add the server by name or search the directory. Click Search The Directory For The Server To Add as shown in Figure 11-28. Figure 11-28. Search the directory for domain controllers to monitor. 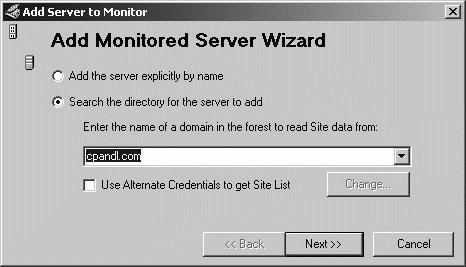 On the Add Server To Monitor page, shown in Figure 11-29, a list of available sites is displayed. Expand the node for the site where the domain controllers you want to monitor are located. Click the domain controller to monitor, and then click Finish. The domain controller is then added to the Replication Monitor. Figure 11-29. Locate and select the domain controller to monitor. 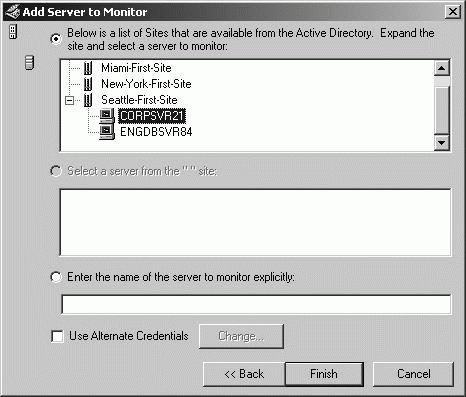
Once you've add a domain controller to monitor, each directory partition maintained by the server is listed, as shown in Figure 11-30. You can now start monitoring replication. Right-click a partition to synchronize the partition with all other domain controllers or to show change notifications to replication partners. Right-click the domain controller node to perform replication monitoring tasks, including checking the replication topology, synchronizing all directory partitions with all other domain controllers, and generating a status report.
Figure 11-30. Monitor replication of the domain controller or its partitions. 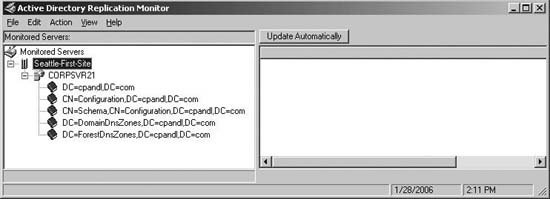
You can also search for replication errors. Click Action  Domain Search Domain Controllers For Replication Errors to view replication errors for all domain controllers in your logon domain. With the Search Domain Controllers For Replication Errors dialog box displayed, you can search other domains by clicking the Run Search button, typing the DNS name of the domain to search, and then clicking OK. Domain Search Domain Controllers For Replication Errors to view replication errors for all domain controllers in your logon domain. With the Search Domain Controllers For Replication Errors dialog box displayed, you can search other domains by clicking the Run Search button, typing the DNS name of the domain to search, and then clicking OK. 11.7.3. Diagnosing and Resolving Active Directory and File Replication Service Issues Using the Performance console, you can perform in-depth monitoring and analysis of Active Directory. Start the Performance console by clicking Start  Programs Administrative Tools Performance or by typing perfmon.msc at a command prompt. Using the Performance consoles remote monitoring capabilities, you can track the performance of multiple domain controllers from a single, monitoring server. Programs Administrative Tools Performance or by typing perfmon.msc at a command prompt. Using the Performance consoles remote monitoring capabilities, you can track the performance of multiple domain controllers from a single, monitoring server. NTDS is the performance object to use for monitoring Active Directory. Over 100 performance counters are available for selection. Each counter has a prefix that reflects the aspect of Active Directory to which the counter relates: AB counters relate to the Address Book in Active Directory. ATQ counters relate to the Asynchronous Thread Queue in Active Directory. DRA counters relate to the Directory Replication Agent in Active Directory. DS counters relate to the Directory Service in Active Directory. KDC counters relate to the Key Distribution Center in Active Directory. Kerberos counters relate to Kerberos in Active Directory. LDAP counters relate to the Lightweight Directory Access Protocol in Active Directory. NTLM counters relate to the NT LAN Manager in Active Directory. SAM counters relate to the Security Accounts Manager in Active Directory.
To specify NTDS counters to monitor, follow these steps: Start the Performance console from the Administrative Tools menu. Click the System Monitor node. Click the Add (+) button on the toolbar or press CTL+L. In the Add Counters dialog box, use the Select Counters From Computer list to select the computer to monitor (see Figure 11-31). Select NTDS on the Performance Object list. Specify counters to track by clicking Select Counters From List. To learn more about a counter, click the counter in the Select Counters From List, and then click Explain to display a description of the counter. To track a counter, click the counter in the Select Counters From List, and then click Add. Repeat this process for other counters you want to monitor. Click Close when you are finished adding counters. Figure 11-31. Select the computer and counters to monitor. 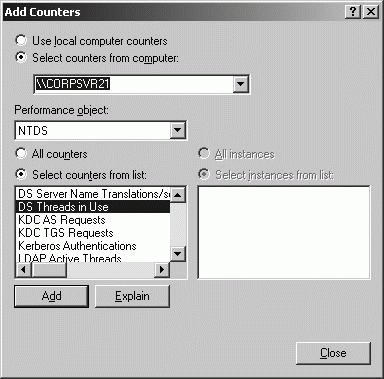
As with other types of monitoring, you can configure performance logging and performance alerting if desired. Events related to Active Directory are also logged in the event logs. Active Directory-related events, including NTDS replication events, are logged in the Directory Service log located on the domain controller. File Replication Service (FRS) is used to replicate the Sysvol files between domain controllers. To monitor File Replication Service, use the FileReplicaConn and FileReplicatSet monitoring objects. Each object has a number of counters that can be used to track the status and health of FRS replication. As with Active Directory, you can configure performance logging and alerting for FRS. To replicate the Sysvol, FRS relies on the availability of a properly configured Sysvol share. You can type net share at a command prompt to check the Sysvol share. The Netlogon service also uses Sysvol for obtaining scripts. NTFS permissions on the Sysvol folder and Share permissions on the Sysvol share must be configured properly. Events related to File Replication Service (FRS), which is used for replicating the Sysvol files, are recorded in the File Replication Service log located on the domain controller. The primary source for events is NtFrs, which is the File Replication Service itself. 11.7.4. Restoring Active Directory As part of your enterprise backup and recovery strategy, you should back up the system state on domain controllers whenever you perform Normal backups to ensure Active Directory data is stored in the full backup set. System State data for a domain controller includes Active Directory data and system volume (Sysvol) files. The System State of a domain controller can only be restored using the Directory Services Restore Mode startup option. When you start a domain controller, you can enter this mode by pressing F8 during boot up, and then selecting Directory Services Restore Mode as the startup option.
Tip: As a part of the planning process, the administrator should make a decision about how often the System State is to be backed up. Typically, you back up the System State as part of every normal (full) backup.
When you have multiple domain controllers in a domain and one fails, the other domain controllers automatically detect the failure and change their replication topology accordingly. You can restore the failed domain controller from backup if necessary. However, the restore doesn't recover Active Directory information stored on the domain controller. To restore Active Directory on the failed domain controller, you must do so using either of the following:
Authoritative restore Use an authoritative restore only when you need to recover Active Directory and no other domain controller has the correct data. For example, if someone accidentally deletes a large number of user accounts, you could use an authoritative restore to recover the deleted accounts. For an authoritative restore, restore the System State, and then use NTDSUTIL to determine how the authoritative restore should be implemented. Do not reboot the computer after restoring the System State. Sysvol is not restored authoritatively unless you do a primary restore of the Sysvol.
Nonauthoritative restore Use a nonauthoritative restore to restore a domain controller and allow it to get any necessary updates for Active Directory from other domain controllers. For a nonauthoritative restore, restore the System State, and then reboot the domain controller. In this state, the domain controller gets updates in its replica of Active Directory and Sysvol from other domain controllers using normal replication. You have the option of doing a primary restore of the Sysvol. Nonauthoritative restores, authoritative restores, and primary restores of Sysvol are discussed in the sections that follow. 11.7.4.1. Performing a nonauthoritative restore operation To restore Active Directory on a domain controller and have the domain controller get directory updates from other domain controllers, you should repair the server, replacing an failed hardware as necessary, and then perform a non-authoritative restore. A nonauthoritative restore allows the domain controller to come back online, and then get replication updates from other domain controllers. You can perform a nonauthoritative restore by completing the following steps: Restart the domain controller. Press F8 during startup to display the Windows Advanced Options menu. Select Directory Services Restore Mode (Windows Domain Controllers Only), and then press Enter. Windows then restarts in Safe Mode without loading Active Directory components. When the system starts, log on using the Administrator account with the Directory Services Restore password. An operating system prompt warns you that you are running in Safe Mode. Click OK. Click Start Programs Accessories System Tools Backup to start the Backup utility. If Backup starts in Wizard mode, click the Advanced Mode Link to switch to Advanced mode. Under Items To Restore, expand the media item that you want to restore, and then expand the backup set that you want to restore. Select the checkbox for each volume, folder, file, or data set to recover. Selecting a volume or folder selects all the related folders and files. Selecting System State allows you to recover the System State, which is required to restore Active Directory. Click Next. By default, files are recovered to their original location. To change the recovery to an alternative location or folder, click the Advanced button, select the restore location, and then configure other advanced options as necessary. Click Finish to begin the nonauthoritative restore. When warned that you will overwrite current system state, click OK. The Restore Progress dialog box shows the progress of the restore operation. When the restore completes, click Close to complete the process or click Report to view a log report of the restore operation. Restart the computer as instructed. Once the server restarts, it is able to act as a domain controller and has a directory database that is current as of the date of the backup. During its normal replication process, the domain controller obtains updates from its replication partners.
11.7.4.2. Performing an authoritative restore operation To restore Active Directory on a domain controller and have the domain controller be the authoritative domain controller for the domain, you should repair the server, replacing failed hardware as necessary, and then perform an authoritative restore. An authoritative restore is used when you need to recover Active Directory to a specific point in time, and then replicate the restored data to all other domain controllers. Before performing an authoritative restore, keep in mind that passwords used for computers and NTLM trusts are changed automatically every seven days. When you perform an authoritative restore of Active Directory, the restored database contains the passwords that were in use when the backup archive was made. Computer account passwords allow computers to authenticate themselves in a domain using a computer trust. If a computer password has changed, the computer may not be able to re-authenticate itself in the domain. In this case, you may need to reset the computer account password.
Tip: Deleted objects have a default tombstone lifetime of 60 days. You won't be able to restore System State data from backups that are older than 60 days. If you try to restore data older than 60 days, the tombstone lifetime will have expired and as a result, the data is not restored.
To reset the computer account password for a workstation, you need to: Right-click the computer account in Active Directory Users And Computers, and then select Reset Account. Log on the problem computer and remove the computer from the domain by joining a workgroup. While logged on to the problem computer, rejoin the computer to the domain.
With member servers and domain controllers, you should use NETDOM RESETPWD. You can reset the computer account password of a member server or domain controller by completing the following steps: Log on locally to the computer. If you are resetting the password of a domain controller, you must stop the Kerberos Key Distribution Center service and set its startup type to Manual. Open a command prompt. Type neTDom resetpwd /s:ComputerName /ud:domain\user /pd:*, where ComputerName is the name of a domain controller in the computer account's logon domain, domain\user is the name of an administrator account with the authority to change the computer account password, and * tells NETDOM to prompt you for the account password before continuing. When you enter your password, NETDOM will change the computer account password locally and on the domain controller. The domain controller then distributes the password change to other domain controllers. When NETDOM completes this task, restart the computer and verify that the password has been successfully reset. If you reset a domain controller's password, restart the Kerberos Key Distribution Center service and set its startup type to Automatic.
NTLM trusts are trusts between Active Directory Domains and Windows NT domains. If a trust password changes, the trust between the domains may fail. In this case, you may need to delete the trust, and then recreate it as discussed previously under "Managing Trusts." You can perform an authoritative restore by completing the following steps: Restart the domain controller. Press F8 during startup to display the Windows Advanced Options menu. Select Directory Services Restore Mode (Windows Domain Controllers Only), and then press Enter. Windows then restarts in Safe Mode without loading Active Directory components. When the system starts, log on using the Administrator account with the Directory Services Restore password. An operating system prompt warns you that you are running in Safe Mode. Click OK. Click Start Programs Accessories System Tools Backup to start the Backup utility. If Backup starts in Wizard mode, click the Advanced Mode Link to switch to Advanced mode. Under Items To Restore, expand the media item that you want to restore, and then expand the backup set that you want to restore. Select the checkbox for each volume, folder, file, or data set to recover. Selecting a volume or folder selects all the related folders and files. Selecting System State allows you to recover the System State, which is required to restore Active Directory. Click Next. By default, files are recovered to their original location. To change the recovery to an alternative location or folder, click the Advanced button, select the restore location, and then configure other advanced options as necessary. Click Finish to begin the authoritative restore. When warned that you will overwrite current system state, click OK. The Restore Progress dialog box shows the progress of the restore operation. When the restore completes, click Close to complete the process or click Report to view a log report of the restore operation. Do not restart the computer when prompted. Instead, open a command prompt and type ntdsutil. This starts the Directory Services Management Tool. At the Ntdsutil prompt, type authoritative restore. You can authoritatively restore Active Directory in several ways: Restore the entire Active Directory database by typing restore database. Restore the entire database only if Active Directory has been corrupted or there is some other considerable reason for doing so. Restore a portion or subtree of the directory by typing restore subtree ObjectDN, where ObjectDN is the distinguished name of the container to restore. For example, you could restore the Tech OU and all the objects it contained by typing the command restore subtree ou=tech,dc=domain,dc=local. Restore an individual object by typing restore object ObjectDN, where ObjectDN is the distinguished name of the object to restore. For example, you could restore the Engineering security group by typing the command restore object cn=engineering,dc=domain,dc=local.
Type quit twice to exit Ntdsutil. Restart the server.
11.7.4.3. Performing a primary restore operation on the Sysvol The Sysvol folder is backed up as part of the System State. It contains critical domain information, including Group Policy Objects, group policy templates, and scripts. If you restore a domain controller, the Sysvol data on the restored domain controller is overwritten with a replica from other domain controllers. The reason this occurs is because Sysvol data is replicated using the File Replication Service (FRS). You must perform a primary restore of the Sysvol to ensure that the restored Sysvol is replicated to all other domain controllers. To perform a primary restore of the Sysvol, use Backup to restore the System State using either an authoritative or nonauthoritative restore technique as discussed previously. There is one important change, however. During the restore, do not accept the default restore settings. Instead, on the Completing The Restore Wizard page, click the Advanced button to access the advanced restore options. Then click Next twice. On the Advanced Restore Options page, select When Restoring Replicated Data Sets, Mark The Restored Data As The Primary Data For All Replicas. Click Next, and then click Finish. |