Section 5.3. Implementing, Managing, and Maintaining Name Resolution
5.3. Implementing, Managing, and Maintaining Name ResolutionWhen you install a computer, you assign the computer a name, which is used as the computer's NetBIOS name and as the computer's DNS hostname. On Windows NT 4.0 networks, WINS is used to resolve NetBIOS names. On networks running Windows 2000 and later computers, DNS is used to resolve DNS hostnames. With DNS, computers are grouped by name with domains. Domains establish a hierarchical naming structure so a computer's place within the domain structure can be determined. In a standard configuration, a computer's fully qualified domain name (FQDN) is its hostname combined with the related domain name. For example, the FQDN for the computer FileServer81 in the WilliamStanek.com domain is FileServer81.WilliamStanek.com. Since domain structure is hierarchical, domains can have subdomains. For example, the WilliamStanek.com domain might have Tech and Eng subdomains. The computer Workstation82 in the Tech domain would have a FQDN of Workstation82.Tech.WilliamStanek.com. The computer TestServer21 in the Eng domain would have a FQDN of TestServer21.Eng.WilliamStanek.com. DNS uses client/server architecture. Any computer that uses DNS for name resolution is a DNS client. A computer that provides DNS name resolution services to a client is referred to as a DNS server. For name resolution to work properly, both DNS clients and DNS servers must be configured appropriately. When the network is not fully configured for DNS name resolution, you might need NetBIOS name resolution. NetBIOS is also required for some applications such as the Computer Browser service. NetBIOS is enabled by default in Windows Server 2003. 5.3.1. Managing DNS ClientsFor clients to use DNS, the client must have an appropriate computer name and a properly configured primary DNS suffix. The computer name serves as the computer's hostname. The computer's primary DNS suffix determines the domain to which it is assigned for name resolution purposes. DNS clients can dynamically update their own records and also cache query responses. The DNS Client service, also known as Resolver, is enabled by default on Windows Server 2003 and Windows XP computers. 5.3.1.1. Configuring primary and alternate DNS suffixesBy default, the primary DNS suffix is the domain in which the computer is a member. To view or modify the primary DNS suffix of a computer, follow these steps:
Unqualified names that are used on a computer are resolved using the primary DNS suffix. For example, you are logged on to a computer with a primary DNS suffix of Tech.WilliamStanek.com and you ping FileServer21 at a command prompt, the computer directs the query to FileServer21.Tech.WilliamStanek.com. When computers have multiple IP addresses, the additional IP addresses can have different (alternate) DNS suffixes, allowing the computer to have connection-specific settings and to communicate as a local host on multiple subnets. The way DNS suffixes are used is determined by the computer's Advanced TCP/IP Settings. You can view and modify these settings by following these steps:
Typically, you will use a primary or connection-specific alternate DNS suffix as discussed previously. Still, there is one other possible configuration that can be usedand that is to append specific DNS suffixes. If you select the Append These DNS Suffixes radio button, you can specify the suffixes to append and define the order in which the computer attempts to use these suffixes to resolve names. 5.3.1.2. Configuring dynamic DNS updatesIn the Advanced TCP/IP Settings dialog box, the Register This Connection's Addresses In DNS checkbox is selected by default, which allows Windows 2000 and later computers to dynamically update their A and PTR records in DNS. As discussed previously, the default configuration for DHCP clients is to dynamically update their A records and allow DHCP servers to dynamically update their PTR records. This behavior is configurable. Dynamic updates can only occur when the client is configured with a domain suffix that matches a zone name hosted by the preferred DNS server. Thus, for a computer named Workstation18 to be dynamically updated in the eng.williamstanek.com zone, the FDQN of the computer must be Workstation18.eng.williamstanek.com. Normally, the FQDN is the computer's name combined with the name of which the computer is a member. However, if you've modified the primary DNS suffix, the FQDN is the computer's hostname combined with the primary DNS suffix. For example, the FQDN for the computer Workstation27 with a primary DNS suffix of Tech.WilliamStanek.com is Workstation27.Tech.WilliamStanek.com. If you create a connection-specific alternate DNS suffix, the FQDN is the computer's hostname combined with the DNS suffix for the connection. For example, the FQDN for the computer Workstation31 with a connection-specific DNS suffix of Eng.WilliamStanek.com is Workstation31.Eng.WilliamStanek.com. 5.3.1.3. Working with the resolver cache on DNS clientsYou can force a client to register its DNS records by typing ipconfig /registerdns at a command prompt. DNS clients send name resolution queries to DNS servers using two key types of lookups: forward lookups , to determine the IP address of a computer from its FQDN, and reverse lookups , to determine a computer's FQDN from its IP address. When DNS clients receive a query response from a DNS server, the response is stored in the local DNS resolver cache. If you type ipconfig /displaydns at a command prompt, you can view the contents of the resolver cache. Each stored response has a specific expiration date and time, as set for the related record on a DNS server. DNS clients display a countdown to this expiration date and time as a Time To Live (TTL) value. This value is the number of seconds until the resolver cache entry expires. You can clear a client's resolver cache by typing ipconfig /flushdns at a command prompt. 5.3.2. Understanding DNS Queries and DNS Server Configuration OptionsDNS uses both recursive and iterative queries to resolve queries. With a recursive query, the DNS client requests that the DNS server either respond directly with an answer that resolves the query or return an error message that the query cannot be resolved. The DNS server cannot refer the client to another DNS server, and instead, queries other DNS servers until it obtains a response that resolves the request or the query fails. With an iterative query, a DNS server attempts to resolve the query from its records or from its cache. If it is unable to resolve the query, the server can refer the client to another DNS server. When you configure a DNS client, you specify the primary and alternate DNS servers for the client to use. Each DNS server is responsible for name resolution within specific administrative areas known as zones. Simply put, a zone is a portion of the DNS database that is being managed. A single zone can contain a single domain or it can span multiple domains. DNS servers are said to be either authoritative or non-authoritative for a zone:
DNS servers store zone information in zone files. Zone files contain resource records that are used to resolve queries and primarily map hostnames to IP addresses. Several types of zone files are used including:
Tip: There is a special type of DNS server known as an Active Directory-integrated primary. An Active Directory-integrated primary is a domain controller configured as a DNS server that is fully integrated with Active Directory and for which the related DNS zones information is stored in Active Directory. Both primary and stubs zones can be stored in Active Directory. DNS servers can be configured in the following roles:
A single DNS server can have multiple roles. For example, a server can be the primary for one or more zones and the secondary for other zones. 5.3.3. Installing, Configuring, and Managing the DNS Server ServiceWith Windows Server 2003, any server can run the DNS Server service and act as a DNS server. Although the server doesn't have to have a static IP address, a static IP address is recommended. However, it is also recommended that domain controllers not be configured as DHCP servers. In a standard configuration, DHCP is integrated with DNS, and DHCP clients are permitted to create, alter, and remove their own records. If you install DHCP on a DC, any client on the network might be able to alter critical service locator (SRV) records, which is an unnecessary security risk. Tip: You must be an administrator to install windows components, including the DNS Server service. The account you use for installing DNS should be a member of the global Domain Admins groups or the DnsAdmins group. You can install the DNS Server service by completing the following steps:
You can also install the DNS Server service using the Configure Your Server Wizard. To start the wizard, click Start Installation of the DNS Server service is only the first step in the configuration of a name server. You also need to configure the name server's:
Once you've completed these steps, clients in the domain will be able to query DNS and obtain responses. If you've installed the DNS Server service on a server but have not configured DNS zones, the server acts as a caching-only server. 5.3.3.1. Configuring and managing DNS Server optionsAs with other Windows services, the DNS Server service can be managed using the Services utility in Control Panel. However, the best way to manage the DNS Server service and DNS itself is to use the DNS Management console, which can be accessed by clicking Start When you start the DNS Management console on a DNS server, the console connects automatically to DNS on this server. If you start the DNS Management console on your workstation or want to connect to a different DNS server, you can do this by right-clicking the DNS node and selecting Connect To DNS Server. You can then use the Connect To DNS Server dialog box to select the remote server you want to work with by its fully qualified domain name or IP address. Each server to which you are connected is listed in the DNS Management console. When you select a server entry in the left pane, the DNS Management console connects to the server so that you can view and manage the server's properties and configuration. If there is a problem connecting to or communicating with a server, this is displayed as depicted in Figure 5-16. Troubleshooting can be performed by right-clicking the server entry and selecting Launch Nslookup. NSLOOKUP.EXE is a command-line tool for querying name servers. Figure 5-16. The DNS Management console. For each Active Directory domain, there is a single primary DNS server, referred to as the domain's primary name server. This server is the holder of the primary zone file for the domain. DNS servers have many options that can be configured using the server's Properties dialog box, which can be accessed in the DNS Management console by right-clicking the server entry and clicking Properties. As shown in Figure 5-17, the server's Properties dialog box has multiple tabs. These tabs are used as follows: Figure 5-17. The Advanced tab.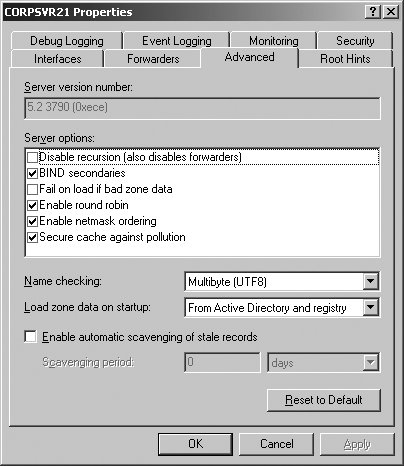
5.3.3.2. Configuring DNS zone optionsAs discussed previously, a single name server can be configured to have multiple roles in DNS. Those roles are determined by the server's configuration and by the types of zones it hosts. Zone types include: primary zones, secondary zones, and stub zones. For each type of zone, there are two related zone files:
On domain controllers that also act as DNS servers, primary zones and secondary zones can be stored in Active Directory. You can create a new zone by completing these steps:
5.3.3.3. Using delegation and stub zonesIn a large enterprise, you may find that you need to delegate administration of subdomains. To do this, you can create a delegated zone. When you delegate a zone, you assign authority over a portion of your DNS namespace and thereby pass control from the owner of the parent domain to the owner of a subdomain. For example, if you have tech.domain.local and eng.domain.local subdomains, you may want to delegate control over these subdomains so they can be managed separately from the organization's parent domain. Delegation helps to ensure that branches or departments within the organization can manage their own DNS namespace. It also helps to distribute the workload so that rather than having one large DNS database, you have multiple DNS databases. Before you can delegate a zone, you must first create the domain to be delegated on the server that will be hosting the delegated zone. Once you do this, run the New Delegation Wizard on the server hosting the parent zone to specify the zone to delegate. To create a delegated zone, follow these steps:
Stub zones list authoritative name servers for a zone. Servers hosting stub zones do not answer queries directly, but instead direct related queries to any of the name servers specified in the stub zone's NS resource records. Stubs zones are most often used to track authoritative name servers for delegated zonesand the parent DNS servers of delegated zones are the ones to host the related stub zones. You can create a stub zone by completing these steps:
5.3.3.4. Managing DNS zone optionsAfter you create a zone, you can manage its settings by right-clicking it and selecting Properties. The available options differ slightly based on zone type. Zone Properties dialog boxes have the following tabs:
The sections that follow examine commonly configured zone options. 5.3.3.4.1. Configuring zone type, dynamic updating, and scavenging optionsUsing the General tab of the zone Properties dialog box, you can view the type and status of the zone as shown in Figure 5-27. To pause a "running" zone, click the Pause button. To change the zone type, click the Change button to the right of the Type entry, select the new zone type, and then click OK. Only one server can be designated as a primary, and thus only one server can have a primary zone. If the DNS server is also a DC, you can store the zone in Active Directory rather than in a text file. You are then able to determine how zone data is replicated by clicking the Change button to the right of the Replication entry. Figure 5-27. The General tab. Using the Dynamic Updates list, you can specify whether and how dynamic updates are used. By clicking the Aging button, you can enable aging and scavenging (see Figure 5-28). Aging refers to the process of placing timestamps on dynamically registered resource records and then tracking the age of the record using the TTL value. Scavenging refers to the process of deleting outdated (stale) resource records. Scavenging can occur when aging is enabled (because aging puts a TTL timestamp on dynamically registered resource records. Figure 5-28. Configuring zone aging/scavenging. To enable aging and scavenging in a zone, select the Scavenge Stale Resource Records checkbox, then set the no-refresh and refresh intervals as appropriate. The no-refresh interval is the period after the timestamp is set that must elapse before a resource record can be refreshed. The refresh interval is the period after the no-refresh interval during which the timestamp can be refreshed. If a timestamp on a resource record is not refreshed in this time, the record can be scavenged. Tip: Manually configured resource records have no timestamp. Only dynamically created resource records do. The default no-refresh interval is seven days. The default refresh interval is also seven days. This means dynamically registered record can be scavenged after 14 days by default. Once aging/scavenging is enabled, scavenging can be performed manually or automatically. To manually scavenge a zone, right-click the zone entry in the DNS Management console and select Scavenge Stale Resource Records. To automatically scavenge a zone, follow these steps:
Tip: Both Aging and Scavenging are disabled by default. Scavenging occurs only when aging is enabled. Scavenging needs to be enabled both at the DNS server properties and from the Zone properties. The Refresh interval should be more than or equal to the No-Refresh interval. 5.3.3.4.2. Configuring the SOAUsing the Start Of Authority (SOA) tab of the zone Properties dialog box, you can configure the SOA record for a zone (see Figure 5-29). The Serial Number field lists the revision number of the zone file. This value is incremented each time a resource record changes in the zone. Zone transfers occur only when the zone serial number on the primary (master) server is greater than the zone serial number on secondary servers. If you are troubleshooting zone transfers, you can manually increment the serial number by clicking the Increment button. Figure 5-29. The Start Of Authority (SOA) tab.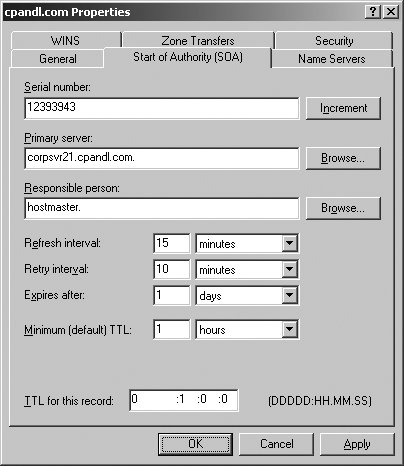 Tip: The serial number is automatically incremented whenever resources records are changed in the zone. To force DNS to think there are changes, you can manually increment the serial number. The Primary Server text box lists the primary server for the zone. The entry must end with a period. The Responsible Person text box lists the person responsible for administering the zone. Typically, this is listed as hostmaster.. The entry must end with a period. 5.3.3.4.3. Configuring name servers for the zoneUsing the Name Servers tab of the zone Properties dialog box, you can configure NS records for the zone as shown in Figure 5-30. You use NS records to specify the authoritative servers for the zone. The NS record of the primary name server for the zone is configured automatically. Records for alternate name servers must be configured as necessary. To create a NS record, click Add. In the New Resource Record dialog box, type the FQDN and at least one IP address for the name server, then click OK. Figure 5-30. The Name Servers tab.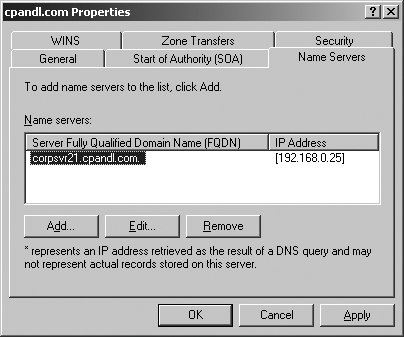 5.3.3.4.4. Configuring zone transfersUsing the Zones tab of the zone Properties dialog box, you can configure zone transfers. Zone transfers are used to send a copy of a zone to requesting servers. By default, zone transfers are not allowed or restricted only to the DNS servers specified in the Name Servers tab. If you've configured secondary (alternate) name servers for a domain, you should enable zone transfers by selecting the Allow Zone Transfers checkbox and then specifying the servers permitted to make requests. To maintain the integrity and security of the network, you'll usually want to limit the list of servers that can make requests to the servers listed on the Name Servers tab or to a specific list of designated name servers (see Figure 5-31). Figure 5-31. For security, limit zone transfers to authoritative Name Servers (or to a specific list of name servers).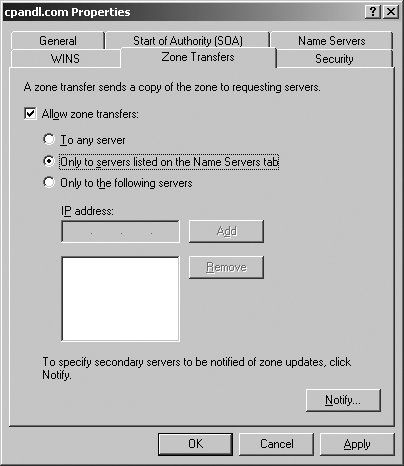 When the zone file changes, secondary servers can be automatically notified. To configure notification, click the Notify button on the Zone Transfers tab. In the default configuration, automatic notification is enabled, but only to a designated list of name servers. You must specify the designated name servers. As shown in Figure 5-32, you can also allow automatic notification to the name servers listed on the Name Servers tab. Figure 5-32. Configuring notification for servers on the Name Servers tab.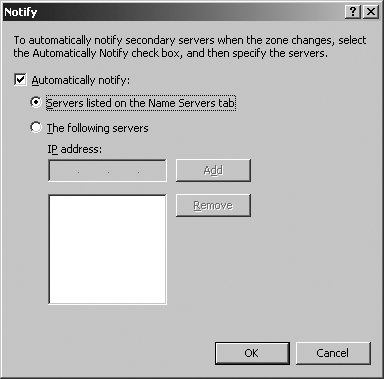 5.3.3.5. Configuring and managing DNS resource recordsAfter you create a zone, you can add any necessary resource records to it. When dynamic DNS updates are allowed, DNS clients can register their own A and PTR records. With DHCP and DNS integration, DHCP servers can register records on behalf of clients as well, as discussed previously in this chapter in "Using Dynamic DNS Updates with DHCP." The most common types of records you'll work with are:
Tip: When you first create the zone, the SOA resource record and the NS resource record for the primary DNS server are automatically created. NS resource records for secondary name servers are not created automatically. To view the records in a zone, follow these steps:
To create resource records in a zone, follow these steps:
To view the settings of, or edit, an existing record, follow these steps:
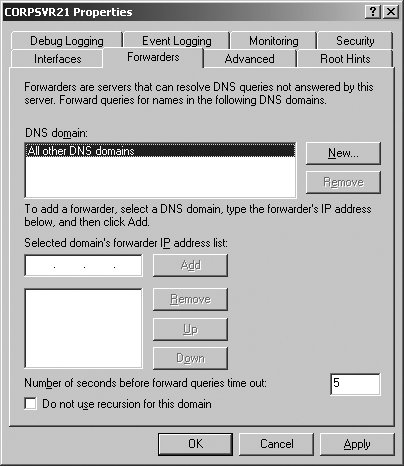
5.3.3.6. Configuring and managing DNS forwardingForwarding allows DNS servers to forward queries that they cannot resolve to other DNS servers; in this way, the servers get a response that resolves a client's query. In the default configuration, a DNS server can forward queries to servers in all other DNS domains. Unfortunately, this allows any name server to forward queries outside the local network, which may not be the desired configuration. Instead of allowing your organization's DNS servers to forward to any DNS server, you'll typically want them to forward to specific name servers, which in turn can forward queries inside or outside the organization's network as necessary. In this way, you control the flow of DNS queries and funnel queries through specific name servers. Since these name servers also cache lookups, many lookups can be resolved without having to look outside the network, which reduces the flow of network traffic. A name server designated as the recipient of forwarded queries is known as a forwarder. When forwarders are used, the DNS query resolution process changes as depicted here:
In a large enterprise with multiple domains, you might want to have multiple forwarding configurations. For example, you might have designated forwarders for the enterprise domains other than those services by the zone files on a name server, and designated forwarders for all other domains. To configure a DNS server to use a forwarder, follow these steps:
To configure your designated forwarders, simply allow the forwarder query all other DNS domains and do not designate the IP address of any specific name servers to use. With this in mind, the typical configuration is achieved by completing these steps:
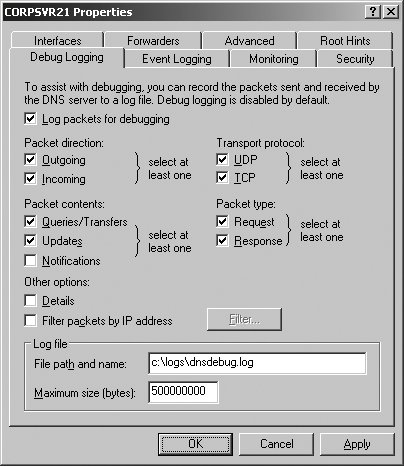
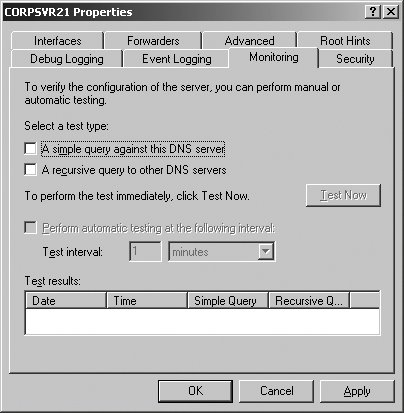
The Forwarders tab also has the option Do Not Use Recursion For This Domain. By default, a DNS server uses recursion to query other DNS servers on behalf of clients. If recursion is disabled, the client performs iterative queries using the root hints from the DNS server. Iterative queries mean that the client will make repeated queries of different DNS servers. Tip: Recursion allows a DNS server to contact other DNS servers when it cannot resolve a query for a client. Recursion is allowed by default. 5.3.4. Monitoring DNSAs discussed previously in this chapter in "Configuring and managing DNS Server options," DNS Server Options can be used to monitor many aspects of DNS. A name server's Properties dialog box can be accessed in the DNS Management console by right-clicking the server entry and clicking Properties. When you configure a new name server, you can use Monitoring tab options to perform basic tests of name resolution. The results of these tests will tell you if DNS is configured properly. You can also use recursive query tests for basic troubleshooting. To configure event logging, you can use the Event Logging options. When logging is enabled, tracked events are written to the DNS event log. As with most other services, the key types of events you will want to examine are warnings and errors. Event logging is enabled for All Events by default. In the DNS Management console, you can access DNS event log options by expanding the server node and then clicking the Event Viewer node. For more detailed troubleshooting, you can use Debug Logging. Debug Logging is disabled by default, and can be enabled and configured on the Debug Logging tab. The resulting logfile tracks the types of packets and packet contents that you specify, and can help you resolve many types of name resolution issues. Using System Monitor and Performance Logging, you can monitor the overall health of DNS and the underlying server. The DNS performance object has an extensive set of performance counters that you can use to track everything from zone transfers to dynamic updates. The Secure Update Failure and Zone Transfer Failure counters can be used to track key types of failure. One of the best tools for troubleshooting is Nslookup. In the DNS Management console, you can start Nslookup by right-clicking a server entry and selecting Launch Nslookup. |

 Control Panel
  Network Connections
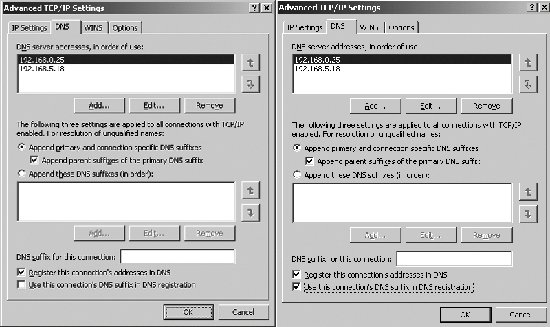


EAN: 2147483647
Pages: 95