Section 5.2. Installing, Configuring, and Managing DHCP
5.2. Installing, Configuring, and Managing DHCPDynamic Host Configuration Protocol (DHCP) is an essential network infrastructure component. By default, Windows XP Professional and Windows Server 2003 computers use DHCP to obtain their network settings for TCP/IP and DNS. Through DHCP, you can manage the assignment of:
Not only does dynamic configuration of IP addressing and other network settings free administrators from having to perform manual configurations on each computer in the organization, it also makes long-term management of these computers easier by centralizing and automating network configuration management. Using DHCP, you can update the network configuration of any dynamically configured computer simply by making the appropriate setting changes on your organization's DHCP servers. In contrast, with manual configuration, you must change the network configuration settings on each individual machine. 5.2.1. Understanding DHCPDHCP is a client/server technology. Any computer configured to dynamically obtain its network configuration settings is considered to be a DHCP client. A computer that provides DHCP services to a client is referred to as a DHCP server. DHCP servers assign IP addresses to clients for a specific period of time known as the lease duration. The default lease duration is eight days. Clients with active leases must renew their leases periodically. For clients that might need to have permanent leases, you can create a reservation on a lease by specifying the IP address to reserve and the MAC address of the computer that will hold the reserved IP address. Thereafter, the client with the specified MAC address will use the IP address designated in the reservation. When you work with DHCP servers, keep the following in mind:
On a network using Active Directory domains, you can install and configure DHCP by completing the following procedures:
Once you've completed these steps, clients in the domain will be able to obtain leases. When working with DHCP in workgroups, you do not need to perform Step 2. 5.2.2. Installing the DHCP Server ServiceWith Windows Server 2003, any server assigned a static IP address can run the DHCP Server service and act as a DHCP server. However, it is recommended that domain controllers not be configured as DHCP servers. In a standard configuration, DHCP is integrated with DNS, and DHCP clients are permitted to create, alter, and remove their own records. If you install DHCP on a DC, any client on the network might be able to alter critical service locator (SRV) records, which is an unnecessary security risk. Tip: You must be an administrator to install windows components, including the DHCP Server service. The account you use for installing the DHCP should be a member of the global Domain Admins groups or the domain local DHCP Administrators group. You can install the DHCP Server service by completing the following steps:
You can also install the DHCP Server service using the Configure Your Server Wizard. To start the wizard, click Start 5.2.3. Working with and Authorizing the DHCP ServerLike any Windows service, the DHCP Server service can be managed using the Services utility in Administrative Tools. However, the best way to manage the DHCP Server service and DHCP itself is to use the DHCP console, which can be accessed by clicking Start When you start the DHCP console on a DHCP server, the console connects automatically to DHCP on this server. If you start the DHCP console on your workstation or want to connect to a different DHCP server, you can do this by right-clicking the DHCP node, and selecting Add Server. You can then use the Add Server dialog box to select the remote server you want to work with by its fully qualified domain name or IP address. Currently authorized DHCP servers are listed as well. As shown in Figure 5-4, the status of a DHCP server is displayed in the right pane when you select the DHCP node. A status of "Not Authorized" means the server has not yet been authorized for use in the domain of which the server is a member. Before a DHCP server can be used on an Active Directory domain, it must be authorized in Active Directory. To authorize the DHCP server, click Action Figure 5-4. The DHCP console.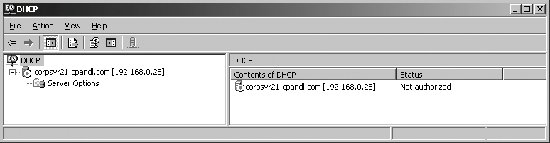 With DHCP servers configured in workgroups or standalone configurations, you do not need authorization prior to using the DHCP serverworkgroups do not have domain controllers and do not use Active Directory. If your organization has workgroups that use DHCP or you plan to configure a standalone DHCP server, you must ensure the DHCP server is not on the same subnet as a domain's authorized DHCP server. With Windows 2000 or later, a workgroup or standalone DHCP server configured on the same subnet as a domain's authorized DHCP server is considered to be a rogue server. As part of a network protection process, the rogue server automatically stops its DHCP Server service and stops leasing IP addresses to clients as soon as it detects an authorized DHCP server on the local subnet. To authorize a DHCP server for use in the domain of which the server is a member, follow these steps:
To authorize multiple servers, you can use the following technique:
Once you've authorized the DHCP server, you have full access to manage the server, and clients can connect to the server to obtain IP address leases and their network configuration settings. The DHCP Server service on any DHCP server can be managed in the DHCP console by right-clicking the server entry and clicking All Tasks. You can then start, stop, pause, or restart the DHCP Server service. As part of routine maintenance, you should periodically back up the DHCP server database and perform a manual compact of the database. See "Managing DHCP Databases," later in this chapter for details. 5.2.4. Creating and Configuring ScopesBefore a DHCP server can lease IP addresses and send clients their network configurations, you must create and activate the scopes that will provide these settings to clients. DHCP supports three types of scopes:
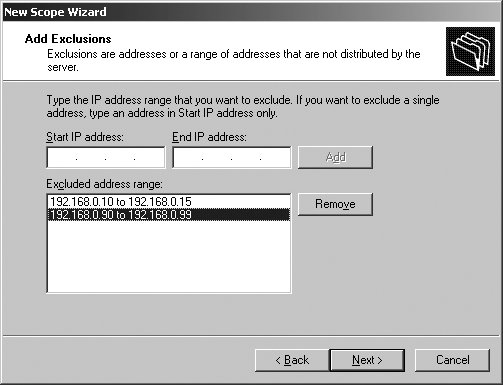
Each of these scope types can be created using the DHCP console. 5.2.4.1. Creating and activating normal scopesYou should create a scope for each range of IP addresses on a logical subnet that you want to manage using DHCP. The logical subnet associated with a range of IP addresses is defined by the related subnet mask. If there are subsets of IP addresses within a range that should not be assigned to clients, you can define exclusions to block the addresses so that they aren't assigned to clients. A scope can include optional parameters to configure client TCP/IP settings for default gateways, preferred and alternate DNS servers, and more. Tip: A single DHCP server can provide dynamic addressing and configuration for multiple subnets. However, routing and relays must be appropriately configured between the subnets. See "Managing DHCP Relay Agents," later in this chapter for details. To create a normal scope, follow these steps:
The new scope is created and listed under the DHCP server node in the DHCP console. You can activate or deactivate a scope at anytime by right-clicking it and selecting Activate or Deactivate. 5.2.4.2. Creating and activating multicast scopesMulticast scopes are used on networks that use TCP/IP version 4 multicasting. With multicasting, multiple computers have the same destination IP address. These computers listen for packets sent to this address, allowing a single source host to send packets of information to multiple destination hosts. Class D IP addresses from 224.0.0.0 to 239.255.255.255 are used for multicasting. To create a multicast scope, follow these steps:
The new multicast scope is created and listed under the DHCP server node in the DHCP console. You can activate or deactivate a multicast scope at anytime by right-clicking it and selecting Activate or Deactivate. 5.2.4.3. Creating and using superscopesSuperscopes allow you to group scopes for easier management. By activating or deactivating the superscope, you can activate or deactivate all the related scopes. When you have already created one or more scopes, you can create a superscope by completing the following steps:
The new superscope is created and listed under the DHCP server node in the DHCP console. Some of the key tasks you'll want to perform with superscopes include:
You can use superscopes to support dynamic IP addressing for multinets. A multinet is a single physical network with multiple logical subnets. To support each subnet in the multinet, you create a scope for each subnet and then add the scopes to a superscope. Because DHCP Relay Agents include details on the originating subnet, a DHCP server on a remote subnet will know which scope to use when. When the organization has multiple DHCP servers, superscopes are useful for ensuring DHCP servers can assign the proper IP addressing to clients as well. For example, when two DHCP servers are on the same subnet and service clients on multiple subnets, you can create a superscope of both servers that includes as members all scopes defined on the physical subnet or subnets. To prevent the servers from issuing leases in each other's scopes, configure each server so that the IP address ranges of the other server are excluded. 5.2.5. Managing DHCP Scope OptionsWhen you create a DHCP scope, you can define key TCP/IP options, including the default gateway, preferred and alternate DNS servers, and preferred and alternate WINS servers. These TCP/IP options, and many others, can be managed individually as well. Using the DHCP console, you can manage these options at five separate levels using:
Tip: You'll find that user and vendor classes are particularly important when you are configured DHCP for a specific type of client. For example, you might want all Windows 2000 clients to use a specific set of options that is different from all Windows XP Professional clients. To do this, define settings for the user class Microsoft Windows 2000 Options. You may also want remote access clients to use specific settings that are different from local clients. To do this, define settings for the vendor class Default Routing and Remote Access Class. When you are working with server and scope options, you'll see a dialog box similar to the one shown in Figure 5-7. To enable an option and configure it, select the related checkbox, and then use the Data Entry options to configure the option. Figure 5-7. Set server and scope options. Table 5-3 provides an overview of the TCP/IP options used on most networks. Each option is identified by its option name and associated option code. Option code 53, which cannot be configured, is included with every DHCP message and is used to set the message type as DHCP Discover, DHCP Offer, DHCP Request, or DHCP Acknowledgement. Every DHCP message header includes DCHP: Option Field as its final field, and the DHCP Message Type is listed as the first option field.
5.2.6. Using Dynamic DNS Updates with DHCPDNS is the primary name service used with networks running Windows 2000 and later computers. DNS uses host (A) records to resolve computer names to IP addresses for forward lookups and pointer (PTR) records to resolve IP addresses to computer names for reverse lookups. In the standard configuration of DNS and DHCP, DHCP clients running Windows 2000 or later update their host (A) records in DNS automatically whenever an IP address is assigned or renewed, and DHCP servers update the pointer (PTR) records on behalf of clients. In the DHCP console, you can control the default behavior by configuring the properties of the DHCP server. Right-click the server entry and then select Properties. Use the options on the DNS tab shown in Figure 5-8 to determine how dynamic DNS updating works. The configuration options available are as follows: Figure 5-8. Configure dynamic DNS updating through the DHCP server properties.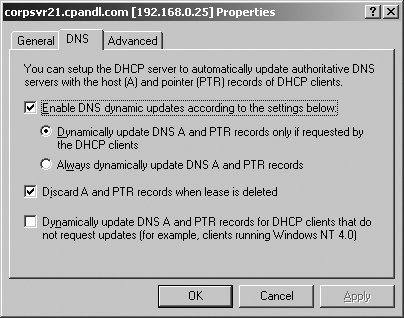
When clients register their own A records, the method they use to create and update records is not secure. This allows any client or server, with appropriate credentials, to modify or delete the records. On the other hand, if a DHCP server dynamically updates A and PTR records on behalf of clients, the server uses secure dynamic updates. DNS records created using secure dynamic updates can only be updated by the server that created the record (the record owner). Although this improves security, this can lead to stale (old) records on the DNS server if the DHCP server that owns a record fails and a client is later assigned a lease from a second DHCP server. Consider the following scenario:
When DHCP servers update both the A and PTR records, you can prevent problems due to stale records by making your organization's DHCP servers members of the DnsUpdateProxy security group. Any objects created by members of this group do not have security settings and thus have no owners. This allows any DHCP server to modify the record. However, if the DHCP server is not a member of the DnsUpdateProxy group, the DHCP server becomes the owner and no other DHCP servers can modify the record. Tip: The DnsUpdateProxy group can be used in configurations where clients update A records and DHCP servers update PTR records. However, this can introduce additional problems and is not recommended. In most cases, domain controllers should not be configured as DHCP servers. If DCs are configured as DHCP servers, and those servers are members of the DnsUpdateProxy group, records created by the Netlogon service for the DC are not secure. 5.2.7. Managing DHCP Clients and LeasesDHCP servers lease IP addresses to clients for specific periods of time. By default, for normal scopes, the lease duration is eight days. Leases are assigned initially and renewed using different techniques. During startup of a client configured to use DHCP, a client without a current lease does the following:
Tip: By default, DHCP discover messages are only broadcast on the client's local subnet. Before a DHCP client can contact a DHCP server on a remote subnet, you must configure a DHCP Relay Agent as discussed in "Managing DHCP Relay Agents," later in this chapter. Clients attempt to renew their leases periodically by sending a DHCP Request to the DHCP server. The server accepts the request by sending the client a DHCP Acknowledgment message. Clients attempt to renew their leases at each restart, when the ipconfig /renew command is run at the client, when 50 percent of the lease time has passed, and when 87.5 percent of the lease time has expired. When a client fails to contact a DHCP server, it pings the default gateway previously assigned, and the response (or lack of response) determines what happens next. Essentially, if the client gets a response from the default gateway, it assumes it is on the same subnet as before and continues to use the lease, attempting to renew it at the appropriate intervals (based on 50 or 87.5 percent expiration). If the client doesn't get a response from the default gateway, it assumes it is on a different subnet and configures itself to use APIPA, and then sends DHCP Discover broadcasts every five minutes. Manage lease durations on a per-scope basis. To view or change the current lease duration, follow these steps:
You can view and manage the current leases assigned to clients by following these steps:
If you need to replace a DHCP server that failed recently and were not able to migrate an up-to-date DHCP database to this server, you may need to enable conflict detection to prevent the new DHCP server from assigning IP addresses that are already in use. With Conflict Detection enabled, the DHCP server pings an address on the network before assigning it to a client. You can enable conflict detection and specify the number of times the DHCP server should ping an IP address before assigning it by completing the following steps:
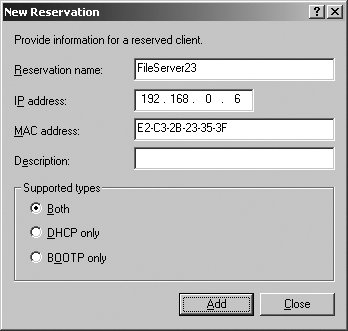
On clients, you can view and manage IP address lease details using ipconfig. As previously discussed, ipconfig /all lists all TCP/IP settings, ipconfig /release releases an IP address lease, and ipconfig /renew renews an IP address lease. 5.2.8. Managing Reservations and Reserved ClientsUse reservations to create permanent address leases assignments. For example, you might want member servers to use DHCP so they can easily be moved between or within subnets if necessary, but might not want a server's IP address to change without specific reason for such a change. In this case, you can define a reservation for the member server. Tip: Reservation definitions must be created on each DHCP server that provides dynamic addressing on the subnet. If you don't do this, a DHCP client can potentially get assigned a different IP address by one of the other DHCP servers on the subnet. To define a reservation for a computer, you must know the MAC address of the computer's network adapter. For a client computer with a current lease, this can be determined by locating the scope under which the lease is assigned and then finding the client lease entry. The MAC address for the client's network adapter is listed in the Unique ID column. The MAC Address is also listed as the Physical Address of the network adapter when you type ipconfig /all at a command prompt. Tip: Reserved addresses cannot be part of an excluded IP address range. You can reserve a DHCP address for a client by completing these steps:
You can edit a current reservation by right-clicking it and selecting Properties. If a client should no longer have a reservation, right-click the reservation and then select Delete. When prompt to confirm, click Yes. 5.2.9. Managing DHCP DatabasesThe DHCP database stores information about client leases, reservations, scopes, and configured options. By default, the database is located in the %SystemRoot%\System32\DHCP folder on a DHCP server. Windows Server 2003 automatically backs up and compacts the database periodically. Administrators can perform manual backups and compactions as well. Automatic backups occur every 60 minutes by default and can be configured using the BackupInterval entry under the HKLM The DHCP database and automatic backup folders are stored under the %SystemRoot% by default. If desired, you can set the database path and backup path to a different location by following these steps: Open the DHCP console and connect to the server if necessary. Right-click the server node and click Properties. Click the Advanced tab as shown in Figure 5-11. Figure 5-11. Set the database and backup paths as necessary.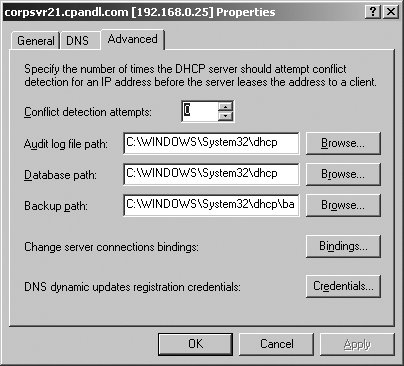 Use the Database Path and Backup Path text boxes to set the database path and backup path. Click OK. 5.2.9.2. Manually backing up and restoring the DHCP databasePeriodic manual backups of the DHCP database are important because they allow you to manually restore the database. If you don't have a manual backup, you cannot perform a manual restore of a corrupted DHCP database. To perform a manual backup of the DHCP database, follow these steps:
Tip: You don't need to stop the DHCP server service to perform a manual backup. To manually restore the DHCP database, follow these steps:
Tip: Manual restores can be done using manual backups only. An automated backup cannot be used for manual restoration of the DHCP database. 5.2.9.3. Migrating a DHCP serverMoving the DHCP database from one server to another can be performed using the manual backup and restore procedure. Follow these steps:
5.2.9.4. Manually compacting the DHCP databasePeriodic manual compaction of the DHCP database, in addition to automatic compaction, can help ensure that the DHCP database stays healthy in a busy network environment with many hundreds of computers using DHCP. The reason for this is that manual compaction is performed with the database offline, which allows more efficient compaction and defragmentation of the database. To ensure DHCP works as expected, you should:
To manually compact the DHCP database, follow these steps:
5.2.10. Troubleshooting DHCPWhen you have problems with DHCP, the DHCP console is the first place you should look to diagnose and resolve problems. The console displays warning icons for many common problems:
To diagnose and resolve deeper issues with DHCP, you'll need the help of the DHCP audit logs. These logs and their use in troubleshooting are discussed in the sections that follow. 5.2.10.1. Understanding the DHCP audit logsBy default, all DHCP activity is written to the DHCP audit logs stored under %SystemRoot%\System32\dhcp. Audit logs are stored in a separate text files named after the day of the week, such as DhcpSrvLog-Mon.log, DhcpSrvLog-Tues.log, etc. Seven days of audit logs are maintained and old logs are overwritten when a new log of the same name is created. You can enable or disable audit logging by completing these steps:
You can change the location of the audit logs by following these steps:
You can use the audit logs for troubleshooting DHCP. The audit logs contain comma-delimited, single-line entries for each audited activity. Each entry begins with an event code, the meaning of which is listed at the beginning of the audit log as shown in Figure 5-12. Figure 5-12. DHCP audit logs are stored as text files with comma-delimited entries.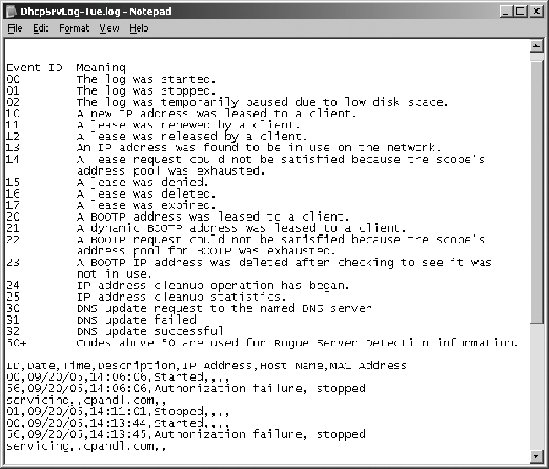 5.2.10.2. Diagnosing and resolving issues related to DHCP authorizationIn Active Directory domains, DHCP servers must be authorized before they can assign leases to clients. Although the DHCP console shows the general status of a server as authorized or unauthorized, you'll need to look through the DHCP audit logs to perform more detailed analysis to resolve some authorization issues. Table 5-4 provides a summary of audit log events related to authorization. Use the event text and descriptions to diagnose and resolve authorization issues. The audit code for events 50 and higher are not summarized in the header of the audit log.
5.2.10.3. Verifying leases and DHCP reservation configurationWhen you select a server's Active Leases node in the DHCP console, the current leases are listed. For leases, the current expiration date is listed. If a lease expires and is not renewed, the dynamically configured computer might have been moved to a different subnet or it might have obtained its configuration from another DHCP server. With reservations, the active or inactive status of the reservation is listed. If a reservation is inactive for a dynamically configured computer that is booted and connected to the network, the reservation may be incorrectly configured. To check the reservation configuration, select a server's Reservations node in the DHCP console, right-click the reservation, and then click Properties. To determine the options used by the reservation, expand the Reservations node in the DHCP console and then in the left pane, click the entry for the lease. In the right pane, the current options are listed by name, vendor (where the options came from), and the value assigned. Verify that the reserved addresses are not simultaneously excluded. 5.2.10.4. Verifying the client configuration and examining the system event logWhen DHCP clients lose access to resources or are unable to establish clients, you might have a problem with DHCP. You should start your troubleshooting by determining whether the problem originates on the client or elsewhere. On a client experiencing problems, you can view the current TCP/IP configuration by typing ipconfig /all at a command prompt. Issues related to TCP/IP can be resolved as discussed previously in this chapter in "Troubleshooting TCP/IP Addressing." If a client has been assigned the appropriate configuration and there is no warning message about an addressing conflict, the network problem most likely isn't a result of an addressing issue on the client. However, if a client computer has been assigned an address in use by another computer on the network, it will have problems communicating with the network and may not be able to access network resources. A warning message regarding the address conflict will be displayed in the system tray on the client computer. Related warning events are also recorded in the System event log on the computer experiencing the problem. Typically, these warning events have the Event ID 1055 and the source as Dhcp. If the client is assigned the IP address by DHCP, the likely issue is that another computer has been assigned a static IP address that conflicts with the range of IP addresses assigned to DHCP clients, and the IP address of the manually configured computer will need to be changed. If you locate the other computer with the same IP address and it is dynamically configured, the likely issue is that more than one DHCP server is assigning the same range of IP addresses, or the scopes assigned to a DHCP server have been modified to allow such a conflict to occur. On the client, you can attempt to restore connectivity with the network using the Repair option on the Support tab of the Local Area Connection Status dialog box. When you use Repair, the client attempts to refresh the stored data for its connection. The client does this by:
Although Windows 2000 and later automatically stop the DHCP Server service for unauthorized DHCP servers in a domain, other devices can be DHCP-enabled. To locate these devices, you can use the Dhcploc.exe utility provided in the Windows Support Tools. You can then remove any rogue DHCP servers from the network. 5.2.10.5. Diagnosing and resolving issues related to configuration of DHCP Server and scope optionsTCP/IP options can be configured manually on the client and in the DHCP console. Manual configurations cannot be overridden. In the DHCP console, TCP/IP options are configured at five separate levels:
A common problem you may see is due to clients obtaining incorrect option values. If a client is getting the incorrect settings, you can resolve this by:
A less common problem you may see when troubleshooting DHCP server configuration has to do with the service binding to the server's network adapter. To provide leases for clients on the local subnet, a DHCP server must be assigned a static IP address on the local subnet. The DHCP Server service must also have a binding on one of the server's network adapters. 5.2.10.6. Verifying address scope assignment and that the DHCP Relay Agent is working correctlyMultiple scopes can be configured and active on a single DHCP server. Scopes containing IP addresses for subnets other than the subnet on which the DHCP server is located are used with remote clients. DHCP servers determine the originating subnet for remote clients by retrieving an option field inserting into DHCP Request messages by a DHCP Relay Agent. This option field identifies the originating subnet of the client, and is formatted as shown here: DHCP: Relay IP Address (giaddr) = OriginatingSubnetGateway In the next example, the originating subnet gateway is identified as 192.168.0.1: DHCP: Relay IP Address (giaddr) = 192.168.0.1 Tip: You use Network Monitor to examine packets and view option fields. If the network's DHCP Relay Agent is improperly configured or not BOOTP (RFC 1542) compliant, the originating subnet might not get attached to the DHCP Request message from the client. As a result, the client could get assigned an IP address from the wrong scope. To resolve this, you would need to verify the DHCP Relay Agent configuration. To verify the binding, follow these steps:
5.2.10.7. Verifying database integrityMany inconsistencies in the DHCP database can be resolved by reconciling the server's leases. When you reconcile the database, the operating system compares the information in the database to the information stored in the Registry, and uses this comparison to determine whether the DHCP database accurately reflects the current leases and reservations. To reconcile all scopes on a server, right-click the server node in the DHCP console and then select Reconcile All Scopes. When prompted to verify the action, click the Verify button. Any inconsistencies are listed. If there are no inconsistencies, you'll see a prompt stating "The database is consistent." |
 Programs
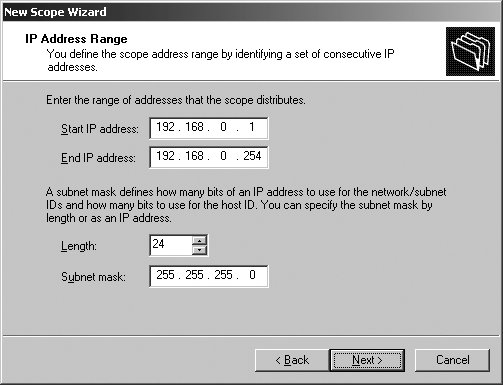

 SYSTEM
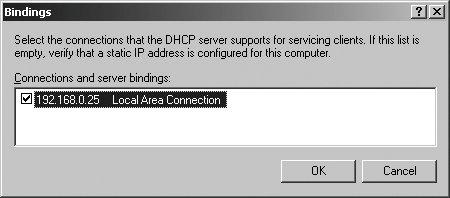
EAN: 2147483647
Pages: 95