Animating Your Site with Dynamic HTML Effects
FrontPage enables you to create some DHTML effects by adding them to your FrontPage-based Web as Web components. Web components automate many of the steps involved in creating animations or other features ”many of which would require complex programming to achieve otherwise .
| Note | If you have already formatted the current Web and added dynamic HTML effects or Web components like the ones discussed in this section, and you then change the status of the Dynamic HTML checkbox, some of the features on your Web site might become unusable. It s best to enable or disable DHTML when you first begin to work with the site. |
| |
Dynamic HTML is a set of commands that enable Web pages to display animation of text, ads, images, marquees, buttons , and other Web page elements. DHTML can turn a static Web page into a business presentation, adding a feeling of professionalism to your Web site.
Typically, a DHTML effect starts with an event. You specify what event or action needs to take place for the effect to be displayed. You select the object that you want the user to act on. Then you choose an event from the first drop-down list in the DHTML Effects toolbar, as shown below in Figure 13-1:
Figure 13-1: Add interactivity by choosing special effects from this toolbar.
When you choose an event, the second drop-down list in the DHTML toolbar becomes active. You choose an option from this list to specify what should happen when the user performs the desired action. (The options vary depending on what event you specify.)
Then, you specify how you want the effect to take place. For instance, if you choose a wipe effect, you choose an option from the third drop-down list to describe how the page should wipe. You can apply a DHTML effect to images as well as text, encouraging visitors to focus on your most critical products and services.
| |
Encourage Clicks with an Image Rollover Button
Rollovers are perfect for Web page buttons: the original button image changes in size or color , or turns into a complete different image that hints at where the browser will go when the viewer clicks on it. Each of these effects says to a visitor: Click here!
| Lingo | A rollover is a Web page image that changes into something else ”usually, a second image ”when the viewer passes the mouse over it. |
To add an image rollover button, follow these steps:
-
Open the Web page where you want to insert an image rollover button.
-
Position the cursor where you want the button to appear.
-
Click the Web Component button in the Standard toolbar.
-
In the Web Component dialog box (see Figure 13-2), click Dynamic Effects in the Component Type list.
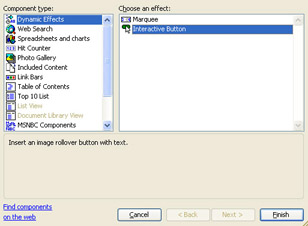
Figure 13-2: Add interactive content by choosing options from this dialog box. -
Click Interactive Button in the Choose An Effect list, and click Finish.
-
When the Interactive Buttons dialog box appears (see Figure 13-3), scroll through the Buttons list of button styles, clicking on each to view a preview in the Preview box. Pass your mouse over the preview to see how it rolls over to a second image (usually with a different color).
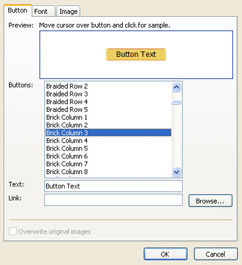
Figure 13-3: An interactive button changes appearance, inviting viewers to click it. -
When you have chosen the rollover button you want, type the text you want on your button in the Text box (replacing the default Button Text).
-
In the Link box, enter the name of the Web page you want the button to link to (when a viewer clicks the button he or she will go to that page).
-
Click Text to change the style of the button text, the font color, or the alignment if you wish.
-
Click Image to change the color of the rollover image, make the image transparent, or change background colors if needed.
-
When you re done, click OK.
| Aha! | Change Your Button Properties |
Grab Attention with a Marquee
A marquee is animated text that moves across a Web page and grabs a visitor s attention. Use it sparingly ”when you want to announce an upcoming event or breaking news alert, for instance. Marquees are supported only by Microsoft Internet Explorer, and not by other browsers. If you want to add a marquee, you need to change the Authoring preferences for the current Web page:
-
Click Tools, Page Options.
-
Click the Authoring tab in the Page Options dialog box.
-
Choose Microsoft Internet Explorer only from the Browsers drop-down list, and click OK.
-
Position the text cursor at the location where you want the marquee to appear.
-
Click the Web Components button.
-
Choose Dynamic Effects, then choose Marquee.
-
Type the text for your marquee in the Text box of the Marquee Properties dialog box (see Figure 13-4).
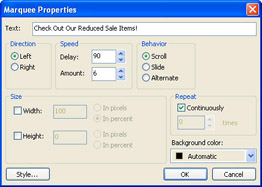
Figure 13-4: Use this dialog box to create moving marquee text guaranteed to grab a visitor s attention. -
Click Left or Right to specify whether you want the marquee to move to the right edge, or to the left edge of the page. Change other options (Speed, Behavior, and Repeat) as needed, and click OK when you re finished.
EAN: 2147483647
Pages: 179