Working with Layers
Working with Layers
Once you have worked with layout tables and cells as described earlier in this chapter, you ll have no problem working with FrontPage s layers. Layers give you the ultimate control over a Web page s contents, and traditional print designers love them. Each layer, in fact, appears like an individual table cell , with a box that displays the number of the layer on the page, and resize handles that you can click and drag to make the layer any size you want (see Figure 11-10). In addition, a list of all layers on the current page is displayed in the Layers task pane.
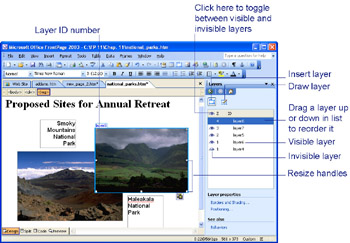
Figure 11-10: Layers give you maximum control over positioning of images and other Web page elements.
Once you have created a layer, click to position the cursor within it. You can then type text directly within the layer, insert an image by choosing Insert, Image, or paste text or an image within the layer. The layer s dimensions change automatically to accommodate the contents you add to it.
Streamlining the Process of Creating Layers
Designers in an office don t all work the same way. Some like to draw by hand, while others prefer to let computer software do the work. When you are ready to work with layers, you can add them to the current page in either of these two ways:
-
Choose Insert, Layer to instantly add a layer to your page.
-
Choose Format, Layers to display the Layers task pane, then click either Insert Layer, or Draw Layer. Insert Layer instantly inserts a layer on the current page; Draw Layer enables you to draw a layer directly on the page as you might a table or a cell.
When you are working on a Web page that contains one or more layers, you control whether or not they are visible, and which ones appear in front of others, by working with the controls in the Layers task pane. Layers in the panel are listed in stacking order, whether they are actually stacked atop one another or not. Layer 1 is treated as being at the top of the stack, and the other layers follow beneath it. Such a list helps you keep track of, or select, layers in complicated layouts that contain multiple layers ”some of the layers might be difficult to see because they are hidden beneath others. (It also provides you with a roadmap of the layers on a page that one of your colleagues has constructed and that you are assigned to revise .) You can alter the order of a layer in one of two ways:
-
Click a layer in the Layers task pane list and drag it up or down to another position in the list.
-
Click the layer s ID number in the Z column, and type a different number to move the layer higher or lower in the order.
You can change the visibility of all layers at once, by clicking on the winking eye icon at the top of the list. If the eye is shut, all layers are invisible when the Web page is viewed in a browser. You can also click on a layer s eye icon to toggle between making it visible or invisible.
Positioning Layers
Once you have inserted a layer, you can move it anywhere you want on the Web page you re creating. This is the big advantage of using layers ”you can click their ID number box and move them around the page with your mouse wherever you want, regardless of whether you are crossing table cells, horizontal rules, or images beneath them.
Often, though, you need to position layers with great precision in order to make them align with other elements on the page. You can precisely locate a layer by first clicking its border to select it, then clicking Positioning in the Layers Panel. The Position dialog box lets you control not only the location of the layer on the page, but also its size, and the way it interacts with any other Web page contents around it (see Figure 11-11).
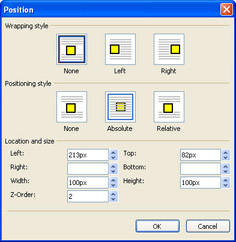
Figure 11-11: Use this dialog box to control position, size, and other features of layers.
| Note | If the layers panel is not yet visible, just double-click a currently visible layer to open it. |
In the Location And Size section of the Position dialog box, Left refers to the number of pixels from the left margin of the Web page you are working on; Top refers to the number of pixels from the top of the page, and so on. Z-Order refers to the selected layer s stacking order on the page. By carefully entering pixel values in the appropriate boxes, you can stack layers atop one another with 12 pixels of overlap, for example.
| Note | By default, layer measurements are expressed in pixels, but you can change this if you re used to working with other units of measurement, such as inches or centimeters. Select Tools, Page Options, and click the Ruler And Grid tab. Then, choose an option from the Ruler And Grid Units drop-down list. You can choose Pixels, Inches, Centimeters, or Points. Table 11-1 compares the various measurement units. |
| Measurement | Abbreviation | Description |
|---|---|---|
| Pixels | Px | Used in computer graphics; one inch contains about 72 pixels |
| Inches | In | Common unit of measurement in the U.S. |
| Centimeters | Cm | One inch equals 2.54 centimeters |
| Points | Pt | Used in printing and graphic design; one inch contains 72 points |
| Note | Tables and layers share common characteristics: they can contain text and images; they can be positioned with precision; they can have their own background colors; and they can be used to control the design of Web pages. Layers and tables can be combined in order to create complex layouts. |
EAN: 2147483647
Pages: 179