Creating Tables the Easy Way
Whenever you want to create tables, you have several options. You can draw the table using the Table Draw tool, or you can insert a table with a specific size , layout, and style. Both techniques have their advantages and disadvantages:
-
Draw Table Draw Table is most useful when you want to create tables with ad hoc -sized rows and columns. If you want to create a table, but aren t really sure how many columns and rows you want to use, or how those columns and rows should be sized or organized, you might want to use the Draw Table tool. Also, if you want to create a table that has odd- sized cells , such as a cell that spans several rows or columns, the Draw Table tool might be best.
-
Insert Table Insert Table is most useful when you want to create a table with a specific layout, and a certain number rows and columns. If you know how many rows and columns the table should have, or, if you want the table to have a specific size, alignment and spacing within and between cells, you might want to use the Insert Table tool.
Regardless of which technique you use, you ll want to activate the Table toolbar by choosing View, Toolbars, Tables. Using the Tables toolbar, you can easily create and edit traditional tables (as discussed in this chapter), and layout tables (as discussed in Chapter 11, Advanced Layout with Tables and Layers ).
| Aha! | Dock the Tables Toolbar |
Going to the Drawing Board to Create Tables
One way to create tables is to draw them, using the Draw Table tool. With this tool, you can create tables with ad hoc -sized columns and rows. You can, for example, easily create unevenly-distributed rows and columns, and oversized cells. On the Table toolbar, you ll find two handy buttons (see Figure 9-1 and Figure 9-2) for drawing tables:
Figure 9-1: Draw Table changes the pointer to a pencil that lets you draw tables. Click and drag to draw.
Figure 9-2: Erase changes the pointer to an eraser that can erase table cell borders. Click and drag to erase.
Whenever you draw tables, you ll use Draw Table and Erase. The sections that follow discuss key table drawing techniques using these tools.
Getting Started Drawing the Table
As discussed previously, you ll draw tables with the Draw Table tool. Click Draw Table on the Table toolbar, and then follow these steps to draw your table:
-
Move the cursor to where you want the upper-left corner of the table to be.
-
Click and hold down the mouse button, then size the table by dragging the pointer down and to the right. Release the mouse button when the table is sized appropriately.
-
To add columns to the table, move the cursor to where you want to add the column. Click and hold down the mouse button; then drag the pointer down until the dashed drawing line extends to the appropriate row or table border.
-
To add rows, move the pointer to where you want to add the row. Click and hold down the mouse button, then drag the pointer left or right, until the dashed drawing line extends to the appropriate column or table border.
| Aha! | Erase Your Mistakes |
Resizing Tables You Have Drawn
Whether you are using the Draw Table or the Erase tool, you can resize tables and the rows, columns and cells they contain. Position the mouse pointer over the border you want to resize, click when the pointer changes to a double arrow, and then drag the mouse pointer in the appropriate direction. If you ve selected a table, column or row border, the resizing affects the entire table, column or row with which you re working.
Avoid the Drawing Board by Inserting Tables
If the table is going to be simple, it might not be worth it to draw it. Instead, create the table using the insert table method. Simply position the insertion point where you d like to insert the table, and then follow these steps:
-
Select Table, Insert, Table. This displays the Insert Table dialog box, shown in Figure 9-3.
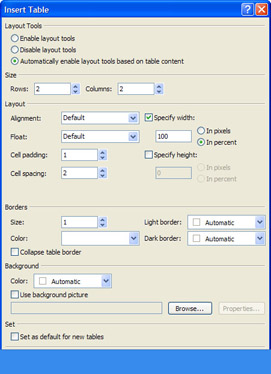
Figure 9-3: Use the Insert Tables dialog box to create tables with specific size, layout, borders and backgrounds. -
Under Size, use Rows and Columns to set the number of rows and columns for the table.
-
To increase the spacing within and between table cells, you can use the Cell Padding and Cell Spacing settings. Cell Padding sets the spacing inside the cell. Cell Spacing sets the spacing between cells.
-
Under Borders, use Size to set the width of table borders, in pixels. If you set the border size to zero pixels, you remove the table border entirely.
-
Use Color to specify the border color to use. If you choose Automatic, the table is usually displayed with the same border color as the background color of the Web page.
-
To add shading to a border, you can set a different color values for the Light Border and Dark Border selection lists. The Light Border sets the color of the left and top borders. The Dark Border sets the color of the right and bottom borders.
-
Once you configure the table settings, click OK, and FrontPage will create your table. That s it. You'll find more specific information on sizing, layout, borders, and backgrounds throughout this chapter.
EAN: 2147483647
Pages: 179