Creating Visual Menus with Pictures
Creating Visual Menus with Pictures
Do you have a product diagram, an aerial photo of your college campus, or some other type of picture to which you want to add multiple clickable areas? If so, you might want to create a visual menu using an image map. In an image map, one or more areas of a picture are keyed to a hidden menu of links. When someone clicks on one of these keyed areas, called a hotspot, their browser opens the Web page, or file resource, specified in the associated link.
Hotspots are added to pictures using the Pictures toolbar, shown in Figure 8-7. Three buttons in particular are the most useful:
Figure 8-7: You ll use the Pictures toolbar to add hotspots to pictures.
-
Rectangular Hotspot Used to create rectangular hotspots.
-
Circular Hotspot Used to create circular hotspots.
-
Polygonal Hotspot Used to create polygonal hotspots.
After you add hotspots to a picture, they become visible when you select the picture in which they are defined. You can use the Highlight Hotspots button to white out the picture, and highlight all the hotspots it contains. Highlight Hotspots can be toggled on and off with a mouse click.
The sections that follow discuss the techniques you ll use to create and work with visual menus, including adding hotspots to pictures, modifying existing hotspots, and deleting hotspots.
Adding Clickable Hotspots to Pictures
You can add hotspots to a picture by completing the following steps:
-
Right-click the picture that you want to turn into an image map, and then choose Show Pictures Toolbar.
-
Use the hotspot shape buttons to highlight an area of the picture where you will be placing a hotspot. Hotspots shouldn t overlap, and can be in any of the following shapes :
-
Rectangle For a rectangular hotspot, click Rectangular Hotspot. Position the pointer where you want to place the upper left edge, and click and hold the left mouse button while dragging the mouse down and to the right to size the hotspot. Release the mouse button when the hotspot is sized appropriately.

-
Circle For a circular hotspot, click Circular Hotspot. Position the pointer where you want to place the center of the circle, and click and hold the left mouse button while dragging the mouse to the right to size the hotspot. Release the mouse button when the hotspot is sized appropriately.

-
Polygon For a polygonal hotspot, choose Polygonal Hotspot. Then, click at any point on the perimeter of the shape, move the pointer to a point where the shape outline should change direction, and click again. A line appears that connects the two points. As you add more points, more lines will appear until you return to your starting point to complete the polygon.

-
-
When the hotspot outline is completed, the Insert Hyperlink dialog box is displayed, as shown in Figure 8-8. This is the same dialog box you use to create other hyperlinks , and the techniques to define the hyperlink are the same as discussed in Chapter 4. After you specify the hyperlink, click OK.
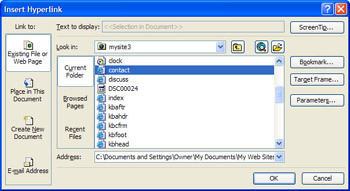
Figure 8-8: Use the Insert Hyperlink dialog box to specify the link for the hotspot. -
Repeat Steps 2 and 3 to add more hotspots to the picture. When you are finished creating the image map, be sure to press Ctrl+S to save the page with your changes.
Moving, Modifying, and Deleting Hotspots
Editing hotspots after you ve created them is easy, but not necessarily intuitive, if you haven t done it before. For example, you might need to change the position of a hotspot, resize it, modify the location to which it links, or delete it. Let s look at each of these tasks in turn.
Moving Hotspots
To move a hotspot, follow these steps:
-
Select the picture that contains the hotspot you want to move. The outlines of all the hotspots in that picture are displayed.
-
Position the mouse pointer within the hotspot, but not touching the outline of the hotspot.
-
Click and hold down the left mouse button, while moving the pointer to the desired location within the picture.
-
The hotspot moves with the pointer. When you are satisfied with the new position, release the mouse button.
Resizing Hotspots
To resize a hotspot, follow these steps:
-
Select the picture that contains the hotspot you want to resize. The outlines of all the hotspots in that picture are displayed.
-
Click within the hotspot or on the outline of it to display resizing handles.
-
Move the mouse pointer over a resizing handle. The resizing handle should appear as a small solid square on each of the corners and in the center of each side of the hotspot boundary.
-
Click and hold down the left mouse button, while moving the double-arrow pointer in the desired direction, to expand or contract the hotspot.
Changing Hotspot Links
To change the link associated with a hotspot, follow these steps:
-
Select the picture to display its hotspots.
-
Right-click the hotspot you want to work with, and then choose Hyperlink.
-
Use the Edit Hyperlink dialog box to specify the new location for the link, and then click OK.
Removing Hotspots
To remove a hotspot, select the picture that contains the hotspot you want to remove. Next, click anywhere within the hotspot to select it, and then press the Delete key.
EAN: 2147483647
Pages: 179