Entering Line Breaks and Horizontal Lines
If you ve browsed the Web, you ve probably seen pages with line breaks and horizontal lines. Line breaks enable you to break a line without adding a space between the lines. Horizontal lines are graphical lines drawn across the width of the page. When used effectively, line breaks and horizontal lines create necessary spacing in a page ”which helps make it easier to understand the text, and gives the reader s eyes a break.
Adding Spacing with Line Breaks
You can use a line break to format text in many ways. Line breaks can highlight text by creating a column or a simple list, which not only adds to the visual impact of the page, but also gets the reader's attention. Sometimes you don't want a space between lines of text, or you want to highlight an example by breaking the line and starting a new line showing the example.
To add a line break, press Shift+Enter. If you want to clear the left, right, or both margins after placing a picture or other element on the page, select Break from the Insert menu, choose the appropriate setting in the Break dialog box, and then click OK.
If you make a mistake and want to remove a line break, or change its properties, you can do this by following these steps:
-
Click Show All on the Standard toolbar (hint: it looks like a paragraph mark). You should now see line breaks and paragraph marks.
-
Double-click the line break you want to remove or change.
-
Press Delete to remove the line break or press Alt+Enter to set the Break properties, using the dialog box shown in Figure 4-1 on the following page.
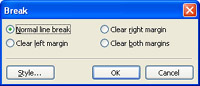
Figure 4-1: Line break properties control whether the left, right or both margins are cleared after the line break.
Adding Spacing with Horizontal Lines
Horizontal lines also provide an easy way to organize, or visually break up the text of a page. Horizontal lines are entered as either shaded (default) or solid lines, and can be as wide as the browser window, a percentage of the browser window, or a specific size in pixels. The thickness of a horizontal rule is determined by its height, which is set in pixels.
To add a horizontal line to a page, choose Insert, Horizontal Line. Double-click the line to set its properties as shown in Figure 4-2. The properties of horizontal lines are as follows :
-
Width Sets the length of the horizontal line in pixels, or as a percentage of the browser window.
-
Height Sets the height (thickness) of the horizontal line in pixels.
-
Alignment Aligns the horizontal line. Choose Left, Center or Right.
-
Color Sets the color of the horizontal line. Choose Automatic to use the default color, or base the color on the current theme.
-
Solid Line Specifies that the line is solid without shading.
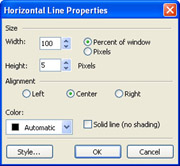
Figure 4-2: Horizontal lines can be optimized for your pages using different width, height, alignment and color settings.
EAN: 2147483647
Pages: 179
- Chapter I e-Search: A Conceptual Framework of Online Consumer Behavior
- Chapter XII Web Design and E-Commerce
- Chapter XVI Turning Web Surfers into Loyal Customers: Cognitive Lock-In Through Interface Design and Web Site Usability
- Chapter XVII Internet Markets and E-Loyalty
- Chapter XVIII Web Systems Design, Litigation, and Online Consumer Behavior