Customizing Toolbars to Boost Efficiency
Customizing Toolbars to Boost Efficiency
The Web is all about clicking, whether on buttons or hyperlinks , and FrontPage s toolbars give you an immediate and graphical way to perform many basic Web page editing functions, with individual mouse clicks. Sometimes, you need to perform functions that you can (apparently, at least) access only by using FrontPage s menus . Other times, toolbars seem to contain more options than you need, and take up too much valuable screen space. Adding commands to toolbars, and moving ”or removing ” buttons , can help you work more efficiently .
| Aha! | Move Toolbars Where You Need Them |
Adding or Removing Buttons to Maximize Toolbar Space
If a toolbar contains buttons you seldom (or never) use, you can remove the buttons to save some screen real estate. You can also add buttons that aren t available on the toolbar by default (as long as you do it sparingly and realize that your customizations can be lost if you move to a new machine or your system needs to be reinstalled). Here s how:
-
Click the Toolbar Options button at the right edge of the toolbar you want to edit.
-
Click Add Or Remove Buttons to change which toolbar buttons are visible.
-
Choose the name of the toolbar (in this case, we will work with the Formatting toolbar) to view all of its buttons.
-
Deselect a button you don t use often, to remove it from the buttons currently displayed (see Figure 20-4).
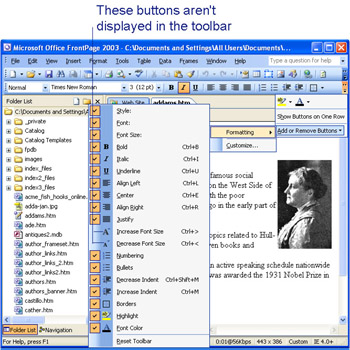
Figure 20-4: You can easily add or remove buttons using the Toolbar Options drop-down list. -
Click a button that s not currently selected to add it to the buttons currently displayed.
| Aha! | Customize How Toolbars and Menus Appear |
| Aha! | Return to Toolbar Button Defaults |
Changing Graphics Format Settings in the Drawing Toolbar
The Office Drawing Toolbar appears in the set of FrontPage toolbars that is available to you when you choose View, Toolbars. Like any toolbar, the Drawing Toolbar can be customized. You can add or remove buttons by clicking Toolbar Options, and by choosing Add or Remove Buttons from the shortcut menu. However, there s another customization option that applies to the Drawing toolbar alone, which can help visitors to your Web site view the graphics that you draw.
The Drawing toolbar enables you to draw graphics directly on the Web pages on which you are working. However, by default, those graphics are saved in a format called Vector Markup Language (VML), which is complex, and difficult for some browsers to display. You can view the code yourself by following these steps:
-
Click the New button, in the Standard toolbar, to create a new blank page.
-
Select View, Toolbars, Drawing, to display the drawing toolbar.
-
Click the Rectangle button in the drawing tool. Then click anywhere in the blank page, and drag down and to the right to draw a rectangle.
-
Click the down arrow next to the Fill Color button. Choose a color from the shortcut menu, to fill the rectangle you just drew.
-
Select the rectangle you drew. Click the Code button at the bottom of the page display area to switch to Code view. The code used to create the relatively simple rectangle should be highlighted (see Figure 20-5).
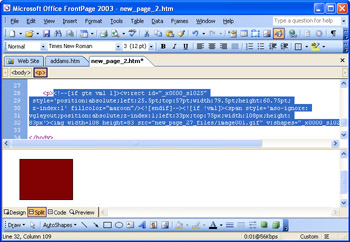
Figure 20-5: Even simple drawing toolbar objects like this rectangle use complicated VML code.
As you can imagine, more complex drawings need longer, more elaborate code to display. If you want to ensure that none of your Web page s graphics contain VML, you can disable this feature in the Page Options dialog box. You ll be disabling your ability to use the Drawing toolbar to add content to your pages. But you, and your fellow Web editors, can use an image editing tool, and save your graphics in GIF or JPEG format to make them visible ”and with simpler code. Here s how to disable VML creation:
-
Open the Web site you want to edit.
-
Choose Tools, Page Options.
-
Click the Authoring tab (see Figure 20-6). Then, deselect the VML graphics (Office drawing) box.
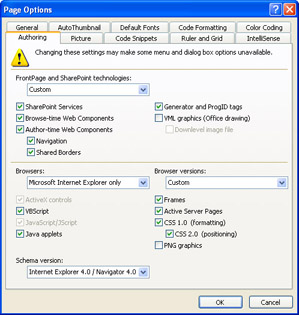
Figure 20-6: Disable VML graphics to ensure that your Web page code remains simple. -
Click OK.
| See Also | By default, many Web browsers can only display bitmap graphics ”graphics that are made up of little squares called pixels, each of which contains one or more bits of digital information. In contrast, vector images are made up of shapes called paths. Vector Markup Language allows some browsers to display those paths by interpreting a complex set of instructions that are added to the HTML and XML for your Web pages. |
Create Your Own Custom Toolbar
In case FrontPage s selection of toolbars doesn t contain the options you want (or doesn t present the options you want in the right combination), you can create your own custom toolbar as follows :
-
Choose Tools, Customize.
-
Click the Toolbars tab, if necessary, and then click New.
-
Type a name for your new toolbar in the Toolbar Name box.
-
Click OK, and then click Commands.
-
Locate the category that contains the command(s) you want to add to the toolbar.
-
Click the command to select it.
-
Drag the command on top of your new toolbar, which appears above the FrontPage window. When you re done, click Close, to close the Customize dialog box.
| Note | The Toolbars tab of the Customize dialog box lists some toolbars in addition to those listed in the Toolbars submenu of the View menu ”for example, 3-D Shapes, and Shadow Settings. Select these options to view them immediately, and click Close to add them to the Toolbars submenu. |
EAN: 2147483647
Pages: 179