Working with Web Parts
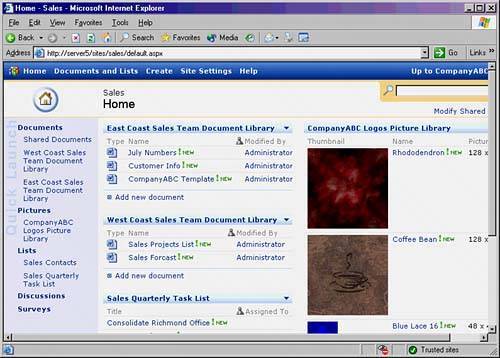
| A SharePoint portal area or site is really just a container that exists solely to house and store information used by its members. The way in which that information is presented to the users of the site is through logical components added to the site. These components, known as Web Parts, display useful information and provide functionality for the users in the site. For example, a Web Part can display the Top 10 Issues for a project, or simply display the weather forecast. Figure 21.1 illustrates several Web Parts that can be displayed on a site. Figure 21.1. Viewing Web Parts. Web Parts are a critical component for any SharePoint site because they present information in a way that makes it useful. If raw data was presented on a site, users in the site would be overwhelmed trying to sort through all the available information. Adding Web Parts to SharePoint SitesAdding a Web Part to a site is a straightforward task for an administrator. By default, SharePoint sites are created with a specific number of standard Web Parts that can be dropped into a page. In addition, each piece of site content that you createfor example, document libraries, lists, discussion groupswill be represented by a default Web Part for it. To add one of these Web Parts to a SharePoint site, follow these steps:
Adding the appropriate Web Parts to a page will make it more informative and useful for your users. In addition, this is the part of the job of site administrator that allows you to put on your creative and artistic hat, and really design a site that people will use and appreciate. Modifying Web Part ViewsWhen a Web Part has been added to a page, its view can be modified to display only the information you want users to see on the page. For example, you could modify a Web Part that shows an Issues list for a project to only display the top 10 active issues. This type of flexibility gives you control over your Web Parts and what type of information they display. To modify an existing Web Part, follow this procedure:
There is a dizzying array of options to choose from when modifying Web Part views or other options. The benefit to SharePoint lies in the fact that the default "out of the box" functionality gives you a powerful interface, whereas the control to modify how your data is presented via methods described previously gives you the ability to go beyond the defaults and customize to your heart's content. |
EAN: 2147483647
Pages: 288

