| SharePoint's document library feature enables management and collaboration by providing a centralized place for controlling access to, and the publishing of, documents. Although a document workspace can be used for the initial development of the document, many organizations use a document library on a departmental or organizational site as the place to go for the most current information. When a new Windows SharePoint Services site is created using the Team Site or Document Workspace Site template, a shared document library is also created. Other templates, such as the Social Meeting template, do not include document libraries by default, so one may need to be created. Or, an administrator may decide to add an additional document library to a site for any of a number of reasons. To create a document library, access the Create menu, using one of the following methods: If the site has a Quick Launch bar, click on Documents (the actual header), and then when the Document and Lists page opens, click on Create Document Library in the toolbar. If the site has a Create tab in the top navigation bar, click on it. Then click on document library. For a Windows SharePoint Services site that does not have a Create tab, go to Site Settings, Modify Site Content, and then Create New Content. Then click on document library. For a SharePoint Portal 2003 area, from the home page, click on Manage Content and then Create. Then click document library.
Once the New document library page is open, follow these steps: 1. | When the New document library screen appears, enter a name and description for the library. A best practice is to have the name reflect the site that houses it or the content of the library, without making the name too long. This makes URLs containing the library name more easily recognized. For example, calling a document library "Documents 2" is not very informative, and if someone sees a hyperlink to a …sites/sales/documents 2/… they won't have any idea what the purpose of the library is. On the other hand, calling it "Sales Department Reference Documents" is probably too long a title. Calling it "Sales Reference Docs" might be a good compromise.
TIP The text entered in the description box when creating a new document library appears above the tool bar in the library. Feel free to put in basic explanations or tips to the users (especially if they are new to SharePoint) such as: "Welcome to the document library for Sales. Please click on the Upload Document button if you want to add documents to the library. If you are having trouble with the library please contact the Help Desk." URLs can also be entered, and will be active when they are displayed. This is a quick and dirty way of linking to other related Web Parts. This description text can easily be changed later by accessing Modify settings and columns, Change general settings. | 2. | Under Navigation, if you want the library to display on the Quick Launch bar of the home page, click the Yes radio button (this is the default).
| 3. | Under Document Versions, if you want SharePoint to keep track of revisions for the documents in the library, click the Yes radio button.
NOTE By default, SharePoint 2003 does not maintain version history. To maintain version history, this option must be changed to Yes. | 4. | Under Document Template, enter the name of the template document that will be used when creating new documents. The default is a Microsoft Word document.
| 5. | Click Create when you are finished. The document library will then open.
|
Tools Available in a Document Library Figure 11.8 shows the view of a document library in SharePoint, using the AllItems.aspx view. Figure 11.8. AllItems view of document library in SharePoint 2003. 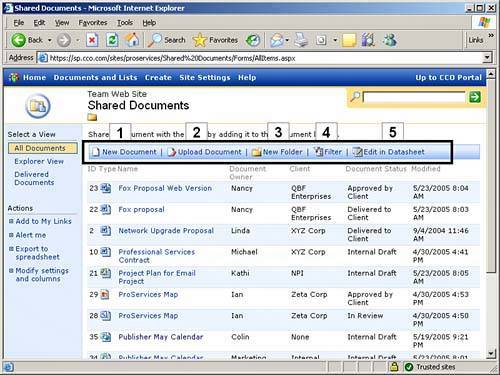
The toolbar is outlined and the different tools are numbered in Figure 11.8. A brief description of each tool follows: 1. | New DocumentBy clicking the New Document button, the user can create a new document based on the template that has been assigned to the document library. This could be a blank Word document, a FrontPage web page, an Excel spreadsheet, a PowerPoint presentation, a Basic Page, or a Web Part pageor there could be no template assigned. If no template is assigned, a blank Word document will open when the user clicks New Document.
| 2. | Upload DocumentClicking on the Upload Document button allows a user with Insert Items permission to upload documents to the library. This process is discussed in more detail in the following section in this chapter.
| 3. | New FolderClicking on the New Folder button allows folder to be created within the document library to help organize the documents by subtopics.
TIP Instead of simply creating subfolders in document libraries (the "old way" of managing documents), consider using metadata instead of subfolders within document libraries. For example, rather than creating a folder for each client, simply add a metadata column titled Client that contains this information. Also add a column titled Technology, and use it to list the type of product that is being discussed. This gets users to see the value of metadata as an aid to sort by to quickly find the document they are looking for as opposed to browsing through different folders. Of course, you can also use the search feature in the document library as another method of finding the desired document. And, another tip is that a view can be created that ignores folders altogether, and shows all contents of the library! (Click Modify settings and columns in the library, click on the default view, expand the Folders section, and select Show all documents without folders, and click OK.) | 4. | FilterWhen the Filter button is clicked, additional information is displayed within the document library to allow the user to filter for specific information. Figure 11.9 shows the results of clicking the Filter button, where the document owner of "Ian" is selected, and only two documents are then shown. This can be extremely useful when a large number of documents are in the library and the user wants to find a specific subset.
Figure 11.9. Filtered View of a document library. 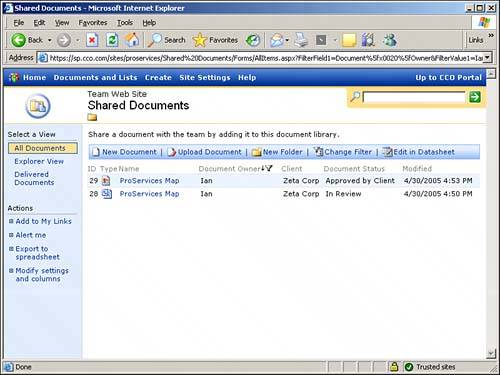
| 5. | Edit in DatasheetClicking on the Edit in Datasheet button can be helpful for quick input of data, and edits to metadata columns, and working with Excel and Access. The Datasheet view requires Office 2003 Professional be installed on the workstation of the user accessing the library to function.
|
Populating the Document Library There are multiple ways of putting documents into a document library. Documents can be added through the browser interface (via the Upload.aspx page), through a Microsoft Office application (via the Save As command), using Windows Explorer, or through the Explorer View of a document library. The simplest way is to select the New Document option on the document library page. This launches Word with a blank document. When the document is saved, it will be saved back to the SharePoint library. A second way to add documents to a library is to upload existing documents. Selecting the Upload Document option on the document library page brings up a prompt for the document name and location. You can either enter the name directly, or you can browse to the document. A single document can be uploaded, or multiple documents can be uploaded all at once if Office 2003 is in use. Figure 11.10 shows how multiple documents can be uploaded at one time to the document library. Figure 11.10. Uploading multiple documents into a document library. 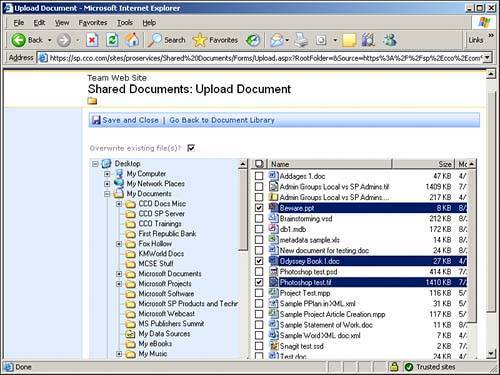
A third way is to set up the document library as a Network Place; then, when saving the document, save it to the Network Place that points to the document library. This process is covered in Chapter 7, "Configuring Client Access to SharePoint Resources," in the section titled "Using My Network Places to Access SharePoint 2003 Sites." Another way is to drag and drop documents into the library using the Explorer View in a document library. The advantage of adding documents in this manner is that multiple documents can be added at the same time. A disadvantage is that some document profile information may be lost. Working with Documents in the Library Now that there are documents in the document library, a number of activities can take place. One of the most common is for users to edit these documents. If a user only has Read privileges in the document library, she won't be able to edit the document and save it back to the library. The user needs Edit permissions to modify a document and save it back to the library. Figure 11.11 shows the commands available when a user hovers over the filename of the document and clicks the black down arrow. The user can also right-click in the space to the right of the filename (this can sometimes be easier than clicking the black arrow). 1. | View Properties and Edit Properties These commands allow the user to view or edit the document properties. Not all document properties are editable because some information is generated automatically, such as Modified Time and Modified By, but the name of the document and the title of the document can be modified by someone with Edit privileges. If metadata columns appear in the library, they can be edited there or in Datasheet view.
| 2. | Edit in Microsoft Word This is the preferred method of editing a Microsoft document stored in a document library, and the command will reflect the application used to create the file (for example, an Excel file would have Edit in Microsoft Excel as the option in this menu).
| 3. | Delete A user needs Delete privileges to delete files within a document library. If versioning is on, all previous versions will be deleted.
CAUTION There is no undelete function by default in SharePoint 2003. When you delete a file from a document library, it cannot be restored by clicking Undo, and will not appear in your Recycle Bin on your desktop. Typically, you will need to approach a site administrator to recover an accidentally deleted file from a tape backup, or site backup. Note that Microsoft did offer an undelete Web Part for SharePoint Portal Server 2001 but has not yet released one for 2003. A solution is discussed in the article "Add a Recycle Bin to Windows SharePoint Services for Easy Document Recovery" (search for this title from http://msdn.microsoft.com/) that involves creating a mirror of the document library that will hold copies of all the files. There are also third-party products available, such as SmartLibrary from Nintex, that offer this functionality. | 4. | Check Out A recommended best practice is to "check out" a document before you start working on it. This lets other users of the library know that you have it reserved. You don't actually have to edit it at that exact moment. A site administrator can force a check-in if you forget to check it in yourself.
| 5. | Version History and Alert Me Version History provides access to a list of previous versions of the document, if versioning is activated for the document library. Alert Me sends an email alert if changes are made to the document. Version History is covered later in this chapter, and the Alert feature in covered in Chapter 12.
| 6. | Discuss A Web Discussion allows a user to attach notes to items on the page. These won't be discussed in detail because they aren't typically used by most clients, and it is generally recommended that discussions take place in a SharePoint Discussion Group Web Part rather than in a Web Discussion. Chapter 7 gives covers Discussion in the section "Using Discussions in Internet Explorer."
| 7. | Create Document Workspace Document workspaces were discussed in a number of previous chapters, and specifically in Chapter 9, both Document Workspaces and Meeting Workspaces. This command provides a handy way to create a workspace "around" a document that is stored in a document library. If you have rights to create a document workspace and click this command, you will see the message that provides the following information: "A new Document Workspace will be created. A copy of this document will be stored in the new workspace. From the new workspace, you can publish the document back to its original location." Click OK to create the Document Workspace.
|
Figure 11.11. Document actions. 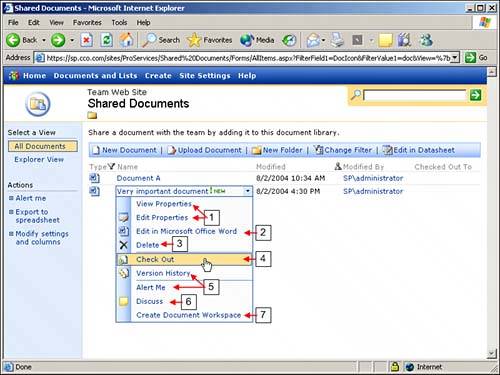
Identifying Documents with Metadata All documents stored in SharePoint document libraries have metadata or profile information associated with the document. Some of the metadata is obtained automatically by SharePoint, and some is entered by the user when saving the document. By default (out-of-the-box), the only "column" (field) that has to be entered is the name of the document. Other columns maintained automatically are The type of document (for example, Word, Excel, and so on) The date/time when it was last modified Who made the last modification Who it is checked out to (if it is checked out) When it was originally created (date/time) Who originally created it A name used in forms A name linked to the document A button for editing the item (for example, the properties of the item) The size of the file The document title
Matching system information that has been entered into the Office application profile will be carried forward to SharePoint. For example, as many SharePoint users discover, the title of the Word document (accessed through File, Properties) will show up in the title field in the document library. So be careful that the file title actually matches the purpose of the document, or searches can become less accurate. For example, a monthly report may have a title "Q1 Operating Budget," but be saved with a file name of "Q2 Operating Budget." Additional columns of information can be added to the profile to further identify and manage the documents contained in the library. Columns are added/changed through the Modify Settings and Columns option in the Quick Link section of a document library page. Scroll down to the Columns section and select Add a New Column. Follow the prompts on the screen by entering a column name, and selecting the type of information you want to have displayed in the column, and enter the optional settings, if desired. Figure 11.12 shows the Add Column page, without any entries. Figure 11.12. The Add Column page for a document library. 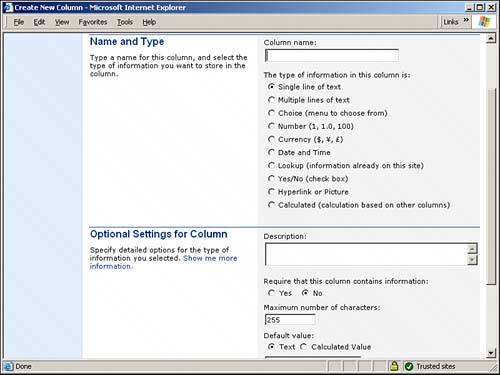
Two things to note in the Optional Settings pane: If something must be entered in the column, make sure that Require That the Column Contains Information is set to Yes. If the column is to be displayed in the default view when looking at the library contents, make sure that Add to Default View is checked. Alternative views can also be created that display the columns in various configurations.
CAUTION While selecting the Require that this column contains information would seem like a foolproof way to make sure that certain data is entered when a document is uploaded to a document library, it can be circumvented. If a user takes advantage of the Explorer View, and pastes a document from another folder or library into the current library, she will NOT have to enter this information. For this reason some site or library administrators may chose to remove the Explorer View.
SharePoint 2003 supports the following types of columns: Single line of text One line of text can be entered into this type of column. The Maximum number of characters (1-255) can be set as well. A Default value can be entered, or a Calculated Value. CAUTION If you are considering using, or having problems using Calculated Values in the Default Value section, note that you cannot include column references in a formula that is specified as the default value of a column. Also, the type of column needs to support the output of the calculation. For example, you won't get any output if you enter "=6*9" as the default value calculation for a Single line of text column, you need to choose a Number type of column. In general, it makes more sense to select a Calculated column type, and then enter the calculation, than to choose another type of column and select Calculated Value as a Default Value.
Text Multiple lines. This type of column is similar to the Single line Text column, but more than one line of text can be entered. The number of lines can vary between 1 and 1,000 lines of text. Choice The user is provided with a menu of options in either Drop-Down Menu, Radio Buttons, or Checkboxes (allow multiple selections) formats. If the Checkboxes option is selected, multiple items can be checked at the same time; with the other two choices only one selection can be made. "Fill-in" choices can be enabled as well, which provides an area on the form where the user can enter whatever they like. A Default value can also be set for the Choice column, or the option suggested can be deleted which will result in a black default value. Number Only numeric data can be entered into this type of column. A minimum and maximum allowed value can be set, the number of decimal places (automatic, or 0-5) can be set, a default value can be set, and the number can be displayed as a percentage if desired. Currency A minimum and maximum allowed value can be set, the number of decimal places (automatic, or 0-5) can be set, a default value can be set, and a drop-down list is available from which you can select the currency format. Date and Time When this type of column is added, you can specify whether just the date will appear or the date and the time. You can also set a default value such as the current date, or a specific date (and time). Lookup Use this type of column when accessing another list on the SharePoint site for providing the menu of entry options. Choose the appropriate library or list from the Get information from drop-down menu, and then choose the appropriate column from the In this column drop-down menu. You can choose to Include presence information if the information is associated with a SharePoint user. Yes/No This type of column requires a "yes" or "no" response. A check box will be shown on the form, and if checked, the value of Yes will be displayed in standard view, or a checked box will appear in datasheet view. Hyperlink or Picture Use this column to enter a hyperlink to a web page, document, or picture. The URL can be formatted as a Hyperlink or a Picture. When the user is uploading a document and is filling out this field, he will have the chance to enter a description for the URL (so the whole URL doesn't display, only the description does). When the URL description is clicked, that site will open. If a picture format is chosen, clicking on the picture has no effect. TIP Note that if you choose to format a hyperlink as a picture in a Hyperlink or Picture column, the full-sized picture will be shown (not a thumbnail), which can be quite large. This may make the library harder to use as one entry could take up the whole screen. Consider using a picture library instead of a document library as it has a number of built-in views for better management of images, and automatically creates a smaller display version of the image.
Calculated This column is populated with the results of a calculation using other columns in the profile. Figure 11.13 shows the interface that is used to enter the calculation. A sample calculation is entered, that returns the value "Warning" if the total of the fields Technical Sat, Soft Skills Sat and Deliverables Sat are less than 2.7. 2.7 is used as these items are displayed as percentages, so SharePoint sees 70% as the value of 0.7. Figure 11.13. Sample formula in Calculated column. 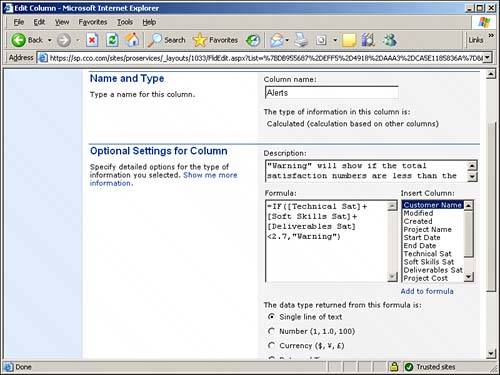
TIP Calculation columns in SharePoint lists and libraries can do a lot more than simply add up other columns. The following data types can be referenced in a formula: Single line of text, choice, number, currency, date and time, yes/no, and calculated. For example, a logical operation where a result of True is provided when the results of an operation match a certain criteria. The formula =AND(1<[Col1], [Col1]<100) will result in a True result if Col1 is greater than 1 and less than 100. Formulae like this can turn raw numbers into useful reports quite quickly. Reference the SharePoint Portal Server 2003 Administrator's Guide for more information by searching on "About Calculated Columns" and "Functions."
The benefits of customizing and using metadata with documents are that the columns are searchable, and views can be filtered, sorted, and grouped by the columns. Note that the number of columns that can be created are not unlimited. With Windows SharePoint Services, you can create the following numbers of each column type for each list or library: Using Views in Document Libraries When a document library is opened, one or more view names will be shown in the left-hand Quick Links bar. By default you will see an All Documents, and an Explorer View for a document library. A picture library offers All Pictures Details, All Pictures Thumbnails, All Pictures Filmstrip, Selected Pictures, and Explorer View. A Forms Library offers All Forms, Explorer View, Merge Forms, and My Forms. The view selected will, naturally, change the appearance of the content of the library. The Explorer view displays the list of documents in the document library in a view similar to Windows Explorer, with an icon for each file or document. In addition to displaying the list of documents in a SharePoint library, the Explorer view can be used to view "other places" such as Desktop, My Documents, My Computer, and My Network Places. This enables access to documents and Explorer types of functions (for example, Rename, Copy, Delete, Print) for documents stored on these other locations without having to leave the SharePoint environment. In addition, multiple files and folders can be moved, copied, or deleted in Explorer view. To use this view, a Windows SharePoint Servicescompatible application such as Microsoft Office 2003 and Internet Explorer is required. SharePoint maintains more information about the document than what is contained in the default view (as specified in the previous section "Identifying Documents with Metadata"). This information, and user-defined columns, is also available for display using views as will be shown in the next section. Adding or Modifying a View to Suit User Needs To modify the default view, or to add a new view, clicking on an existing view enables editing of that view, or clicking on Create a new view enables adding a view. The following steps show how to create a new view: 1. | From the Quick Launch bar of the document library click on Modify Settings and Columns.
| 2. | Once the Customize Library Name window opens, scroll down to the Views section. Click on Create a new view.
| 3. | Choose between Standard View, Datasheet View, and Calendar View. Datasheet View requires that a user have Office 2003 Professional installed, while Calendar View requires that a date column be included. If a Datasheet view is accessed by someone who doesn't have datasheet-supported software, the view is presented in standard format. For this example, choose Standard View.
| 4. | Enter a View Name as shown in Figure 11.14. In this case, "Home Page View" is entered. This view is being created for use on the site's home page.
Figure 11.14. Create View page. 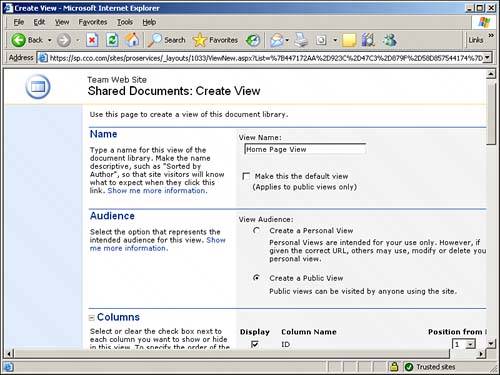
| 5. | Select the box next to Make this the default view, if appropriate. Leave this box blank in this example.
| 6. | Determine the View Audience. This can be a personal view that only you will be provided as an option, or for any user of the library. In this example, choose Create a Public View.
| 7. | In the Columns section, check the boxes of the columns that you would like displayed. In this example, since the view will be on the home page of the site, only a few columns will be selected (as shown in Figure 11.15): Type, Name, and Client.
Figure 11.15. Columns selection on Create View page. 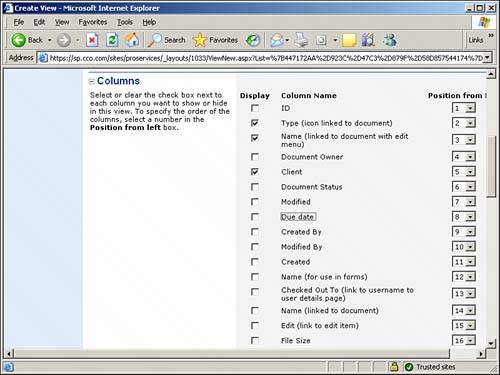
| 8. | In the Sort section, choose which columns to sort by. In this example, choose Modified, and click in the circle next to Show items in ascending order. This will put the most recently modified documents at the top of the list.
| 9. | In the Filter section you can enter a filter for the view. In this example, Show items only when the following is true is selected, and select Document Status from the drop-down menu. Is equal to is then left as the operand, and Delivered to Client is entered. So in this example, only documents with the option Delivered to Client selected in the Document Status column will be displayed.
| 10. | The Group By section enables grouping documents together based on a column of data. The grouping can be in expanded or collapsed format. A grouped view enables grouping items together based on one or two columns. For example, if "technology" was the name of a data field, and it contained values such as "Exchange 2003," "Windows 2003," and "Windows Professional," all the Exchange 2003 items could be grouped together, all the Windows 2003 documents could be grouped together, and all the Desktop documents could be grouped together. No selections will be made here for this example.
| 11. | The Totals section provides a way to count the number of documents with a specific value in a column and also to total the values for a column of numeric data. This feature can be useful for determining how many there are of a specific type of document. No totals will be used in this example.
| 12. | The Style section provides several different styles for displaying the document list including a "newsletter" format, detailed items, and shaded. No style will be selected for this example.
| 13. | FoldersEnables displaying all the documents together regardless of which folder they are in, or displaying documents within the folder structure. Show all documents without folders is selected for this example. With this selection made, even if a new document is buried in one of more folders, it will show up in the "Home Page View" view.
| 14. | In the Item Limit section the number of items that are viewed can be set. The item limit can be an absolute amount (for example, 100) meaning that no more than that number of items can be viewed, or the amount can be used to view the items in groups or "batches." For example, if the limit is 25 and display in batches is selected, the first 25 items would be displayed, then the next 25, and so on. For this example, 10 is entered, and Limit the total number of items returned to the specified amount is selected. If there are more than 10 items that meet the view's display criteria, the user will need to open the document library to see the additional items.
| 15. | Click OK and you will return to the Customize Library Name screen. The new view will appear in the Quick Links bar under Select a View.
|
The purpose of creating this view was to use it on the site's home page. So to select this view on the home page, follow these steps. 1. | Click on Home in the top navigation bar to go to the site's home page.
| 2. | Click on Modify Shared Page (assuming you have the rights to do so) and select Modify Shared Web Parts, and select the name of the document library (in this example Shared Documents). This assumes the document library Web Part was already on the home page.
| 3. | Under Selected View change the view to Home Page View (the view created in the previous section) and click OK. Figure 11.16 shows the new view of the document library. Note that of the many documents contained within the document library, only three meet the filter set with the criteria that Document Status is equal to Delivered to Client.
Figure 11.16. Home Page View applied to document library. 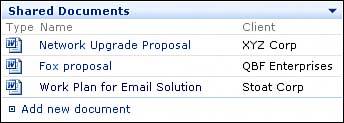
|
This is just one example of how views can be used in document libraries, but hopefully gives an idea of the main features and options available when a view is created. Creating appropriate views for different types of libraries will impact how useful users find the libraries, so the site administrator(s) should solicit input from end users and test different types of views to ensure their effectiveness. |