Connecting Network Devices to Your PC

 < Day Day Up > 

Network devices such as wireless access points, infrared adapters, and broadband Internet access devices can be connected to your PC with the following methods :

  • Direct connection to the RJ-45 (10/100 Ethernet) port

  • Direct connection to the USB port

  • Wireless Ethernet (Wi-Fi) connection

  • Installation of a proprietary module on the motherboard

Read the following sections to learn more.

Connecting Wireless Access Points

Although some wireless access points (WAPs ) can be configured through a wireless connection established with a compatible wireless Ethernet card, you might prefer to connect a CAT 5 (10/100 Ethernet) cable using the RJ-45 connector between the WAP and your PC to make configuration easier.

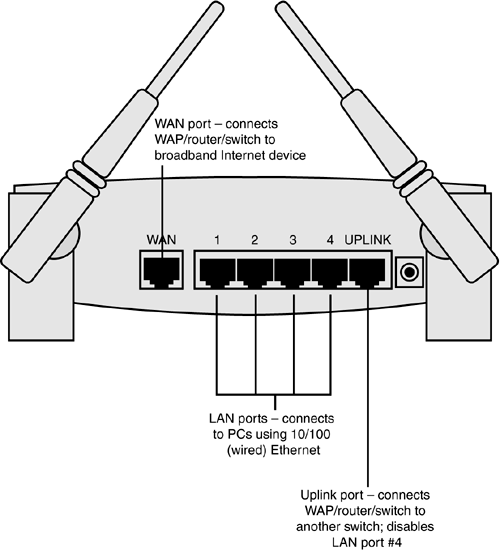
The cable should be plugged into the appropriate port on the WAP. If the WAP also contains a router , make sure you don't attach the cable to the WAN portthis port is used to connect the router to a broadband Internet access device. Use one of the LAN portsthey are designed to connect to PCs (see Figure 11.6).

Figure 11.6. The rear of a typical WAP, which incorporates a router and a switch. Use the LAN ports (numbered 14 in this example) for wired networking or to configure the router.

graphics/11fig06.gif

After the connection is made, follow the instructions provided with the WAP for configuration.

Connecting Broadband Internet Access Devices

You can connect broadband Internet access devices such as cable modems or DSL modems to the USB or 10/100 Ethernet port on your computer. Follow this procedure:

  1. If the broadband Internet access device supports both USB and 10/100 Ethernet, select the connection type you want to use. I recommend 10/100 Ethernet if your computer and broadband device support it. Otherwise, use USB.

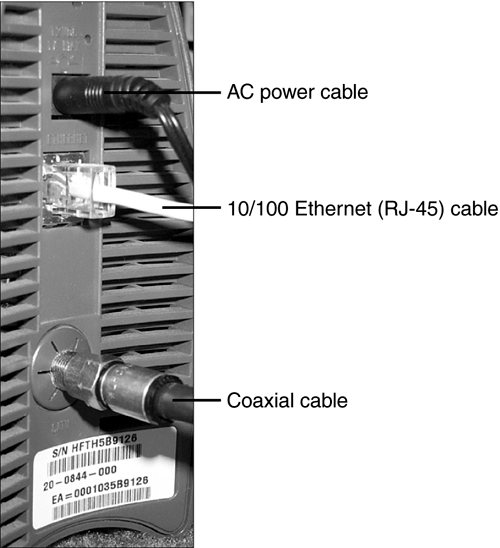
  2. Connect the broadband Internet access device to the data cable used by the provider: A cable modem uses coaxial cable provided by the CATV provider (see Figure 11.7), whereas a DSL modem uses a specially provisioned telephone line. See Chapter 21, "Networking and Internet Connectivity," for more details.

    Figure 11.7. Power, 10/100 Ethernet, and coaxial cables connected to the rear of a typical cable modem.

    graphics/11fig07.gif

  3. Connect the USB or 10/100 Ethernet (RJ-45) cable to the port on the broadband device (see Figure 11.7)

  4. Connect the other end of the cable to the USB or 10/100 Ethernet port on your computer.

  5. Connect the broadband Internet device to AC power with the transformer provided with the unit (see Figure 11.7).

  6. Turn on the broadband Internet device if it has a separate on/off switch.

  7. Turn on the PC if it was turned off.

  8. Install any software provided by the broadband Internet access vendor. You might also need to install Windows network drivers, so have your Windows CD handy.

  9. Configure the software as required ( user name , password, and so on).

Connecting Infrared Adapters

Infrared adapters for connecting computers to IrDA-compliant printers and other devices aren't all that popular. Nevertheless, the 2003 edition of the A+ Certification Exam expects you to be ready to handle the process of installing and configuring an infrared adapter just in case.

Infrared adapters can be installed in the following locations:

  • Inside a desktop PC

  • Connected to existing serial or USB ports

  • Connected to a printer

Some laser printers, portable inkjet printers, and notebook computers already include IrDA-compliant infrared ports.

Installing an Infrared Port on a PC

Most motherboards that support Pentium or newer processors have a multi-pin infrared port that is compatible with the IrDA standard. IrDA is the infrared data transport method supported by the Infrared Data Association. Most motherboards treat the IrDA port as a COM port; the IrDA port is enabled in the system BIOS as a separate component on some motherboards, but other motherboards enable infrared as a setting for one of the COM ports (normally COM 2).

Although the infrared port can be enabled or disabled through the system BIOS, it is useless until a transceiver is attached to the header pins on the motherboard. So, if you want infrared transmissions, where do you get the transceiver? You can get transceivers from the following sources:

  • The motherboard maker

  • Third-party sources (search Google for "IrDA motherboard" to find them)

graphics/note_icon.gif

The leading third-party source of IrDA transceivers is ACTiSYS Corporation (www.actisys.com).


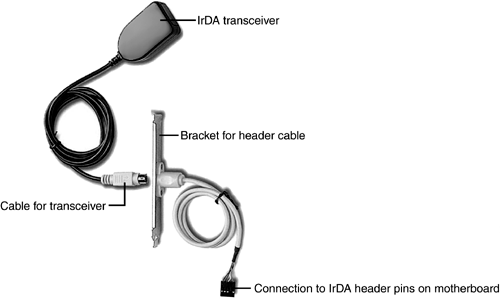
In most cases, the transceiver is connected to the motherboard by means of a bracket with a header cable (see Figure 11.8). To install this type of a transceiver, follow this procedure:

  1. Shut down the computer and unplug it. Take ESD precautions as described in Chapter 13, "Safety and Recycling."

  2. Remove the cover to gain access to the motherboard.

  3. Remove a slot cover for use by the bracket with the IrDA header cable.

  4. Attach the bracket to the rear of the computer in place of the slot cover you removed in step 3.

  5. Use the documentation for the motherboard to locate the pins for the IrDA infrared module or infrared port.

  6. Connect the cable from the bracket to the header pins on the motherboard. Make sure you match the pinouts of the header cable to the header pins.

  7. Connect the transceiver to the bracket you installed in step 4.

  8. Plug in the computer and turn it on.

  9. Start the BIOS setup program and enable the infrared port. Adjust the settings according to the recommendations for the transceiver or module you are using.

  10. Save the changes to the BIOS and restart the computer.

  11. If necessary, provide the Windows CD or driver disk to complete the setup process.

Figure 11.8. A typical IrDA transceiver kit designed to connect to the IrDA header pins found on most recent motherboards.

graphics/11fig08.gif

tip

graphics/tip_icon.gif

As an alternative to installing an internal infrared port, ACTiSYS and other vendors offer IrDA-compatible adapters that can be attached to existing USB and serial ports.


Adapting a Parallel Printer to Work with IrDA

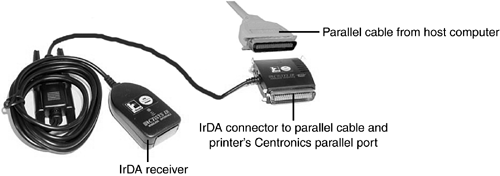
Having IrDA support on a desktop or portable computer is useful if you want to print or perform file transfers without wires. However, if you want to print wirelessly , the printer also needs to support IrDA. You can attach an IrDA receiver (see Figure 11.9) to many parallel printers that don't include IrDA support. Follow this basic procedure:

  1. Shut down the PC and the printer.

  2. Disconnect the parallel cable from the printer's Centronics parallel port.

  3. Connect the IrDA receiver to the Centronics port on the printer.

  4. Plug the parallel cable back into the IrDA receiver's Centronics port (see Figure 11.9).

  5. Make sure the parallel cable is still connected to the PC's parallel port.

  6. If the IrDA receiver requires power, plug its AC adapter into a power source.

  7. Position the IrDA receiver where it can be seen by the computer(s) from which you want to print.

  8. Turn on the computer and the printer.

  9. Install any software drivers required by the adapter.

  10. Test the adapter by printing from the host PC and by printing from a computer with an IrDA port.

Figure 11.9. A typical IrDA parallel printer adapter kit. The printer can still be used by the host PC as well as by other PCs that have IrDA support.

graphics/11fig09.gif

 < Day Day Up > 


Absolute Beginners Guide to A+ Certification. Covers the Hardware and Operating Systems Exam
ISBN: N/A
EAN: N/A
Year: 2004
Pages: 310

flylib.com © 2008-2017.
If you may any questions please contact us: flylib@qtcs.net