Upgrading to Windows 2000 Professional You can upgrade to Windows 2000 Professional from any of the following versions of Windows: You cannot upgrade to Windows 2000 Professional from Windows 3.1 or earlier versions, Windows Me, or from any version of MS-DOS. Preparations to Make Before Upgrading to Windows 2000 It probably won't surprise you to realize that Windows 2000 requires more powerful hardware than its predecessors: -
Pentium 133MHz or compatible processor; dual processors also supported -
64MB of RAM -
2GB hard disk with 650MB free space -
CD-ROM or DVD-ROM drive -
VGA or higher-resolution monitor -
Keyboard Some older systems might require processor, memory, or hard disk upgrades to be qualified to run Windows 2000. You should make sure your computer meets, or exceeds, these standards before you start the upgrade process. Because upgrading to a new version of Windows retains your existing application software and settings, you should also make sure that both your hardware and software are compatible with Windows 2000. Windows 2000 provides three options you can use to help make sure your system is compatible with Windows 2000. Depending on the installation type, you might not see all these options during the same installation. -
Link to the Microsoft Compatibility Web Site You can go straight to the Microsoft Compatibility Web site from the Windows 2000 installation if you have a working Internet connection. I recommend performing this task before you start the installation process if possible. -
Upgrade Packs for Software If your software vendors provide software packs to provide compatibility with Windows 2000, you can install them on the screen after the option to go to the Microsoft Compatibility Web site. -
Upgrade (Readiness) Analyzer After selecting whether to upgrade to NTFS, the system will run this option to analyze the hardware in your system. You can also download it and run it before you start the installation process. tip  | You can download this tool (also known as the Windows 2000 Readiness Analyzer ) from http://www.dewassoc.com/support/win2000/analyzer2.htm as well as from the Microsoft Download Center at http://www.microsoft.com/downloads/. Select Windows 2000 as the Product/Technology and enter Readiness Analyzer in the Keywords field. |
After you review the results of the Upgrade Analyzer (which can be saved or printed), you can immediately provide a replacement driver for any hardware listed, or provide a replacement driver later. Any hardware listed on the report will not work correctly until a Windows 2000compatible driver is installed; drivers from earlier versions of Windows will not work. Before you upgrade to Windows 2000, you should Create a folder for your updates on your system and uncompress them if needed so they can be used during the upgrade process. Upgrading to Windows 2000 from Windows NT 4.0 You can upgrade Windows NT 4.0 to Windows 2000 by following these steps: -
Start Windows NT 4.0. -
Insert the Windows 2000 CD-ROM. -
To start the upgrade process, click Yes when the computer asks Would you like to upgrade to Windows 2000 now? . -
On the Welcome to the Windows 2000 Setup Wizard, select Upgrade to Windows 2000 (the default); click Next. tip | | If you prefer to find out before starting the installation process if you need updated drivers or applications, visit http://www.microsoft.com/windows2000/professional/howtobuy/upgrading/compat/default.asp and use the Computers, Hardware Devices, and Software buttons to display compatible items and update information when needed. When you search for software, specify the company and application/product fields but use All for the product category to most easily find the information you need. When you search for computers or hardware devices, be sure to specify the full name of the company (Hewlett-Packard, not HP, for example) and the model name / number. If your search delivers no results, make the search less specific and try again. | -
Accept the Windows 2000 end user license agreement ( EULA ); click Next to continue. -
On the Your Product Key screen, enter your 25-character product key from the back of the CD case or sleeve that contained your Windows 2000 CD-ROM. Click Next to continue. -
If the Windows NT 4.0 hard disk is not using NTFS, the Upgrading to the Windows 2000 NTFS File System screen appears. Choose Yes to upgrade your drive to NTFS, or choose No to keep its current file system. -
Windows 2000 runs the Upgrade Analyzer to check hardware and software compatibility, which enables you to display or print a report. If some of your hardware needs new drivers, you can provide updated Plug and Play (PnP) driver files now (recommended) with Have Disk (browse to the folder containing the drivers needed), or click Next if you want to provide file updates later. -
After you review the Upgrade Analyzer report, you can continue or quit the installation. -
The system reboots for the first time after copying files. -
After rebooting, you are prompted to press F6 to load third-party SCSI or RAID drivers; you should also press F6 if you are using a Serial ATA drive. Provide the drivers as needed for your hardware. The Setup program examines your hardware and begins to load driver files, checks your C: drive for errors, and begins to copy files. After your system is configured, Windows 2000 reboots your computer for a second time. -
After the reboot, your drive is converted to NTFS if you selected this option earlier in the setup process. The system is rebooted again. -
The Setup program detects hardware devices and installs network components . -
Additional components are installed and configured, including advanced network features, such as COM+. -
After Final Tasks are performed, the system is rebooted a third time. -
Log on to the system when prompted to start your upgraded Windows 2000 Professional installation.  | If Autorun has been disabled on your system, you can open the Setup.exe program on the Windows 2000 CD-ROM from Windows Explorer to start. |
Upgrading to Windows 2000 from Windows 9x/Me You can upgrade Windows 9x to Windows 2000 by following these steps: -
Start Windows 9x. -
Insert the Windows 2000 CD-ROM. -
To start the upgrade process, click Yes when the computer asks, Would you like to upgrade to Windows 2000 now? . -
On the Welcome to the Windows 2000 Setup Wizard, select Upgrade to Windows 2000 (the default). Click Next (see Figure 17.1). Figure 17.1. Select the default Upgrade to Windows 2000 to replace Windows 9x with Windows 2000. 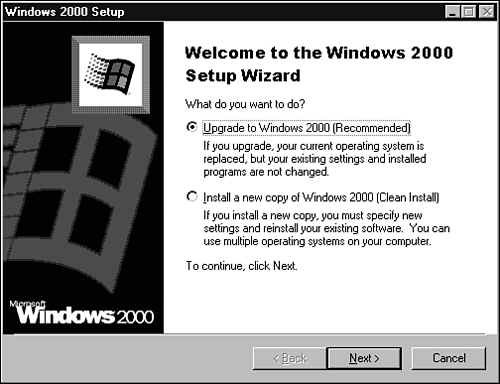 -
Accept the Windows 2000 EULA, and click Next to continue. -
Enter your 25-character product key from the back of the CD case or sleeve that contained your Windows 2000 CD-ROM. Click Next to continue. -
Click on the link to visit the Windows Compatibility Web site to check for hardware and software updates if you did not do so before starting the installation process. tip | | If you have not accessed the Internet on this computer before, you might be prompted to run the Internet Connection Wizard at this time. See Chapter 21, "Networking and Internet Connectivity," for details. | -
On the Windows 2000 Setup Web site, click Search for Hardware or BIOS Updates to start the Computer search at the Windows Compatibility Web site. You can also use this tool to search for hardware device or software updates. -
After downloading and installing any updates you found in the previous step, click the Back button in your browser until you return to the Windows 2000 Setup screen. Click Next to continue. -
Click the Download the Latest Upgrade Pack for Setup and Compatibility button to check the system against the latest compatibility information; run it from its current location. | | This site lists computer vendors, but not motherboard vendors. If you are looking for updates for a "white-box" generic PC, or if your name-brand PC now uses a third-party motherboard, don't bother to use this search tool. Instead, check the motherboard vendor's site yourself. Note also that you must manually enter computer, hardware, and software information; Windows doesn't detect the components or software in your system. |
-
Accept any security warning that might appear and click Next to continue. -
Windows returns you to the screen you saw in step 7. Click Next to continue. -
Select whether to install upgrade packs provided by software vendors to make their software work with Windows 2000, and click Next. If you selected the option to install upgrade packs, specify their location. -
Select whether to use the NTFS file system on your drive. If you want to dual boot, choose the default of No, but to enjoy the additional benefits of the NTFS file system, choose Yes. If you are unsure, skip this option and convert the drive after installation. Drives other than C: will not be converted during setup. -
You can run the Upgrade Analyzer to check hardware and software compatibility and view or print a report; skip this step if you already checked compatibility. If some of your hardware needs new drivers, you can provide updated Plug and Play driver files now (recommended), or click Next if you want to provide file updates later (see Figure 17.2). Figure 17.2. Many hardware devices on this recent motherboard need updated drivers for Windows 2000. 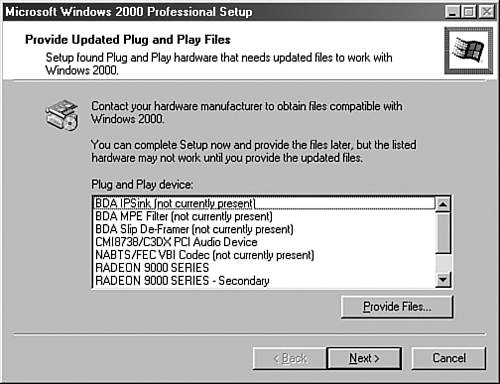 -
The Upgrade Analyzer report lists compatibility concerns for hardware, software designed for MS-DOS, general information, and upgrade pack information. After you review the Upgrade Analyzer report, you can continue or quit the installation. caution  | If the Upgrade Analyzer indicates it will remove backup files (look under the General Information section), you should press Ctrl-Esc, open Windows Explorer, and make backup copies of any files you want to keep, or cancel the upgrade process until you make the backups you need. | -
The system reboots for the first time. -
After rebooting, the Setup program examines your hardware and begins to load driver files, checks your C: drive for errors, and begins to copy files. After your system is configured, Windows 2000 reboots your computer for a second time. -
After the reboot, a fully graphical desktop appears during the setup process, and your input devices are recognized and set up. -
Networking components are installed if your system is connected to a local area network (LAN). You might be asked whether the computer is part of a domain or workgroup; specify the domain or workgroup. -
Additional components are installed and configured, including advanced network features, such as COM+. -
After final tasks are performed, the system is rebooted a third time. -
Press F8 for special startup options, or allow the system to boot normally. -
After the startup process is completed, you'll be asked to provide a password for the administrator and the last logged-in user. Because the passwords for these two accounts will be identical (a single password is used for both), you'll want to assign a new password to the regular user as soon as possible to maintain security. -
The Getting Started screen is displayed; you can register your copy of Windows 2000, set up your Internet connection, and tour Windows 2000. Uncheck this option to prevent it from running on each reboot. Do not use the Set Up the Internet option if you already have a working Internet connection. | | Confused about the difference between domains and workgroups? A domain is a collection of network resources (servers, printers, and so forth) that is managed by a domain controller, such as a server running a version of Windows Server (NT/2000/2003). A workgroup is a simple network used in homes and small offices that lacks a domain controller. Instead, one or more computers share resources such as printers, folders, and Internet access with others. |
Installing Windows 2000 Service Packs and Updates It's a truism that every computer is outdated as soon as you take it out of the store. That's even truer of operating systems. As the recent history of virus and worm attacks has taught us all too well, it's critical to install service packs and updates available for your operating system as soon as you install it (either as a clean installation or as an upgrade). Service packs can add features and driver updates to your Windows installation as well as improve security, whereas updates provide solutions to specific Windows problems. Windows Update also can provide service packs and updates. So, if you've just installed Windows, the first thing I recommend that you do is download the most recent service pack or order the service pack CD and install it. Then, use Windows Update to download and install additional drivers and fixes. To see a listing of all service packs for Windows 2000, go to http://www.microsoft.com/windows2000/downloads/servicepacks/. To download and install a service pack for Windows 2000 -
Determine whether the system has any service packs installed. You should perform this check even if you have just installed Windows 2000, because you can install Windows 2000 with service packs included, and some Windows 2000 CDs might contain a service pack. Right-click on the My Computer icon and select Properties. Look at the Windows version section of the General tab for service pack information (see Figure 17.3). Figure 17.3. This Windows 2000 system has Service Pack 3 installed. 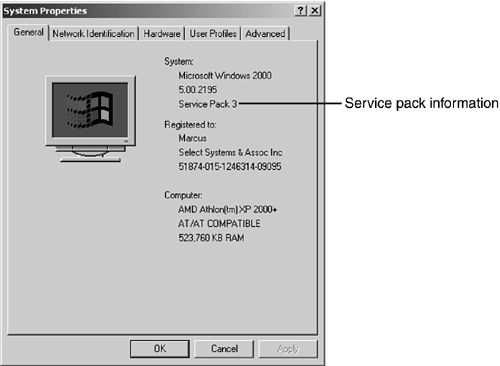 tip | | Microsoft's service packs occasionally cause more significant problems than they solve. Before you select a particular service pack to download, you should verify its reliability. Check online technical publications and chat rooms for feedback about the service pack. You might determine that installing an earlier service pack and using Windows Update to install additional patches is better than installing the latest service pack. | -
Go to the Web site containing the service pack needed. -
If you have not installed previous service packs, make sure the service pack you want to install also contains the contents of the previous service packs. If not, download and install previous service packs as required. -
Click the link to start the download; you might need to select the correct language for the service pack first. -
Shut down real-time virus checkers such as Norton Anti-Virus's Auto-Protect. -
Select Express Installation if you want to install the service pack on only one computer (this requires an active Internet connection during the entire process); select Network Installation to download the entire service pack for use on multiple computers. Follow steps 7 and 8 to perform a Network Installation. Follow steps 7a and 8a to perform an Express Installation. -
Select a location to store the file with Network Installation. 7a. Open the file from its current location to start the installation process with Express Installation. -
Open the file you downloaded in step 6 to perform a Network Installation of the service pack. 8a. Follow the prompts to complete an Express Installation of the service pack. -
You should update your system backup disk and back up your files before you install the service pack, and select the option to archive existing Windows 2000 files during the service pack installation. -
Restart the system when prompted. tip | | In some cases, you might need to reinstall third-party applications or utilities after you install a service pack. For example, a service pack might disable a particular third-party program, or a thirdparty program might stop working until it is upgraded or patched after a service pack is installed. These issues are normally discussed in the technical notes for the service pack or might not be discovered until after the service pack is installed. |
To install additional updates for Windows 2000 through Windows Update -
Click Start, Windows Update. -
Follow the prompts to install the latest version of the Windows Update software if necessary. -
Scan for updates. Updates are divided into the following categories: -
Critical Updates and Service Packs These include the latest service pack and other security and stability updates. Some updates must be installed individually; others can be installed as a group . -
Windows Updates Recommended updates to fix noncritical problems certain users might encounter; also adds features and updates to features bundled into Windows. -
Driver Updates Updated device drivers for installed hardware. -
After you select the updates desired, they are downloaded to your system and installed. You might need to restart your computer to complete the update process. | | You can perform an Express Installation of the latest service pack only through Windows Update. If you prefer a Network Installation or to install an earlier service pack, you must manually download it as discussed earlier in this section. |
Troubleshooting the Windows 2000 Upgrade Unlike Windows 9x, a Windows 2000 installation doesn't offer an automatic uninstall option. Therefore, it's important to make sure that installation works correctly. The following problems can prevent you from upgrading a system to Windows 2000: -
Hardware conflicts Change the hardware resource settings on legacy hardware (non-PnP hardware) to values that don't interfere with PnP devices, or remove them for reinstallation later. -
Not enough disk space To ensure that you can complete the installation, make certain that the partition or drive you will use for the Windows 2000 upgrade or dual-boot installation has at least 1GB of free space (see Figure 17.4). Use the Drive Properties sheet or Fdisk to determine free space. Figure 17.4. This Windows 98 system has just over 1GB of free disk space, barely enough for an upgrade to Windows 2000.  -
System configured to dual boot Windows 2000 cannot be installed as an upgrade on a computer that is set to dual boot Windows 9x and Windows NT (or Windows 2000). Remove one operating system, or perform a clean install on an empty hard disk after backing up all vital data. tip | | Converting the partition to NTFS during the installation makes more space available for Windows 2000 if the drive was previously formatted as a FAT drive. Do this only if you don't plan to access the drive with Windows 9x/Me. |
Various problems can take place after you upgrade to Windows 2000 from Windows NT, including Various problems can take place during or after the upgrade from Windows 9x to Windows 2000, including -
Monitor flickers because a lower refresh rate is in use -
Non-PnP sound card stops working -
Can't select more than 16 colors or higher than base VGA (640x480) resolution or screen is blank -
Can't complete the upgrade installation because the computer can't boot after the initial reboot during the upgrade process tip | | For a more complete list of Windows 9x-to-2000 upgrade problems and solutions (most based on Microsoft Knowledge Base articles), see http://www.labmice.net/Windows2000/install/win9xupgrd.htm. |
The preceding examples are just a few of the problems that can happen during and after the upgrade. Because some upgrade problems can prevent you from accessing the Internet for solutions, you should make sure you have performed the following before you start the upgrade process: -
Checked your hardware, applications, and utilities for compatibility using the Upgrade Advisor -
Downloaded updated drivers and application patches -
Removed or disabled applications and utilities that cannot be updated to Windows 2000compatible versions -
Updated the system BIOS to handle the full capacity of your hard disk and removed nonstandard drivers such as EZ- BIOS or Disk Manager Drive Overlay tip | | EZ-BIOS and Disk Manager Drive Overlay are provided as part of vendor-supplied disk setup programs provided by most major drive vendors (Western Digital, Seagate, Maxtor, and so forth). Contact the maker of your drive for details of how to remove the driver (which is no longer necessary after you update your system BIOS or add an ATA host adapter card with an auxiliary BIOS onboard to handle the full capacity of your hard disk; see Chapter 14, "Storage," for details). Keep in mind that you should make a full backup of your hard disk in case something goes wrong. EZ-BIOS is provided by Phoenix Technologies (www. phoenix .com) and Disk Manager Drive Overlay is provided by Kroll Ontrack (www.ontrack.com). |
|