Upgrading to Windows XP Professional You can upgrade to Windows XP Professional from any of the following versions of Windows: You cannot upgrade to Windows XP Professional from Windows 95 or earlier operating system versions (including MS-DOS). Preparations to Make Before Upgrading to Windows XP Can you believe it? Windows XP Professional raises the hardware ante compared to previous versions (including Windows 2000) with these requirements: -
Pentium 233MHz or compatible processor or faster; 300MHz or faster recommended -
64MB of RAM minimum; 128MB or more recommended -
1.5GB free hard disk space -
CD-ROM or DVD-ROM drive -
Super VGA (800x600) or higher-resolution monitor -
Keyboard and Microsoft mouse or compatible pointing device tip  | If you've installed Windows XP on a system that is marginal (slow processor, small hard disk, and so forth), you can remove it if you find it's not performing satisfactorily. Try it and see how you like it. If it's not working for you, open the Add/Remove Programs icon in the Control Panel to locate the uninstall program. However, if you want to install Windows XP on another system without hassles, don't activate it until you're sure you're happy. Windows XP doesn't need to be activated until 30 days have passed from the install date, so take your time and think it over. |
As with Windows 2000, some older systems might require processor, memory, or hard disk upgrades to be qualified to run Windows XP. You should make sure your computer meets or exceeds these standards before you start the upgrade process. Because upgrading to a new version of Windows retains your existing application software and settings, you should also make sure that both your hardware and software are compatible with Windows XP. Windows XP provides three options you can use to help make sure your system is compatible with Windows XP: -
Downloadable Upgrade Advisor You can download the same Upgrade Advisor found on the Windows XP CD and run it before you buy Windows XP. I recommend using the Upgrade Advisor before you start the installation process if possible to find and solve any problems with your system early. -
Upgrade Advisor on Windows XP CD If the 30MB download required to get the Upgrade Advisor is too much for your Internet connection, you can run the Upgrade Advisor from the Windows XP CD. Click Check System Compatibility from the Welcome to Windows XP menu; then click Check My System Automatically. -
Link to the Microsoft Windows Catalog You can go straight to the Microsoft Windows Catalog (a listing of Windows XPcompatible hardware and software) from the Upgrade Advisor. You can launch it after the downloaded version reports on compatibility issues and from the Windows XP CD after you click Check System Compatibility. Using the Windows XP Upgrade Advisor Follow this procedure to run the Windows XP Upgrade Advisor (download version): -
Connect to the Internet with your existing version of Windows. -
Use My Computer or Windows Explorer to locate the folder where you downloaded the Upgrade Advisor. Open it to start the process. -
Follow the prompts to start the advisor and accept the EULA. The following steps apply to both the downloaded and Windows XP CDbased versions of the Upgrade Advisor: -
Download updated files when prompted. -
After the Upgrade Advisor uses Dynamic Update to update itself, it starts to analyze your system. -
After the analysis is complete, the Upgrade Analyzer displays any incompatible hardware or software it finds (see Figure 17.5). Figure 17.5. The Windows XP Upgrade Advisor lists incompatible hardware and software products. Click the Full Details button to learn more. 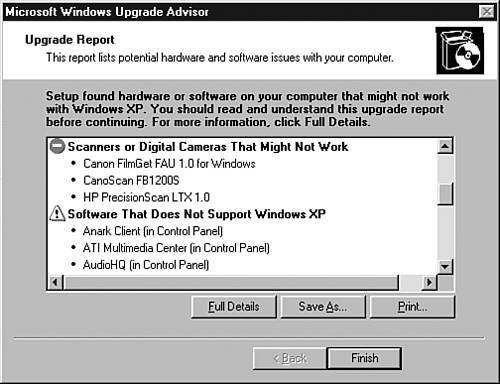 -
When you click Finish, the Upgrade Advisor displays a button you can click to go to the Windows Catalog, which lists compatible products and links to drivers or updates for older products (when available).  | Learn more about the Upgrade Advisor and download it from http://www.microsoft.com/windowsxp/pro/howtobuy/upgrading/advisor.asp. Note that it's a large (over 30MB) download, so use a broadband Internet connection for the download if at all possible. If you have already installed and registered Windows XP from a CD, you can still use its Upgrade Advisor on another system. |
Additional Preparations to Make Before the Windows XP Upgrade Before you upgrade to Windows XP, you should also download any new device drivers or new application updates that you need. Create a folder for your updates on your system and uncompress them if needed so they can be used during the upgrade process. Upgrading to Windows XP from Older Versions To start the Window XP upgrade process if you want to replace your old version of Windows, do the following: -
Insert your Windows XP CD into the CD-ROM drive while your old version is running. -
Unless you've disabled Autorun, the Windows XP splash screen is displayed. If the splash screen does not appear, use Windows Explorer to open the Setup.exe file on the Windows XP CD. Choose Install Windows XP, Perform Additional Tasks, or Check System Compatibility. -
If you haven't used the Windows Upgrade Advisor on this system, click Check System Compatibility as discussed earlier in this chapter. | | During the upgrade process, as with Windows 2000, you can convert the file system to NTFS. Do this to save space on your hard disk (NTFS is more efficient than FAT32) and if you want features such as encryption, file/folder compression, and better security. Remember, though, that if you dual boot with a Windows 9x/Me operating system, they cannot read an NTFS disk. |
-
After completing the Upgrade Advisor check (if necessary), click Install Windows XP. -
Select Upgrade (the default setting) to change your installed version of Windows to Windows XP, which enables you to use your existing software and settings without reinstallation. -
Read the license agreement, click I Accept, and click Next to continue. -
Enter the product key from the back of the CD package and click Next to continue. -
The installation process begins; a display on the left side gives an estimate of how long the process will take until completion. The computer restarts several times during the process. -
At the end of the process, the Welcome to Microsoft Windows dialog box is displayed. You can use it to activate your copy of Windows and set up users. -
After you complete the steps listed in the Welcome dialog box, the Windows XP desktop is displayed. Installing Windows XP Service Packs and Updates Service Packs for Windows XP? Yes, even Microsoft's latest operating system is a bit out of date now; one service pack is already available, along with a long list of additional updates. Fortunately, just as with Windows 2000, the one-two punch of service pack downloads and Windows Update can bring Windows XP up to date and protect you from the numerous digital bad guys on the Internet. To download and install a service pack for Windows XP -
Determine whether the system has any service packs installed. You should perform this check even if you have just installed Windows XP, because you can install Windows XP with service packs included, and newer Windows XP CDs might contain a service pack. Right-click on the My Computer icon and select Properties. Look at the Windows version section of the General tab for service pack information; if a service pack has been installed, it will be listed in the System section of the General tab similar to the way it is listed with Windows 2000 (refer to Figure 17.3). | | Get the Microsoft Windows XP Professional Service Packs and other updates from http://www.microsoft.com/windowsxp/pro/downloads/default.asp. The Windows XP Home version of this site is located at http://www.microsoft.com/windowsxp/home/downloads/default.asp. |
-
Go to the Web site containing the service pack needed. -
If you have not installed previous service packs, make sure the service pack you want to install also contains the contents of the previous service packs. If not, download and install previous service packs as required. -
Read the release notes for the service pack to see if it will cause any problems for your particular configuration, such as problems with networking, winmodems, CD mastering software, and so forth. Take the necessary actions as noted. (Some might require changes before you perform the service pack installation; others might take place afterward.) -
Click the link to start the download; you might need to select the correct language for the service pack first. -
Shut down real-time virus checkers such as Norton Anti-Virus's Auto-Protect. -
Select Express Installation if you want to install the service pack on only one computer (this requires an Internet connection during the entire process); select Network Installation to download the entire service pack for use on multiple computers. Follow steps 8 and 9 to perform a Network Installation. Follow steps 8a and 9a to perform an Express Installation. -
Select a location to store the file with Network Installation. 8a. Open the file from its current location to start the installation process with Express Installation. -
Open the file you downloaded in step 8 to perform a Network Installation of the service pack. 9a. Follow the prompts to complete an Express Installation of the service pack. -
You should update your system backup disk and back up your files before you install the service pack, and select the option to archive existing Windows XP files during the service pack installation. -
Restart the system when prompted. tip | | To save the specific document referenced in the release notes so you can follow up on the problem, use the Save as Web Archive option in Internet Explorer. This saves the entire Web page (including graphics) as a single file with an .MHT extension. You can then view the file offline with Internet Explorer if necessary. |
tip | | In some cases, you might need to reinstall third-party applications or utilities after you install a service pack. |
To install additional updates for Windows XP through Windows Update -
Click Start, All Programs, Windows Update. -
Follow the prompts to install the latest version of the Windows Update software if necessary. -
Scan for updates. Updates are divided into the following categories: -
Critical Updates and Service Packs These include the latest service pack and other security and stability updates. Some updates must be installed individually; others can be installed as a group . -
Windows Updates Recommended updates to fix noncritical problems certain users might encounter; also adds features and updates to features bundled into Windows. -
Driver Updates Updated device drivers for installed hardware. -
After you select the updates desired, they are downloaded to your system and installed. You might need to restart your computer to complete the update process. | | You can perform an Express Installation of the latest service pack only through Windows Update. If you prefer a Network Installation or need to install an earlier service pack, you must manually download it as discussed earlier in this section. |
Troubleshooting the Windows XP Upgrade If a Windows XP upgrade from Windows 9x or Me goes badly , you can uninstall Windows XP and revert back to your previous Windows version (look for the Uninstall Windows XP option in the Add or Remove Programs icon in the Control Panel) if you are still using the FAT16 or FAT32 file systems. However, if you need the Windows XP upgrade, that isn't much of a consolation. Try the following tips to make the upgrade go smoothly. tip | | If you receive other types of errors during the upgrade, such as blue screen "STOP" errors, see http://www.microsoft.com/windowsxp/pro/using/howto/gettingstarted/guide/troubleshoot.asp and http://www.labmice.net/WindowsXP/Install/installbugs.htm. |
If you are unable to start the upgrade, check the following: -
Free disk space You need 1.5GB free at the minimum; more is better. -
Hardware conflicts or problems Use Windows Device Manager to ensure that all hardware is working correctly before you start the upgrade or dual-boot installation. -
Processor speed and memory size If your system doesn't meet the minimums, upgrade it. tip | | For a more complete list of Windows 9xtoWindows XP upgrade problems and solutions, see http://www.labmice.net/WindowsXP/Install/win9xupgrade.htm. A list of Windows NT/2000 to Windows XP upgrade problems and solutions is available at http://www.labmice.net/WindowsXP/Install/win2kupgrade.htm. |
As with upgrades to Windows 2000, various problems can take place after you upgrade to Windows XP from older versions, including -
Can't connect to network or Internet resources -
Can't remove programs with Uninstall -
Certain systems and hardware don't work properly As with Windows 2000, you should carefully study Microsoft Knowledge Base articles and any tips from your computer vendor to determine if your particular system might have problems with the upgrade to Windows XP. Because some upgrade problems can prevent you from accessing the Internet for solutions, you should make sure you have performed the following before you start the upgrade process: -
Checked your hardware, applications, and utilities for compatibility using the Upgrade Advisor -
Downloaded updated drivers and application patches -
Removed or disabled applications and utilities that cannot be updated to Windows XPcompatible versions -
Updated the system BIOS to handle the full capacity of your hard disk and removed nonstandard drivers such as EZ-BIOS or Disk Manager Drive Overlay. tip | | EZ-BIOS and Disk Manager Drive Overlay are provided as part of vendor-supplied disk setup programs provided by most major drive vendors (Western Digital, Seagate, Maxtor, and so forth). Contact the maker of your drive for details of how to remove the driver (which is no longer necessary after you update your system BIOS or add a helper card to handle the full capacity of your hard disk). Keep in mind that you should make a full backup of your hard disk in case something goes wrong. |
|