Frame Relay Terminology
| < Free Open Study > |
The Many Uses of PPPPPP is a versatile protocol, and you can configure it on a number of different interface types:
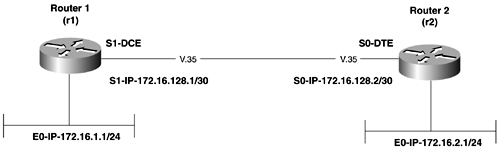
As you can already see, PPP can be deployed in a variety of situations. And, as mentioned previously, most people use PPP as their data link layer protocol to access the Internet. PPP is also commonly used as the data-link layer for Integrated Services Digital Network (ISDN) and when configuring a point-to-point link to a non-Cisco device. Another use of PPP can be on a serial backup link, or to "bundle" multiple Basic Rate Interfaces (BRIs) together to maximize bandwidth and load share, such as in a PPP multilink scenario. When modeling PPP in the internetwork, you will deploy PPP in a number a ways. First, you look at configuring PPP on serial links. Then, the chapter expands and applies the same theory to asynchronous ports using modems. Finally, the chapter discusses how to implement some of the more advanced features of PPP, including PPP compression, PPP multilink, and other PPP features. PPP over ISDN is covered in Chapter 7, "WAN Protocols and Technologies: Integrated Services Digital Network (ISDN)." Configuring PPP on Synchronous Serial LinksTo configure PPP on a serial interface, you must first enable PPP encapsulation on the interface with the encapsulation ppp command. If you are configuring both ends of the PPP link, you need to configure PPP encapsulation on each side. If you are configuring a PPP link with two routers, using DTE-to-DCE cable connections, you also need to use the clock rate bps command on the DCE side of the connection. Essentially , setting the encapsulation coupled with a network layer address is all that is needed for a basic PPP configuration. As you will see, this is just the basic configuration, and you will be using the more advanced features of PPP in the upcoming sections. The first example involves configuring PPP on a serial interface between two Cisco routers. Use Figure 4-1 as the network diagram and address map, and begin by defining PPP encapsulation on Serial 1 (S1) of r1 and Serial 0 (S0) of r2. Because this is a V.35 back- to-back connection, one side needs to be configured as DCE. Use the clock rate statement on the Serial 1 interface of r1 to accomplish this. Figure 4-1. PPP Network Diagram and IP Scheme Example 4-1 demonstrates the configuration commands used for a simple PPP back-to-back configuration. Example 4-1 PPP on a Serial Interfacer1(config)# interface s1 r1(config-if)# encapsulation ppp Example 4-2 lists the relevant portions of the configurations for routers r1 and r2. Example 4-2 Configuration Listings for PPP Back-to-Back Network on r1 and r2hostname r1 ! interface Ethernet0 ip address 172.16.1.1 255.255.255.0 no ip directed-broadcast ! interface Serial1 ip address 172.16.128.1 255.255.255.252 no ip directed-broadcast encapsulation ppp clockrate 56000 ! router ospf 2001 network 172.16.1.1 0.0.0.0 area 0 network 172.16.128.1 0.0.0.0 area 1 _________________________________________________________ hostname r2 ! interface Ethernet0 ip address 172.16.2.1 255.255.255.0 ! interface Serial0 ip address 172.16.128.2 255.255.255.252 encapsulation ppp ! router ospf 2001 redistribute connected subnets network 172.16.128.2 0.0.0.0 area 1 default-metric 100 Configuring PPP on Asynchronous Ports for Analog Dial LinksConfiguring PPP on asynchronous interfaces for analog dial connections can be more involved than configuring PPP on serial links. This section briefly lists the steps needed to configure PPP and then goes into greater detail on the more complex steps. The steps to configure PPP for use on an asynchronous dialup connection are as follows :
Step 1: Modem and Asynchronous Port ConfigurationCarefully follow the outlined instructions in Chapter 1 to properly connect a modem to either the AUX port or an asynchronous port on a router. This includes using the modem inout command and the modem autoconfigure command or deploying the use of chat scripts. A chat script is always needed for the remote router to dial into the host. To call the chat script on dial-out use only, use the script dialer script_name command under the absolute line entry. The chat script should be kept simple and clean. For example, the following chat script will reset the modem, load the factory defaults, and then dial the number 5496561 and wait for a connect message. chat-script dialhost "" "ATZ&F" OK "ATDT5496561" TIMEOUT 60 CONNECT The chat script is where you actually place the number to be called with analog dial communications. The dialer map string also has a telephone number on it, but this is used for authentication and caller identification, not for actually placing the call. When the dialer map is deployed in an ISDN configuration, the dialer map string is used to place the call. Be sure to perform the show line command and make note of the absolute line number that corresponds to the port to which the modem was attached. Example 4-3 attaches a modem to the AUX port of a Cisco 2500 router. Example 4-3 show line Command Listing the Absolute Line Number of the AUX PortRouter# show line Tty Typ Tx/Rx A Modem Roty AccO AccI Uses Noise Overruns Int * 0 CTY - - - - - 0 0 0/0 - 1 AUX 9600/9600 - - - - - 0 1 0/0 - You later use the absolute line number (1, in this case) to configure an asynchronous link. The absolute line number can and will change with different router types, so it is important to perform the show line command to verify the absolute line number. For example, Example 4-4 attaches a modem to port 16 of the terminal server, and the AUX port is on line 17, not line 1. This example also shows the line as being inactive and shows that a transmit and receive clock is also set. This indicates that a modem is already configured and attached to the line. Example 4-4 show line Command Listing the Absolute Line Number of the AUX Portaccess_server# show line Tty Typ Tx/Rx A Modem Roty AccO AccI Uses Noise Overruns Int * 0 CTY - - - - - 7 0 0/0 - * 1 TTY 9600/9600 - - - - - 1 0 0/0 - * 2 TTY 9600/9600 - - - - - 1 1776 0/0 - * 3 TTY 9600/9600 - - - - - 1 1 0/0 - * 4 TTY 9600/9600 - - - - - 1 0 0/0 - * 5 TTY 9600/9600 - - - - - 1 1 0/0 - * 6 TTY 9600/9600 - - - - - 1 0 0/0 - * 7 TTY 9600/9600 - - - - - 1 0 0/0 - 8 TTY 9600/9600 - - - - - 0 0 0/0 - 9 TTY 9600/9600 - - - - - 0 0 0/0 - 10 TTY 9600/9600 - - - - - 0 0 0/0 - 11 TTY 9600/9600 - - - - - 0 0 0/0 - 12 TTY 9600/9600 - - - - - 0 0 0/0 - 13 TTY 9600/9600 - - - - - 0 0 0/0 - 14 TTY 9600/9600 - - - - - 0 0 0/0 - 15 TTY 9600/9600 - - - - - 0 0 0/0 - I 16 TTY 115200/115200- inout - - - 0 0 0/0 - 17 AUX 9600/9600 - - - - - 0 0 0/0 - 18 VTY - - - - - 1 0 0/0 - 19 VTY - - - - - 0 0 0/0 - 20 VTY - - - - - 0 0 0/0 - 21 VTY - - - - - 0 0 0/0 - Tty Typ Tx/Rx A Modem Roty AccO AccI Uses Noise Overruns Int 22 VTY - - - - - 0 0 0/0 - access_server# Step 2: Defining and Configuring PPP on the Asynchronous InterfaceNext , configure the asynchronous interface of the router and enable it for PPP. To define the asynchronous interface, simply enter the command interface async interface-number. To enable PPP on the interface, you must first decide how you want to use PPP and DDR. This is mainly because when PPP originated, it was designed to use PPP strings on call establishment. An example of this is the /routing command that can be sent upon PPP establishment, to enable routing protocols to transverse the link. To accommodate this type of flexible session establishment, Cisco offers a variety of commands:
Table 4-2. PPP Frame Flags
To enable PPP on an asynchronous port, use the following commands:
Challenge Handshake Authentication Protocol and Password Authentication ProtocolCHAP and PAP authentication are available on all interfaces running PPP. Both protocols were originally outlined in RFC 1334, and later CHAP was updated in RFC 1994. CHAP and PAP use the concept of each device or router identifying itself with a unique name . The identification process also prevents one router from placing a call to another if the other router port is already connected to the site for which it is configured. PPP operates in the following manner:
The CHAP and PAP process starts when LCP negotiates the parameters of the link. The PAP process sends a clear-text password across the link, which is interpreted by the routers at the remote ends of the link. A data scope or line monitor can capture the response and then can spoof the same process later; therefore, it is a less secure method of authentication. The CHAP process never sends a clear-text password across the link, making it inherently more secure then PAP. The CHAP process uses a Message Digest 5 (MD5) hash generator to form a 128-bit hash during its challenge process. Only the hash and its modifiers are sent out on the link. When an initiating router first issues a challenge to a remote router, the initiating router responds with four important parts of information:
When the remote router receives the response, it performs a reverse lookup on the username and retrieves the password associated with it. The ID, a random number, and the password are fed into the MD5 hash generator. The output from this process is called a hash. The MD5- hashed CHAP challenge is the number that is sent back across the link. When the hash is sent, it is sent along with the CHAP response packet type identifier, the ID, and the host name of the router. The initiating router performs the same process with the values received from the remote router. That is, the initiating router looks up the password associated with the host name sent by the remote router. The initiating router then feeds this information, along with the ID and random number, into the MD5 hash generator. The result of the process is a hash that is equal to the hash value sent by the remote router. If any other result is produced, the remote fails authentication and the link is torn down. To configure PPP CHAP authentication, perform the following tasks :
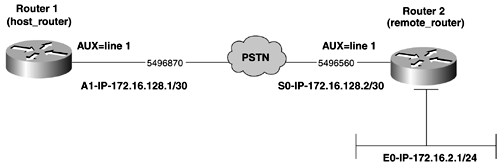
Figure 4-2 and Example 4-5 demonstrate two routers configured for PPP CHAP authentication over an asynchronous interface. Normally, you would enable service password-encryption, and the passwords would be encrypted in the router's listing. For readability and educational purposes, however, the passwords have been left unencrypted. Figure 4-2. PPP CHAP over Asynchronous Dial Configurations Example 4-5 CHAP Authentication Configuration for the host_router over an Analog Dial Connectionhostname host_router ! ! username remote_router password 0 cisco ip subnet-zero ! interface Async1 ip address 172.16.128.1 255.255.255.252 no ip directed-broadcast encapsulation ppp dialer in-band dialer map ip 172.16.128.2 name remote_router broadcast 5496560 async mode interactive ppp authentication chap ! ip classless ! ! ! line con 0 exec-timeout 0 0 transport input none line aux 0 autoselect ppp login local modem InOut modem autoconfigure discovery transport input all speed 38400 line vty 0 4 login ! end To configure PPP PAP authentication, perform the following tasks:
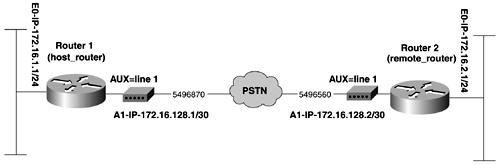
NOTE Whenever you are running a PPP dial-in client, and during your session establishment, you are prompted for a password, which is a clear indication that the host is issuing you a PAP challenge. Many times, this is the case with Internet service providers (ISPs). Figure 4-3 illustrates the configuration of PPP PAP in the same network as Figure 4-2. Figure 4-3. PPP PAP over Asynchronous Dial Configurations Example 4-6 shows the configurations for the host_router and remote_router for the network in Figure 4-3. Example 4-6 PAP Authentication Configuration for the host_router and remote_router over an Analog Dial Connectionhostname host_router ! username remote_router password 0 cisco1 ip subnet-zero chat-script dialremote "" "ATZ&F" OK "ATDT5496561" TIMEOUT 60 CONNECT ! interface Ethernet0 ip address 172.16.1.1 255.255.255.0 no ip directed-broadcast ! interface Async1 ip address 172.16.128.1 255.255.255.252 no ip directed-broadcast encapsulation ppp dialer in-band dialer idle-timeout 305 dialer map ip 172.16.128.2 name remote_router broadcast 5496560 dialer-group 1 async mode interactive ppp authentication pap ppp pap sent-username host_router password cisco1 ! ip classless ip route 172.16.2.0 255.255.255.0 172.16.128.2 ! dialer-list 1 protocol ip permit ! ! line con 0 exec-timeout 0 0 transport input none line aux 0 autoselect ppp script dialer dialremote modem InOut modem autoconfigure type usr_sportster transport input all speed 38400 line vty 0 4 login ! end host_router# _________________________________________________________ hostname remote_router ! username host_router password 0 cisco1 chat-script dialhost "" "ATZ&F" OK "ATDT5496870" TIMEOUT 60 CONNECT ! interface Ethernet0 ip address 172.16.2.1 255.255.255.0 ! interface Async1 ip address 172.16.128.2 255.255.255.252 encapsulation ppp async mode interactive dialer in-band dialer idle-timeout 305 dialer map ip 172.16.128.1 name host_router broadcast 5496870 dialer-group 1 ppp authentication pap ppp pap sent-username remote_router password cisco1 ! no ip classless ip route 172.16.1.0 255.255.255.0 172.16.128.1 ! dialer-list 1 protocol ip permit ! line con 0 line aux 0 autoselect ppp script dialer dialhost modem InOut modem autoconfigure discovery transport input all rxspeed 38400 txspeed 38400 line vty 0 4 login ! end remote_router# NOTE When assigning host names to routers, it's best to use all lowercase names . If you need more text in the name, you can always use the underscore ( _ ) character. Try to stay consistent in naming conventions throughout the internetwork or model, to avoid possible typos and case-sensitive mismatches . Most often, these occur on map statements or an authentication process of one sort . For example, "Host_router" doesn't equal "host_router" or "host-router," even though they are all called "host router." This might seem confusing at times because some of the router names used are proper nouns and are lowercase throughout the book. Figure 4-4 is a network diagram and IP address map of an asynchronous PPP dial connection between two routers. To configure this model, begin by attaching and configuring a modem to the AUX port of each router. You might want to reference Chapter 1 for more detailed information on modem configuration. Figure 4-4. PPP Network Diagram and IP Scheme for an Asynchronous Analog Dial Connection Example 4-7 shows the configuration for the host_router and remote_router in Figure 4-4. Example 4-7 PAP Authentication Configuration for host_router and remote_router over an Analog Dial Connectionhostname host_router ! username remote_router password 0 cisco1 ip subnet-zero chat-script dialremote "" "ATZ&F" OK "ATDT5496561" TIMEOUT 60 CONNECT ! interface Ethernet0 ip address 172.16.1.1 255.255.255.0 no ip directed-broadcast ! interface Async1 ip address 172.16.128.1 255.255.255.252 no ip directed-broadcast encapsulation ppp dialer in-band dialer idle-timeout 305 dialer map ip 172.16.128.2 name remote_router broadcast 5496560 dialer-group 1 async mode interactive ppp authentication pap ppp pap sent-username host_router password cisco ! ip classless ip route 172.16.2.0 255.255.255.0 172.16.128.2 ! dialer-list 1 protocol ip permit ! ! line con 0 exec-timeout 0 0 transport input none line aux 0 autoselect ppp script dialer dialremote modem InOut modem autoconfigure type usr_sportster transport input all speed 38400 line vty 0 4 login ! end host_router# _________________________________________________________________________________ hostname remote_router ! username host_router password 0 cisco1 chat-script dialhost "" "ATZ&F" OK "ATDT5496870" TIMEOUT 60 CONNECT ! interface Ethernet0 ip address 172.16.2.1 255.255.255.0 ! interface Async1 ip address 172.16.128.2 255.255.255.252 encapsulation ppp async mode interactive dialer in-band dialer idle-timeout 305 dialer map ip 172.16.128.1 name host_router broadcast 5496870 dialer-group 1 ppp authentication pap ppp pap sent-username remote_router password cisco ! no ip classless ip route 172.16.1.0 255.255.255.0 172.16.128.1 ! dialer-list 1 protocol ip permit ! line con 0 line aux 0 autoselect ppp script dialer dialhost modem InOut modem autoconfigure discovery transport input all rxspeed 38400 txspeed 38400 line vty 0 4 login ! end remote_router# Example 4-8 demonstrates the configuration of an asynchronous port and the corresponding AUX port of a router for dial-in and dial-out PPP connections. This example also includes the configuration of the modem. To configure the AUX port for a modem, first perform the show line command and find the absolute line number to which the modem will be physically attached. Then, configure that port for modem use. Second, configure the asynchronous interface for PPP. Example 4-8 Configuration of an Asynchronous Port for a Modem and PPP (Steps 1 and 2 Only)remote_router# show line Tty Typ Tx/Rx A Modem Roty AccO AccI Uses Noise Overruns Int * 0 CTY - - - - - 0 1 0/0 - 1 AUX 9600/9600 - - - - - 0 1 0/0 - Recall from Chapter 1 that you can add a loopback interface to assist in performing a reverse Telnet session to test the modem. Another way to try a quick test is to simply Telnet to the Ethernet interface address with a port of 2001. Example 4-9 exhibits a successful reverse Telnet to the modem on port 1. When in session with the modem, performing a quick ATZ or a more detailed AT command such as AT&V displays the current modem configuration. Be sure that you do not forget to disconnect your modem session after testing it using the disconnect command. To do this, complete the Ctrl-Shift-6 keyboard function, which brings you back to the router. Then, enter the disconnect command. Example 4-9 Performing a Reverse Telnet Session to the Modemremote_router# telnet 172.16.2.1 2001 Trying 172.16.2.1, 2001 ... Open atz OK at&v ACTIVE PROFILE: B1 E1 L1 M1 N1 Q0 T V1 W0 X0 Y0 &C1 &D2 &G0 &J0 &K3 &Q5 &R1 &S0 &T5 &X0 &Y0 S00:001 S01:000 S02:043 S03:013 S04:010 S05:008 S06:002 S07:055 S08:002 S09:006 S10:014 S11:095 S12:050 S18:000 S25:005 S26:001 S36:007 S37:000 S38:020 S46:138 S48:007 S95:000 OK CTRL/SHIFT/6 remote_router# disconnect Closing connection to 172.16.2.1 [confirm] y The last two configuration phases involve configuring network layer addresses and configuring DDR. These steps are tightly related to one another because DDR naturally requires some form of a network layer addressing to be in place. Step 3: Configuring Network Layer Addresses or Addressing Schemas, and Routing as It Corresponds to the Asynchronous InterfaceThe next step involved in configuring PPP over asynchronous interfaces is to configure all network layer addresses for the interfaces. Along with configuring standard addressing, protocol-specific issues, such as OSPF, demand circuits should also be configured at this time. You can configure IP addressing on the dialer interface in multiple ways. You can configure the router to assign an IP address to the client, or the router could assign multiple addresses from a pool or could simply ignore the addressing requirements of the client and reference only how to get to the address with a dialer map statement. The async dynamic address and peer default ip address pool commands are used to assign an IP address to the client from a pool or from the host router. Table 4-3 lists the combinations that should be used when configuring and assigning IP addresses to a dialer interface. Table 4-3. Recommend Router Address and Addressing for PPP
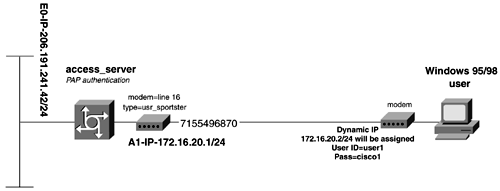
Use the ip address negotiated statement when you don't have control of the assignment of the IP address on the dialer interface. This might be the case with ISPs. Usually, the ISP will assign you an address when you make a PPP connection. Using the ip address negotiated statement enables LCP to properly receive an IP address from the host router. You will use this command for "Easy IP configuration," which is essentially NAT using a dynamic address as its outside address, with TCP overload. NOTE The command peer default ip address local_ip_address must be entered before the dialer in-band command is entered. If the dialer in-band is entered first, the router will not accept a specific remote peer IP address. Figure 4-5 illustrates a Windows 95/98 client dialing into an access server. The Windows workstation has its PPP stack configured to receive the IP address automatically. Windows 95/98 dialup networking uses PPP PAP for authentication. Figure 4-5. Windows 95 PPP Dial-In If the workstation wants access to the Internet, a DNS server needs to be configured on the client if DHCP is not used. In Example 4-10, the access_server assigns the address of 172.16.20.2 to the PPP client dialing in. Notice that the access server also has a dialer list on it. This defines interesting traffic so that the link does not terminate while the client is sending data. The dialer idle-timeout terminates the line after 5 minutes and 5 seconds (305 seconds) of inactivity. Example 4-10 WIN 95 PPP Configuration for an Analog Dial Connectionhostname access_server ! username user1 password 0 cisco1 ip subnet-zero ! interface Ethernet0 ip address 206.191.241.42 255.255.255.248 no ip directed-broadcast ! interface Async16 ip address 172.16.20.1 255.255.255.0 no ip directed-broadcast encapsulation ppp dialer in-band dialer idle-timeout 305 dialer-group 1 async mode interactive peer default ip address 172.16.20.2 no cdp enable ppp authentication pap ! ip classless ! dialer-list 1 protocol ip permit ! line con 0 exec-timeout 0 0 transport input none line 1 8 transport input all line 9 15 line 16 autoselect ppp login local modem InOut modem autoconfigure type usr_sportster transport input all speed 115200 line aux 0 line vty 0 4 login ! end access_server# NOTE By default, the Cisco Discovery Protocol (CDP) is enabled on all interfaces. To disable CDP on an interface, use the no cdp enable command. CDP is used in ODR routing and to help identify other adjacent Cisco devices. CDP messages can keep dialer lines up if it is not disabled on these type of interfaces. CDP can be considered a security risk if it is enabled and you are not using ODR. Controlling Routing UpdatesThe second half of Step 3 involves configuring routing for the DDR link. Proper control of routing updates can be one of the most difficult parts of DDR configuration. To prevent routing updates from constantly bringing up the link and dialing, you must have thorough knowledge of the routing protocol in use. You must also understand how the routing protocol sends and receives updates from one network to another, so as not to filter pertinent information. The dilemma for network engineers is how to propagate routing information without needing to constantly keep the link active. There are several ways to address how to route on a DDR link without keeping the link active all the time. To accommodate spoofing and routing updates for distance vector protocols for IP, as well as IPX RIP and AppleTalk RTMP, Cisco invented snapshot routing. Snapshot routing involves taking a "snapshot" of the routing table and then spoofing the interface that participates in snapshot routing of its routing updates for a certain period. This time, called the snapshot quiet time, eventually expires , forcing the router to make a call to the snapshot server to receive a routing update. Snapshot helped solve some problems of routing over a dynamic link, but it does have a limitation: It doesn't support protocols that support variable-length subnet masking (VLSM). To address dynamic links for OSPF networks, OSPF uses a concept called demand circuits. Demand circuits are complex and are covered in more detail in Chapter 7 covers snapshot routing and the dialer watch commands in greater detail. As you can see, when modeling or designing any network with dynamic links, it is important to look at the routing schema of the entire network. You must consider whether you need to advertise networks with different bit boundaries over your backup link. As you will learn in upcoming chapters, protocols such as RIP and IGRP accept and advertise only those networks on the same major bit boundary whose subnet masks match those of the interface sending or receiving the routing update. Table 4-4 lists some suggested methods of routing over dynamic links based on routing schemas that Cisco supports. Table 4-4. Dynamic and Static Routing Methods over Dial Links Based on Routing Protocol Type
A common approach to the routing dilemma, and the approach that this section addresses, is the application of floating static routes or weighted routes. A floating static route is a static route defined as a route that is not permanently entered into the routing table. The route appears only under a special set of circumstances. A floating static route is configured as a static route to a destination network with an administrative distance greater than the routing protocols in use. This allows the route to be advertised through the routing protocol first. If the route learned by the routing protocol is lost, the floating static route will be entered into the routing table. The syntax for configuring a weighted or floating static route is as follows: ip route remote_ip_subnet subnet_mask {[ ip_next_hop administrative_distance ( 1-255 )] interface } An administrative distance of 150 to 180 is usually sufficient for weight. Table 4-5 lists the administrative distances for routing protocols and static routes. If no administrative distance is added to the ip route command, the default distance is 1. If you point the static route to an interface instead of the next-hop address, the administrative distance will be 0, as in a connected route. A static route that can reach the next-hop IP address will be placed in the forwarding table. A connected route will always be in the forwarding table, unless the interface is in a down state. Table 4-5. Default Administrative Distances on Cisco Routers
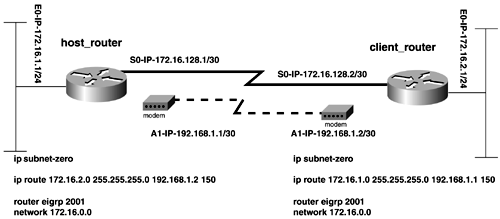
Figure 4-6 illustrates the relevant commands needed for using floating static routes to back up a serial connection. In this example, you also need to be sure to use the IP subnet-zero command because the address 192.168.1.1/30 is being used on the asynchronous link. The natural network for the asynchronous link as assigned is 192.168.1.0/30, which is the zero subnet on a Class C network. Keeping the DDR link on a separate subnet eliminates the worry of the routing protocol (EIGRP, in this case) bleeding routing updates onto the link. This is yet another way to control routing updates on a link. Figure 4-6. Floating Static Route Configuration for Analog Dial Connection Step 4: Configuring the Asynchronous Interface for Dial-on-Demand RoutingDial-on-demand routing (DDR) can be divided into two subgroups:
This section covers legacy DDR; advanced DDR topics are covered in Chapter 7. All DDR, whether legacy or advanced, operates in a similar way:
Configuring DDR is a four-step process:
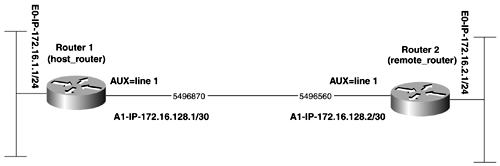
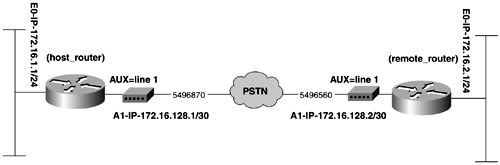
Using an earlier example of PPP PAP authentication, you can now focus on the DDR portion of the configuration. Figure 4-7 illustrates two routers connected through modems attached to their AUX ports. When each router detects traffic destined toward the subnet defined in the static routes, it dials the other router. This call stays connected until no IP traffic has crossed the subnet for 305 seconds. This time limit is assigned in the dialer idle-timeout statements. Figure 4-7. Network Topology for the PPP Analog Dial Configuration Example 4-11 shows the configurations for the host_router and remote_router in Figure 4-7. Example 4-11 PPP Analog Dial Configurationhostname host_router ! username remote_router password 0 cisco1 ip subnet-zero chat-script dialremote "" "ATZ&F" OK "ATDT5496561" TIMEOUT 60 CONNECT ! interface Ethernet0 ip address 172.16.1.1 255.255.255.0 no ip directed-broadcast ! interface Async1 ip address 172.16.128.1 255.255.255.252 no ip directed-broadcast encapsulation ppp dialer in-band dialer idle-timeout 305 dialer map ip 172.16.128.2 name remote_router broadcast 5496560 dialer-group 1 async mode interactive ppp authentication chap ! ip classless ip route 172.16.2.0 255.255.255.0 172.16.128.2 ! dialer-list 1 protocol ip permit ! ! line con 0 exec-timeout 0 0 transport input none line aux 0 autoselect ppp script dialer dialremote modem InOut modem autoconfigure type usr_sportster transport input all speed 38400 line vty 0 4 login ! end host_router# _________________________________________________________ hostname remote_router ! username host_router password 0 cisco1 chat-script dialhost "" "ATZ&F" OK "ATDT5496870" TIMEOUT 60 CONNECT ! interface Ethernet0 ip address 172.16.2.1 255.255.255.0 ! interface Async1 ip address 172.16.128.2 255.255.255.252 encapsulation ppp async mode interactive dialer in-band dialer idle-timeout 305 dialer map ip 172.16.128.1 name host_router broadcast 5496870 dialer-group 1 ppp authentication chap ! no ip classless ip route 172.16.1.0 255.255.255.0 172.16.128.1 ! dialer-list 1 protocol ip permit ! line con 0 line aux 0 autoselect ppp script dialer dialhost modem InOut modem autoconfigure discovery transport input all rxspeed 38400 txspeed 38400 line vty 0 4 login ! end remote_router# To reiterate, recall the step-by-step list for configuring PPP over asynchronous interfaces. This step-by-step list is a useful tool in configuring PPP over asynchronous interfaces:
Configuring PPP CompressionPPP also offers the use of data payload compression to maximize performance across low-bandwidth links. Compression is negotiated by LCP during link initialization. Because LCP negotiates this parameter, it is necessary to have compression configured on both sides of the link. Cisco offers three types of payload compression on PPP links, along with standard TCP header compression :
The preceding compression techniques are configured with the compress command at the interface level. To enable payload compression, use the following interface command: compress [ predictor stac mppc ] When enabling compression, the link should always be restarted or cleared with the clear interface interface_name command. This forces the routers or LCP to renegotiate the link with compression enabled. You cannot use any form of payload compression with TCP header compression. TCP header compression, as defined in RFC 1144, uses the Van Jacobson algorithm for compressing TCP headers. TCP header compression is most useful when deployed in an environment where there are many small data packets. TCP header compression can significantly cut down on the TCP overhead associated with these packets. To enable TCP header compression, use the following interface command: ip tcp header-compression [ passive ] The passive argument compresses outbound TCP packets only if incoming TCP packets on the same interface are compressed. If the passive argument is not specified, all traffic is compressed. Compression is most effective if the data that you are transferring is highly compressible , such as a text file or ASCII-based data. Files such as JPEG or MPEG files are already compressed to a great extent, and compression merely slows down the router and the transfer of this type of data. Compression will also increase the number of CPU cycles and the amount of memory used by the router. Therefore, you should apply careful consideration to current memory and processor usage before enabling compression. Two useful commands for analyzing whether compression is in use, are the show processes and show processes buffers commands. Example 4-12 lists the output of the show processes command. Here we see the average utilization of this router is approximately 30 percent. In this case, the router has enough resources to enable compression. Be careful when implementing compression on routers operating at 65 percent of capacity. Example 4-12 Output from the show processes Commandskynet_2# show processes CPU utilization for five seconds: 29%/2%; one minute: 30%; five minutes: 32% PID QTy PC Runtime (ms) Invoked uSecs Stacks TTY Process 1 Csp 2E68C 1132 67278 16 3760/4096 0 Load Meter 2 ME 122648 8882756 6695839 132610432/12288 0 Exec 3 Lst 17E918 494620 45735 10814 7960/8192 0 Check heaps 4 Cwe 183AE8 0 1 0 7840/8192 0 Pool Manager 5 Mst 11A2E8 4 2 2000 7808/8192 0 Timers 6 Lwe 1D0124 219292 342622 640 7528/8192 0 ARP Input 7 Mwe 23D924 892 1668 534 7144/8192 0 DDR Timers 8 Mwe 24DA90 0 2 011920/12288 0 Dialer event 9 Lwe 260FC0 0 1 0 7856/8192 0 Entity MIB API 10 Mwe 429FE4 0 2 0 7816/8192 0 Serial Background 11 Mwe 42DF08 4 1 4000 7856/8192 0 SERIAL A'detect 12 Cwe 188D94 0 1 0 7848/8192 0 Critical Bkgnd 13 Mwe 1A0690 16212 49282 32810888/12288 0 Net Background 14 Lwe 11090C 6900 19588 35211752/12288 0 Logger 15 Msp 12C25C 274660 335655 818 7472/8192 0 TTY Background 16 Msp 19FD38 6244 335694 18 7800/8192 0 Per-Second Jobs 17 Mwe F0DB0 8092 1186590 6 7648/8192 0 LED Timers 18 Mwe 4BB398 0 23 0 7976/8192 0 CSM timer process 19 Mwe 4BE740 212 574 369 7736/8192 0 POTS 20 Mwe 2004B8 16908 44367 381 7544/8192 0 CDP Protocol 21 Mrd 2B434C 272492 211068 129110672/12288 0 IP Input NOTE Cisco offers hardware accelerator cards, or compression service adapters (CSAs), to offset the overhead compression that uses valuable router resources. Cisco compression is performed on the CSA boards if present in the router. Configuring PPP MultilinkPPP multilink is a mechanism for combining, or bundling, multiple physical links into one large logical link. The logical end-to-end connection is called a bundle. This bundle provides increased bandwidth to the destination, along with reduced latency by allowing packets to be disassembled and sent down different links simultaneously to the same destination. The most common use of PPP multilink is with ISDN, which can use PPP multilink to bind two 64-kbps B channels together to form a single 128-kbps link. ISDN is the most common use of PPP multilink; however, it is also supported on the following interfaces:
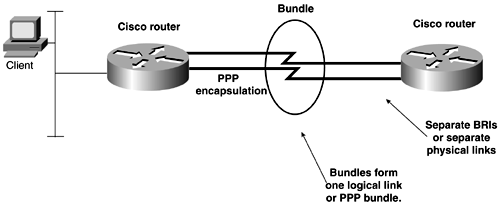
Figure 4-8 illustrates how a PPP multilink is formed . Figure 4-8. PPP Multilink Bundles When a bundle is formed, it can be formed with different physical interface types. For example, an asynchronous interface can be joined with a synchronous interface to form a bundle. NOTE PPP multilink is outlined in RFC 1990, which replaces RFC 1717. RFC 1990 specifies multivendor interoperability and resolves some earlier ISDN sequencing issues. PPP multilink is an option negotiated by LCP during its initial negotiation period. After negotiation, PPP multilink operates by first splitting packets into fragments. The fragments then are sent at the same time over multiple point-to-point links to the same remote address. When the fragments arrive at the other side of the connection, LCP reassembles them into a packet. To configure PPP multilink, use the following commands on the interface or dialer on which you want to configure PPP multilink: ppp multilink dialer load-threshold load [ inbound outbound either ] The dialer load-threshold command specifies the interface load at which the dialer initiates another call to the destination. The value is set at a load between 1 and 255, as in the show interface command; 1 is the lowest load, which makes the dialer call almost immediately. This can be tweaked further by specifying the direction of the traffic. NOTE Cisco IOS Software Release 11.1 is the first release to support PPP multilink. Cisco IOS Software Release 11.3 includes a feature called the Bandwidth Allocation Control Protocol (BACP). BACP enables two routers to negotiate which peer will add or remove links during a session. To verify the functionality of PPP multilink, use the debug ppp negotiation script along with a source ping. By turning on the debug for PPP, you can tell when LCP brings up another channel or link. By performing a extended ping, you can easily force a large amount of data quickly across the link to exceed the load threshold and bring up another PPP bundle. The show ppp multilink command can also be useful to show the state of a multilink session. Example 4-13 demonstrates the use of the show ppp multilink command, followed by an extended ping, which brings up the second multilink bundle. Example 4-13 show ppp multilink Command Outputskynet_2# show ppp multilink Virtual-Access1, bundle name is cns_isdn_callback Dialer interface is Dialer1 0 lost fragments, 0 reordered, 0 unassigned, sequence 0x0/0x0 rcvd/sent 0 discarded, 0 lost received, 1/255 load Member links: 1 (max not set, min not set) BRI0:1 Configuring PPP LAPB and LQMPPP link quality can be enforced or enabled on Cisco routers in two ways. One method is done by enabling LAPB numbered mode negotiation. This is done with the ppp reliable-link command. Another method is by enforcing Link Quality Monitoring (LQM) on the link with the ppp quality command. LQM monitors the link quality; if the quality drops below a configured percentage, the router shuts down the link. The percentages are calculated for both incoming and outgoing traffic. The LQM out is calculated by comparing the total number of packets and bytes sent with the total number of packets and bytes received by the destination node. The incoming LQM is measured by comparing the total number of packets and bytes received with the total number of packets and bytes sent by the destination peer. When LQM is enabled, Link Quality Reports (LQRs) are sent in place of keepalives . LQR is further defined in RFC 1989, "PPP Link Quality Monitoring." NOTE LAPB numbered mode inserts essentially another error-correction layer with retransmits, if necessary, while LQM monitors link quality. To enable LQM, use the following command: ppp quality percentage_of_successful_traffic The other form of increasing link reliability is to use the ppp reliable-link command. This command causes the router to provide LAPB numbered mode negotiation. LAPB performed on the data-link layer can provide error detection for many upper-layer protocols, such as PPP, in this case. You must enable PPP reliable link on both ends of the link. Unlike ppp quality, you can use the ppp reliable-link command with compression; however, you cannot use PPP reliable link with PPP multilink. To verify that these commands are functioning, use debug ppp negotiation because LQM will be listed there. The "Big show" and "Big D" for PPP and DDRCisco offers some strong commands for debugging PPP and DDR sessions. Again, this section focuses on the best and most useful show and debug commands. The "big show " and "Big D" for PPP and DDR are as follows:
The following examples show some of the "big Show " and the "big D" commands in action. The debugs should all be used together because they present a clearer picture of what is happening. In Example 4-14, all the debugs from the preceding list, along with debug async state, have been turned on. Example 4-14 Output of a Successful debug ppp negotiation01:01:57: Async1: Dialing cause ip (s=172.16.128.2, d=172.16.1.1) Example 4-15 illustrates a PPP CHAP failure on a link with the debug ppp authentication command. Example 4-15 PPP CHAP Failure skynet_lab# debug ppp authentication Se0 PPP: Phase is AUTHENTICATING, by the peer Se0 CHAP: I CHALLENGE id 51 len 31 from "skynet_lab" Se0 CHAP: O RESPONSE id 51 len 31 from "isp_router" Se0 CHAP: I FAILURE id 51 len 25 msg is "MD/DES compare failed" Se0 PPP: Phase is AUTHENTICATING, by the peer Se0 CHAP: I CHALLENGE id 52 len 31 from "skynet_lab" Se0 CHAP: O RESPONSE id 52 len 31 from "isp_router" The debug ppp negotiation command can be one of the most powerful debugs available for PPP. It's not too data-intensive, and it provides enough information to solve or narrow down a majority of PPP-related problems. NOTE Technique, Technique, Technique It might seem that some of these examples and labs are overcomplicated with routing protocols and by using VLSM, but there is a reason for this. Too often, many texts and examples use standard 24-bit address space and pay little attention to addressing and other techniques. This just puts the engineer into bad habits of IP address design. In most of this text, IP addresses are assigned just like they would be in the field. Constant reinforcement in examples like this improves your technique. Much in the same way that a martial artist pays strict attention to the smallest detail of every move, you must pay strict attention to every command that you make. If you don't know the purpose of a command in a configuration, ask yourself, "Is it a necessary command?" Configuring PPP CallbackPPP callback is a way for a remote or calling router to place a call to a callback server, terminate the link, and then receive a call from the callback server. This method can be used to enhance security and to control which side of the link gets connection time. Configuring PPP callback is covered in detail in Chapter 7. |
| < Free Open Study > |
EAN: 2147483647
Pages: 283