Ethernet Switching
| < Free Open Study > |
| In the early 1990s, Kalpana, Grand Junction, and Bay Networks started to ship some of the first Ethernet switches. The Bay Networks 28115 was one of the first switches to introduce 10/100 auto-sensing ports and virtual LANs ( VLANS ). More importantly, all switches put an end to the old Ethernet repeater rules, while increasing bandwidth. Until this point, many people were predicting that ATM would be the only high-speed protocol in use on the LANand if it hadn't been for the Ethernet switch, they might have been right. Ethernet switches provide several key advantages over traditional shared media LANs:
A switch functions much like a multiport bridge. When VLANs are created, virtual bridges are created to join the ports in the VLAN. Broadcast, unicast, and multicast traffic is forwarded to each member of the VLAN. The Catalyst 5500 series switch builds an address table by recording the source MAC address of frames that it received from its interfaces. When a frame destined for an address not yet in the address table is received, the switch floods the frame out all ports and trunks in the same VLAN as the frame was received. The switch does not forward the frame out the interface that it received it. When a reply for that frame is received, the switch records the new address in the address table. The switch forwards subsequent frames to a single port, without flooding it to all ports. Traffic can leave the VLAN only with the aid of a router or a Layer 3 switch providing routing functionality. Switches forward traffic in three primary modes:
Broadcast Domains and Collision DomainsTwo key concepts in switched networks are broadcast domains and collision domains. A broadcast domain is the area of the network that forwards broadcasts from one portion of network to the next . A practical example of a broadcast domain is an IP or IPX subnet. A collision domain is a function of the physical properties of a device. Devices in the same collision domain reside on the same "wire" or hub/repeater. Table 2-8 illustrates how various network devices segment collision and broadcast domains. Figure 2-5 illustrates where collision and broadcast domains reside on various devices Figure 2-5. Collision and Broadcast Domains Table 2-8. How Various Network Devices Segment Collision and Broadcast Domains
Virtual LANs (VLANS)Many definitions for a VLAN exist. The definition that we chose to use is simple. Virtual LANS (VLANs) can be easily defined as broadcast domains that can extend geographical distances. When configuring Ethernet switching, every port must be assigned to a VLAN. The default VLAN is always VLAN 1. When switches ship from the factory, they are in some ways plug-and-play. Every port is assigned to VLAN 1, so every port of the switch is in a single broadcast domain. This makes migrating from shared Ethernet hubs to a basic switched network easy. VLANs always should be thought of as simply broadcast domains. Most VLANs eventually become IP/IPX subnets or bridging domains. The basic design rules that apply to broadcast domains also apply to VLANs:
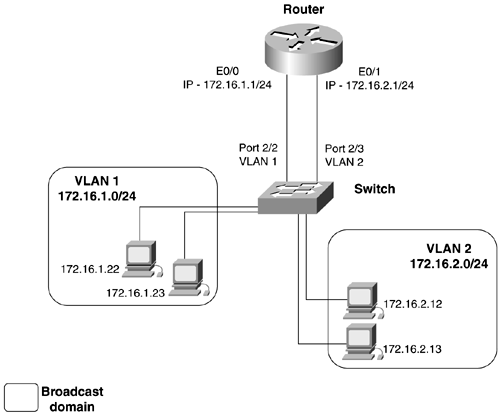
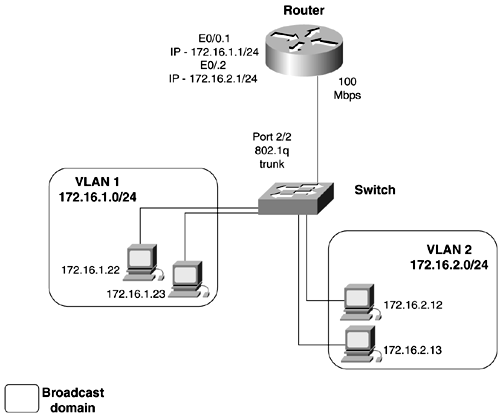
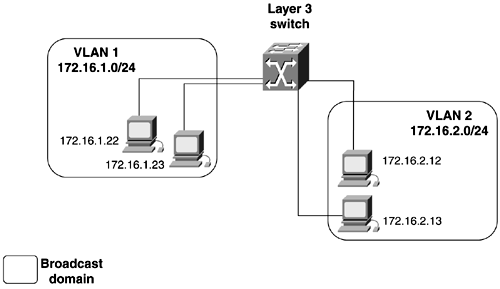
Let's examine some basic switched networks, focusing on the differences in each one. Figure 2-6 shows a basic VLAN configuration. The switch has VLANs 1 and 2 configured on it. Each VLAN is configured with a separate IP subnet. If information needs to pass from VLAN 1 to VLAN 2, a router is required. Here, the router has an interface in each VLAN. Traffic going from one VLAN to the other needs to first hit the router. The downfall in this configuration is that a single interface is required for every VLAN that needs to be routed, severely limiting the scalability of networks like this. Figure 2-6. Per Interface VLAN Routing Figure 2-7 shows another basic VLAN configuration. The switch has VLANs 1 and 2 configured on it again. Here, the router has a single 100-Mbps interface running a VLAN trunking protocol, such as 802.1q. Traffic going from one VLAN to the other must travel up the trunk to the router and then back down the same trunk. Using a single trunk to route between VLANs is the most economical way to accomplish routing between VLANs. This type of configuration often is referred to as a "router on a stick." Figure 2-7. Router on a Stick The next evolution was to move the routing function from a standalone router to the switch itself; this is called Layer 3 switching. This move was only logical because traffic is doubled up coming in and exiting the same router interface. At first, this was accomplished through the use of a route switch processor (RSM), installed into a Catalyst 5500 series switch. More switches now are offering this capability. Figure 2-8 illustrates a Layer 3 switch. Figure 2-8. Layer 3 Switching VTP and Trunking ProtocolsA powerful function of VLANs is their capability to span distance. VLANs are communicated from switch to switch by the means of a VLAN Trunking Protocol (VTP). VTP is used to maintain global VLAN information between switches. A VLAN management domain, or VTP domain, consists of one or more switches interconnected and sharing the same administrative responsibility. Anytime that you want the VLANS on one switch to have information about the VLANs on another switch (that is, when you want these two broadcast domains to communicate), you need to configure a VTP domain and a trunk. VTP also tracks all the VLANs in a VTP domain and propagates these in a client/server manner from one switch to another. The intent of VTP is to ease management and provide a common VLAN database across the VTP domain. VTP advertisements are sent out on all trunk connections in Inter-Switch Link (ISL) frames, 802.1q frames, IEEE 802.10, or ATM LANE. VTP frames are sent to the destination MAC address of 0100.0ccc.ccc with an LLC code of SNAP (AAAA) and a type of 2003 in the SNAP header. For VTP messages to successfully be transmitted, the following must occur:
After a trunk is established, VTP sends periodic advertisement out each trunk port. The VTP advertisements contain the following:
VTP has two versions, simply called version I and version II. All the switches in the VTP domain must be on the same version. This rule does not apply to the transparent-mode switches. Version II offers the following, the most important being support for Token Ring:
VTP operates in one of three modes:
Table 2-9. Various VTP Modes of Operation
Table 2-10 lists the default VTP mode on Catalyst switches. Table 2-10. Default VTP Settings
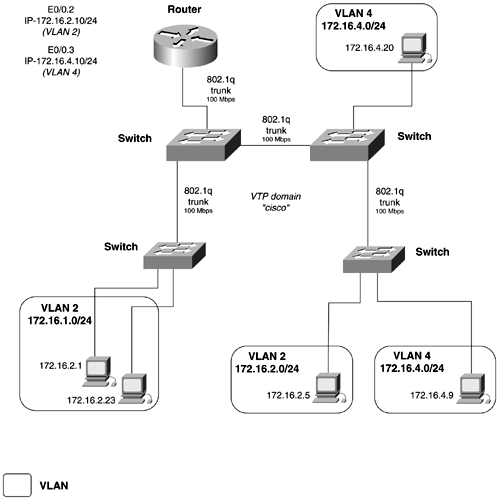
VLAN Trunking ProtocolsVTP requires trunks to transport VTP information. A trunk is considered a point-to-point link between Ethernet switch ports and another networking device such as a router or another switch. Trunks have the capability to carry the traffic of multiple VLANs over a single link and extend VLANs across the internetwork. Without the use of VTP and trunks, an IP subnet could never be partitioned across switches. VTP trunks allow for an effective way to tie two broadcast domains together. Figure 2-9 illustrates how 802.1q trunks are used to tie VLANs 4 and 2 together. Figure 2-9. VLAN Trunking Three primary trunking encapsulations are available for Ethernet:
Dynamic ISL (DISL) and Dynamic Trunk Protocol (DTP)Dynamic ISL was Cisco's first trunk-negotiation protocol. It exists on all Catalyst 5500 series software 4.1 and earlier. Originally, it was used to negotiate trunks for the ISL protocol only. Later, in 4.2, DISL was replaced with Dynamic Trunk Protocol (DTP). DTP is essentially DISL that attempts to automate ISL and 802.1q trunk configuration. DTP uses the reserved destination multicast address of 0100.0ccc.cccc for LAN networks to negotiate trunks. In the default auto state, DTP messages are sent out every 30 seconds on all trunk lines. Depending on the mode of the port, the port might become an ISL or 802.1q trunk. DTP operates in the following modes:
In actuality, this is really too many options for a trunk. Network administrators either configure a port as a trunk or they don't. It could be argued that to have a network be so flexible the trunks can or should be added dynamically is a security risk. Table 2-11 illustrates the possible combinations of trunks and the modes. As you will see, the most reliable and simplest way to configure a trunk is to statically configure it on both sides of the link as a trunk and in the "on" mode. Table 2-11. Ethernet DTP Configuration Outcomes
Configuring Catalyst Ethernet SwitchesThe colorful history of Ethernet switching is present in the Catalyst line. Each family of Catalyst switches has a slightly different command-line interface. The Catalyst switches such as the 1900 and 2800 come from Grand Junction and have one type of configuration interface and method. The Catalyst 3000 originated with Kalpana and has another method of configuration. The Catalyst 5500 family started with Cisco's acquisition of Crescendo. The Catalyst 5500 and 6500 families have a unique configuration interface originally called the XDI. Presently, the configuration mode is simply called the command-line interface (CLI); whereas the Catalyst 8500 series uses a hybrid, where the configuration resembles the traditional Cisco router configuration, except that it is a router with hundreds of ports. The upcoming sections, excluding the section on Token Ring, focus on configuring the Catalyst 2900XL and 3500G family of switches along with the Catalyst 4000/ 5500/6500 series switches. These two families represent that majority of Cisco Catalyst switches in deployment. LAN switches were designed to be easy to install and configure. On smaller networks, little to no configuration might be required. On large redundant networks, with multiple VLANs and trunks, switching becomes quite a task. Configuring Ethernet switch configuration can be divided into a four-step process. Most switches, not all, will require a nondefault VTP domain to be created before VLANs can be created.
Step 1 involves configuring the management VLAN, IP addresses, and default gateways on the switch so that it can be accessed in- band from the internetwork. In Step 2, you define the VTP domain and the VLANs on the VTP servers. During this step, you also assign ports to VLANs. Step 3 involves configuring VLAN trunks, if there are any on the network. Step 4 is optional but critical to large networks. It involves controlling STP through the setting of root bridges, clearing VLANs from trunks, and using VLAN prune eligibility. Step 1: Configuring Switch ManagementAll Catalyst switches have the capability to be managed by an IP address. To accomplish this, an IP address needs to be assigned to the switch, along with a default gateway or default route for IP traffic to get forwarded to. The default management VLAN is VLAN 1. When you assign an IP address to the switch, it will be in VLAN 1 unless you specify another VLAN. Configuring Switch Management on Catalyst 4000/5500/6500 SwitchesThe management interface on Catalyst 4000/5500/6500 series is called the SC0 interface. This is a logical in-band interface, which means that it relies on another switch port to forward traffic for it. The 4000 series also has an out-of-band management interface called the ME1 interface. Use the following syntax to set the IP address for the Catalyst switch: set interface sc0 [ vlan ] [ ip_addr [ netmask [ broadcast ]]] A default route also needs to be set for IP to forward traffic to. This is usually a router with an interface on the same VLAN that the switch's IP address is in. A default route can be entered in one of two ways: by entering either a default gateway or the IP default route of 0.0.0.0. set ip route default IP_default_gateway Or set ip route 0.0.0.0 IP_default_gateway For full IP reachability, ensure that a router exists in the same subnet/VLAN as your management IP address. Use the router's Ethernet interface or subinterface as the default gateway IP address for the switch. Example 2-1 demonstrates the configuration of an IP address and default gateway on the switch sw13. This default gateway is in VLAN 2. You need to proceed to Step 2 and configure VLAN 2 for this configuration to fully work. This is because VLAN 2 will not be in the database yet. Example 2-1 Configuring an IP Address and Default Routesw13 (enable) set int sc0 2 172.16.2.13 255.255.255.0 Interface sc0 vlan set, IP address and netmask set. sw13 (enable) set ip route default 172.16.2.10 Route added. NOTE On the Catalyst 4000/5500/6500 series switches, the VTP domain and appropriate VLAN must be configured if the SC0 interface is not on VLAN 1. Other commands that are useful in configuring general management on the Catalyst 4000/5500/6500 series switches are the following:
Example 2-2 demonstrates the entry of a static route, followed by the show ip route command. Example 2-2 Configuring Static Routessw13 (enable) set ip route 172.18.2.0 172.16.2.10 Route added. sw13 (enable) show ip route Fragmentation Redirect Unreachable ------------- -------- ----------- enabled enabled enabled Destination Gateway Flags Use Interface ----------------------- ----------------------- ------ ---------- --- default 172.16.2.10 UG 165 sc0 172.18.2.0 172.16.2.10 UG 0 sc0 172.16.2.0 172.16.2.13 U 279 sc0 sw13 (enable) Example 2-3 shows how the set system values are displayed with the show system command. Example 2-3 show system Command Output sw13 (enable) show system PS1-Status PS2-Status Fan-Status Temp-Alarm Sys-Status Uptime d,h:m:s Logout ---------- ---------- ---------- ---------- ---------- -------------- ---------- ok ok ok off ok 0,06:59:37 20 min PS1-Type PS2-Type Modem Baud Traffic Peak Peak-Time ---------- ---------- ------- ----- ------- ---- ------------------------- WS-C4008 WS-C4008 disable 9600 0% 0% Thu Jun 14 2001, 09:01:43 System Name System Location System Contact ------------------------ ------------------------ ------------------------ switch13 CCIE Lab Solie sw13 (enable) NOTE VLAN 1: "Just Say No" VLAN 1 is the default VLAN for all Catalyst switches. MST on 802.1q uses this VLAN for its entire Spanning Tree domain. VLAN 1 has rules that limit how you can control traffic on it. Until recently, you could not even remove VLAN 1 from any trunk line. Any switch added to the network, by default, will be in VLAN 1. This leaves the network vulnerable to potential VLAN and data corruption on VLAN 1. For these reasons, I personally don't run production traffic or management traffic on VLAN 1, which is essentially a "dead" VLAN. Configuring IP Permit Lists on Catalyst 4000/5500/6500 SwitchesWhen an IP address is configured on the switch, it can be accessed through Telnet and SNMP. There is no need for any additional configuration. Sometimes, you might want to limit Telnet or SNMP access to the switch. To limit this type of traffic, use the set ip permit command. Up to 10 line entries can be configured. Networks or single IP addresses can be filtered. For example, to allow only the network 172.16.2.0/24 to pass, the syntax would resemble the following: set ip permit 172.16.2.0 255.255.255.0 To limit access to a single address, use a 255.255.255.255 mask or simply omit the mask. After the lines have been entered, enable the "access-list" with the set ip permit enable command. The switch will still allow ICMP echo replies and requests ; however, it will block SNMP and Telnet traffic. By default, IP permit lists are disabled and need to be enabled to take effect. The syntax for IP permit is as follows: set ip permit [ ip_address ] [ subnet_mask ] set ip permit [ enable disable ] IP permit lists can viewed by entering the show ip permit command, such as in Example 2-4. Example 2-4 show ip permit Command Output sw13 (enable) show ip permit IP permit list feature enabled. Permit List Mask ---------------- ---------------- 172.16.2.0 255.255.255.0 Denied IP Address Last Accessed Time Type ----------------- ------------------ ------ 172.16.3.1 06/14/01,19:07:43 Telnet sw13 (enable) Configuring Switch Management on Catalyst 2900XL/3500G FamiliesThe management interface on Catalyst resembles a router with a special VLAN database added to it. The commands for assigning ports, trunks, and their management all are performed from the classic configuration mode, or conf t mode. VLAN information is configured from enable mode by using a special key-in, vlan database, from the enable mode. From this point on, we will refer to commands in the VLAN database as VLAN commands that is, commands accessed by keying the vlan database from the enable mode prompt. Configuration commands entered from the more traditional router-like mode will be called configuration-mode commands. The 2900XL/3500G switch has a default virtual interface called VLAN 1. This is the default VLAN for the switch; if you want to configure the management IP address in VLAN 1, you would simply add it under this interface much like you would a router. To run management on a different VLAN, you will need to shut down the VLAN 1 interface and configure a new virtual interface for the VLAN that you want to run management on. Only one VLAN interface can be active at once; you must shut down VLAN 1 to activate VLAN 2. Example 2-5 demonstrates how to configure the management interface on a VLAN other than VLAN 1. Example 2-5 Configuring the Management Interface on Catalyst 2900XL/3500G Switchessw11# conf t Enter configuration commands, one per line. End with CNTL/Z. sw11(config)# interface vlan 1 sw11(config-if)# shut sw11(config-if)# exit sw11(config)# interface vlan 2 sw11(config-subif)# ip address 172.16.2.11 255.255.255.0 sw11(config-subif)# no shut sw11(config-subif)# ^Z sw11# In this particular example, the management interface will not work until VLAN 2 is defined on the switch. This is Step 2 of the four-part configuration process. To configure a default route, use the ip default-gateway ip_address command, the same as it is on a router. Example 2-6 shows how to configure the default gateway. Here, the default gateway points at the router 172.16.2.10. Example 2-6 Configuring Default Routing on Catalyst 2900XL/3500G Switches sw15(config)# ip default-gateway 172.16.2.10 Controlling IP Access on Catalyst 2900XL/3500G FamiliesControlling IP access on the 2900XL/3500G switches is identical to controlling Telnet access on the router. Recall from Chapter 1 for configuring virtual Telnet access. Step 2: Configuring VTP and VLANs on Catalyst 4000/5500/6500 SwitchesThis step contains three substeps , all performed with set commands. The three substeps are as follows:
Configuring VTP Domain and Mode on Catalyst 4000/5500/6500 SwitchesA VTP domain must be configured before any VLANs can be added to the VLAN database. To configure the VTP domain, use this syntax: set vtp [ domain name ] [ mode { client server transparent }] [ passwd passwd ] [ pruning { enable disable }] [ v2 { enable disable }] The name field sets the VTP domain name and is a case-sensitive field. The default mode of VTP is server mode. If you want to change the mode, use either client, server, or transparent modes. Remember that any VLAN changes on the server are propagated to all client VLANs. For a server to send VTP updates to a client, it must have a higher revision number. If the client revision number is higher than the server's, it will not accept updates from the server. If you are having problems with VLANs propagating, be sure to check the revision number of VTP. To reset the VTP revision number, simply change the name of the VTP domain, and then change it back. This will reset the revision counter to 0. This will not work on 2900XL/3500G series switches; these switches must be restarted to clear a corrupt VTP domain. V2 updates can be enabled or disabled, depending on switch type. You need to use only version 2 updates during Token Ring switching, which is why Ethernet-only switches do not have V2 updates. All switches in the VTP domain must be V2-capable for this mode to work. VTP also uses and MD5 hash password protection for VTP updates. This can be simply enabled by adding the password command to the VTP domain. Example 2-7 demonstrates configuring a VTP domain ciscomd5 with the MD5 password of ccie. Example 2-7 Configuring a Password-Protected VTP Domain sw13 (enable) set vtp domain ciscomd5 password ccie Generating MD5 secret for the password .... VTP domain ciscomd5 modified sw13 (enable) The VTP domain can be viewed with the command show vtp domain, as in Example 2-8. Example 2-8 Configuring a Password-Protected VTP Domainsw13 (enable) show vtp domain Domain Name Domain Index VTP Version Local Mode Password -------------------------------- ------------ ----------- ----------- ---------- ciscomd5 1 2 server configured Vlan-count Max-vlan-storage Config Revision Notifications ---------- ---------------- --------------- ------------- 9 1023 0 disabled Last Updater V2 Mode Pruning PruneEligible on VLANs --------------- -------- -------- ------------------------- 172.16.2.13 disabled 2-1000 sw13 (enable) The show vtp domain command lists the VTP domain name, revision index, and VTP modes and tells whether updates are password-protected. This command also shows the number of VLANs in the domain and tells which ones are prune-eligible. The Last Update row lists the IP address of the switch from which the last VTP update was received. In the previous example, the last update was received from 172.16.2.13. Configuring Physical Port Properties and Assigning Ports to VLANs on Catalyst 4000/5500/6500 SwitchesThe next two steps might be combined into one step, depending on whether the switch is configured as a VTP server/transparent or client. Essentially, this step involves configuring VLANs and port characteristics. There is no need to configure VLANs if the switch is a VTP client. On the Catalyst switch, every port that is not a trunk will be assigned to the default VLAN, VLAN 1. If the port is assigned to any other VLAN, that VLAN must be created in the VLAN database. When trunk lines are configured, the VLANs created on the VTP server will be propagated to other VTP servers and clients. This step also calls for you to configure physical Ethernet properties, such as full- or half-duplex operation, port speed, and so on. The following commands list some of the most common port configurations:
Port status can be viewed with the show port command. This version of the command lists all the ports on the switch, along with the VLAN ID of the port, connection status, duplex setting, speed, and interface type. Example 2-9 lists the output of the show port command. Notice how the logical port names help identify the port's function. Port 2/19 also is set for a high priority, with the set port level command. Example 2-9 show port Command Output sw13 (enable) show port Port Name Status Vlan Level Duplex Speed Type ----- ------------------ ---------- ---------- ------ ------ ----- ------------ 2/1 gigabit_trunk_sw11 connected trunk normal full 1000 1000BaseSX 2/2 gigabit_trunk_sw12 connected trunk normal full 1000 1000BaseSX 2/3 notconnect 1 normal auto auto 10/100BaseTX 2/4 notconnect 1 normal auto auto 10/100BaseTX 2/5 notconnect 1 normal auto auto 10/100BaseTX 2/6 notconnect 1 normal auto auto 10/100BaseTX 2/7 notconnect 1 normal auto auto 10/100BaseTX 2/8 notconnect 1 normal auto auto 10/100BaseTX 2/9 notconnect 1 normal auto auto 10/100BaseTX 2/10 notconnect 1 normal auto auto 10/100BaseTX 2/11 notconnect 1 normal auto auto 10/100BaseTX 2/12 notconnect 1 normal auto auto 10/100BaseTX 2/13 notconnect 1 normal auto auto 10/100BaseTX 2/14 connected 800 normal a-full a-100 10/100BaseTX 2/15 notconnect 200 normal auto auto 10/100BaseTX 2/16 notconnect 200 normal auto auto 10/100BaseTX 2/17 notconnect 200 normal auto auto 10/100BaseTX 2/18 notconnect 200 normal auto auto 10/100BaseTX 2/19 internet_conn connected 100 high a-half a-10 10/100BaseTX 2/20 100_trunk_sw15 connected trunk normal a-full a-100 10/100BaseTX Detailed information about a port can be viewed by appending the port number to the show port command. The detailed version of this command provides all the information that the show port command provides, plus detailed information on the physical properties of the port. These include security, port errors, and collisions. Example 2-10 lists the detailed version of the show port command. Example 2-10 Detailed Port Information sw13 (enable) show port 2/1 Port Name Status Vlan Level Duplex Speed Type ----- ------------------ ---------- ---------- ------ ------ ----- ------------ 2/1 gigabit_trunk_sw11 connected trunk normal full 1000 1000BaseSX Port Security Secure-Src-Addr Last-Src-Addr Shutdown Trap IfIndex ----- -------- ----------------- ----------------- -------- -------- ------- 2/1 disabled No disabled 9 Port Send FlowControl Receive FlowControl RxPause TxPause Unsupported admin oper admin oper opcodes ----- -------- -------- -------- -------- ------- ------- ----------- 2/1 desired off off off 0 0 0 Port Status Channel Channel Neighbor Neighbor mode status device port ----- ---------- --------- ----------- ------------------------- ---------- 2/1 connected auto not channel Port Align-Err FCS-Err Xmit-Err Rcv-Err UnderSize ----- ---------- ---------- ---------- ---------- --------- 2/1 - 0 0 0 0 Port Single-Col Multi-Coll Late-Coll Excess-Col Carri-Sen Runts Giants ----- ---------- ---------- ---------- ---------- --------- --------- --------- 2/1 0 0 0 0 0 0 0 Last-Time-Cleared -------------------------- Sat Jun 16 2001, 13:29:17 sw13 (enable) Configuring VLANs on Catalyst 4000/5500/6500 SwitchesVLANs are created on the Catalyst 4000/5500/6500 series switches with the set vlan command. Ports can be added to the VLAN by simply appending the port number to the set vlan command: set vlan [ 1-1001 ] [ mod/ports ] The set vlan command automatically creates the VLAN, if previously undefined, and adds the port to the VLAN. Multiple ports can be added to a VLAN by adding them with a ",", or denoting a range with a "-". For example, to add ports 1/1 and 1/12 to VLAN 2, you would use the following syntax: set vlan 2 1/1,1/12 To add ports 1/10 and ports 2/1, 2/2, and 2/3 to VLAN 3, you would use the following: Set vlan 3 1/10,2/1-2/3 Example 2-11 demonstrates the creation of VLAN 33, and adding ports 2/5, 2/10, 2/11, 2/12, and 2/13 to that VLAN in a single statement. Example 2-11 VLAN Creation sw13 (enable) set vlan 33 2/5,2/10-2/13 Vlan 33 configuration successful VLAN 33 modified. VLAN 1 modified. VLAN Mod/Ports ---- ----------------------- 33 2/1-2,2/5,2/10-13,2/20 sw13 (enable) When you create a VLAN, it has certain default values, such as MTU, prune eligibility, and so on. Table 2-12 lists the default values of VLANs. Most of these values can be changed with the set vlan command, the syntax for which is as follows: set vlan 1-1001 [ name { vlan_name }] [ state { active suspend }] [ said { said_value }] [ mtu mtu ] [ bridge { bridge_number }] [ stp { ieee ibm auto }] The parameters for this command are described as follows:
Table 2-12. Default VLAN Settings
VLANs on the switch can be viewed in two ways. The show vlan command provides an overview of all the VLANs on the switch, their status, and what ports are assigned to them, along with the default VLAN values. Example 2-12 lists the output of the show vlan command. Notice how clear the VLAN name appears on the VLAN's assigned names. Assigning VLAN names will help the network self-document itself. Example 2-12 show vlan Command Output sw13 (enable) show vlan VLAN Name Status IfIndex Mod/Ports, Vlans ---- -------------------------------- --------- ------- ------------------------ 1 default active 4 2/3-4,2/6-9,2/21-34 2 management_VLAN active 64 3 Engineering_VLAN active 65 4 VLAN0004 active 70 5 VLAN0005 active 71 33 VLAN0033 active 72 2/5,2/10-13 100 Internet_VLAN active 66 2/19 200 dummy_VLAN active 67 2/15-18 800 VLAN0800 active 68 2/14 801 VLAN0801 active 69 1002 fddi-default active 5 1003 token-ring-default active 8 1004 fddinet-default active 6 1004 fddinet-default active 6 VLAN Type SAID MTU Parent RingNo BrdgNo Stp BrdgMode Trans1 Trans2 ---- ----- ---------- ----- ------ ------ ------ ---- -------- ------ ------ 1 enet 100001 1500 - - - - - 0 0 2 enet 100002 1500 - - - - - 0 0 3 enet 100003 1500 - - - - - 0 0 4 enet 100004 1500 - - - - - 0 0 5 enet 100005 1500 - - - - - 0 0 33 enet 100033 1500 - - - - - 0 0 100 enet 100100 1500 - - - - - 0 0 200 enet 100200 1500 - - - - - 0 0 800 enet 100800 1500 - - - - - 0 0 801 enet 100801 1500 - - - - - 0 0 1002 fddi 101002 1500 - - - - - 0 0 1003 trcrf 101003 1500 - - - - - 0 0 1004 fdnet 101004 1500 - - - ieee - 0 0 1005 trbrf 101005 1500 - - - ibm - 0 0 VLAN AREHops STEHops Backup CRF ---- ------- ------- ---------- 1003 0 0 off sw13 (enable) VLAN AREHops STEHops Backup CRF ---- ------- ------- ---------- 1003 0 0 off sw13 (enable) By adding the VLAN number behind the show vlan command, it provides information on just that particular VLAN. Example 2-13 shows the output of the show vlan 2 command. Example 2-13 show vlan2 Command Output sw13 (enable) show vlan 2 VLAN Name Status IfIndex Mod/Ports, Vlans ---- -------------------------------- --------- ------- ------------------------ 2 management_VLAN active 64 2/1-2,2/20 VLAN Type SAID MTU Parent RingNo BrdgNo Stp BrdgMode Trans1 Trans2 ---- ----- ---------- ----- ------ ------ ------ ---- -------- ------ ------ 2 enet 100002 1500 - - - - - 0 0 VLAN AREHops STEHops Backup CRF ---- ------- ------- ---------- sw13 (enable) VLANs can be deleted from the database with the clear vlan vlan_number command. VLANs can be deleted only if the switch is in a VTP server or it is in VTP transparent mode. When a VLAN is deleted on a VTP server, it removes the VLAN from the entire VTP domain. All switches in the VTP domain, VTP servers, and clients delete the VLAN from their database. For these reasons, caution should be used when clearing a VLAN . The switch will prompt you before final clearing of the VLAN, as shown in Example 2-14. Only the Cat 4000/5500/6500 will issue this warning when clearing a VLAN. VLANs on the Cat 2900XL and 3500G will be deleted when the changes are applied. Example 2-14 Deleting or Clearing a VLAN sw13 (enable) clear vlan 801 This command will deactivate all ports on vlan 801 in the entire management domain Do you want to continue(y/n) [n]?y Vlan 801 deleted sw13 (enable) Step 2: Configuring VTP and VLANs on Catalyst 2900XL/3500G SwitchesConfiguring VTP and VLANs on the 2900XL/3500G series switches follows the same three substeps as the Catalyst 5500:
Configuring VTP Domain and Mode on Catalyst 2900XL/3500G SwitchesA VTP domain must be configured before any VLANs can be added in the VLAN database. The VLAN database is used to configure the VLAN properties of the switch. This we will refer to as the VLAN configuration mode. This mode is entered by the privileged command vlan database. The router-like configuration mode is to configure the physical port properties and assign them to VLANs. To enter this mode, key in conf t. To configure the VTP domain use this syntax: Switch# vlan database (vlan)# vtp domain domain_name [ password ] If you add a password behind the domain name, VTP updates will use a MD5 hash. The default VTP mode will be server mode; to change the mode, use the following command from the VLAN configuration mode: (vlan)# vtp [ server client transparent ] For more information on the VTP mode, see the previous section, "VTP and Trunking Protocols." The VTP domain can be viewed using the show vtp status command. This command displays information about the VTP domain, such as configuration revision, domain name, operating mode, and so on. Example 2-15 lists the output of the show vtp status command. Example 2-15 Viewing the VTP Domain Information Switch# show vtp status VTP Version : 2 Configuration Revision : 28 Maximum VLANs supported locally : 254 Number of existing VLANs : 13 VTP Operating Mode : Server VTP Domain Name : ciscomd5 VTP Pruning Mode : Disabled VTP V2 Mode : Disabled VTP Traps Generation : Disabled MD5 digest : 0xD9 0x50 0xE2 0x4F 0x09 0xDE 0x98 0x07 Configuration last modified by 172.16.2.13 at 6-17-01 18:10:24 sw11# NOTE VLAN information is propagated only if the VTP revision number of the server is higher than the client's VTP revision number. If the VTP client's revision number is equal to or higher than the server's, it will not accept any VLAN information. To view the current VTP revision numbers , use the commands show vtp domain on Catalyst 4000/5500/6500 series switches and show vtp status on Catalyst 2900/3500 series switches. Configuring Physical Port Properties and Assigning Ports to VLANs on Catalyst 2900XL/3500G SwitchesThe next step for VTP and VLAN configuration on Catalyst 2900XL/3500G switches is to configure any physical port properties, along with assigning the port to a VLAN. Physical port properties are changed from the configuration mode under the interface, much like you would do on a router. Example 2-16 demonstrates configuring an Ethernet port to 10-Mbps full duplex on a 2800 series switch. This example also assigns the logical name internet_port to the interface. Example 2-16 Configuring Physical Port PropertiesSwitch# conf t Enter configuration commands, one per line. End with CNTL/Z. 04:59:58: %SYS-5-CONFIG_I: Configured from console by console Switch(config)# interface fastEthernet 0/6 Switch(config-if)# speed 10 Switch(config-if)# duplex full Switch(config-if)# description Internet_port Switch(config-if)# exit Some of the common physical properties of Ethernet that can be changed are as follows:
The interface command switchport is used to assign VLANs to a port in one of three ways. The port can be set up to run as a trunk, or to run multiple or single VLANs. At this time, we will focus on assigning a port to a single VLAN. To accomplish this first, configure the port to be in access mode and then attach a VLAN to the port. The syntax used to accomplish this is as follows: (config-if)# switchport mode [ access multi trunk ]
To assign the port to a VLAN, use the following command: (config-if)# switchport access vlan [ 1-1001 dynamic ] The VLAN standard range is 1 to 1001. The dynamic keyword is used in VLAN Membership Policy Server (VMPS) configurations. VMPS will not be covered in this text; for more information on VMPS, see the book Cisco LAN Switching , by Kennedy Clark and Kevin Hamilton. Example 2-17 demonstrates the configuration of FastEthernet 0/5 for VLAN 2. Example 2-17 Assigning VLAN 2 to Interface fast 0/5Switch(config)# int fastEthernet 0/5 Switch(config-if)# switchport mode access Switch(config-if)# switchport access vlan 2 When the VTP mode is set to transparent, VLANs automatically are created with the switchport access vlan command . If the VTP mode is set as a client, you cannot configure VLANs on this switch. The VLANs must be configured on the server switch and propagated through VTP over a trunk to the client switch. Configuring VLANs on Catalyst 2900XL/3500G SwitchesThe third step for VTP and VLAN configuration on Catalyst 2900XL/3500G switches involves configuring VLANs if the VTP mode is set as a server. VLANs are configured in the VLAN database simply by entering vlan [2-1001] options . Example 2-18 demonstrates the configuration of VLAN 175 with the name backbone. Changes in VLANs must be activated with the apply command. All changes will be applied when the VLAN database is exited. If a mistake is made, VLAN changes can be canceled with the abort or reset commands. The abort command exits you from the VLAN database, while the reset command cancels the current changes and rereads the current database. Example 2-18 Configuration of VLAN 175Switch# vlan database Switch(vlan)# vlan 175 name backbone VLAN 175 added: Name: backbone Switch(vlan)# apply APPLY completed. Switch(vlan)# Other options might be configured on the VLAN from this mode. They include the following: Switch(vlan)# vlan vlan_num [ name vlan_name ] [ state {active suspend}] [said said_value ] [ mtu mtu ] [ bridge bridge_number ] [ stp type { ieee ibm auto }]
For the default VLAN values, refer to Table 2-11 in the previous section. To find the status of VLANs on a 2900XL/3500G switch, use the same command used on the 4000/5500/6500 series switches. The show vlan vlan_number command displays all the VLANs on the switch, the state, and which ports are assigned to it. To display specific physical and logical information about a single VLAN, use the show vlan id vlan_number ]Example 2-19 lists the output of the show vlan command, followed by the more specific version of command. Notice again how the VLAN logical names help immediately identify the port purpose. Example 2-19 show vlan Command Outputsw11# show vlan VLAN Name Status Ports ---- -------------------------------- --------- ------------------------------- 1 default active Fa0/2, Fa0/3, Fa0/4, Fa0/5, Fa0/6, Fa0/7, Fa0/8, Fa0/9, Fa0/11, Fa0/12, Fa0/13, Fa0/14, Fa0/15, Fa0/16, Fa0/17, Fa0/18, Fa0/19, Fa0/22, Fa0/23, Fa0/24, Fa0/25, Fa0/26, Fa0/27, Fa0/28, Fa0/29, Fa0/30, Fa0/31, Fa0/32, Fa0/33, Fa0/34, Fa0/35, Fa0/36, Fa0/37, Fa0/38, Fa0/39, Fa0/40, Fa0/41, Fa0/42, Fa0/43, Fa0/44, Fa0/45, Fa0/46, Fa0/47, Fa0/48, Gi0/2 2 management_VLAN active 3 Engineering_VLAN active Fa0/1 4 VLAN0004 active 5 VLAN0005 active 33 VLAN0033 active 100 Internet_VLAN active 200 dummy_VLAN active 800 VLAN0800 active 1002 fddi-default active 1003 token-ring-default active 1004 fddinet-default active 1005 trnet-default active VLAN Type SAID MTU Parent RingNo BridgeNo Stp BrdgMode Trans1 Trans2 ---- ----- ---------- ----- ------ ------ -------- ---- -------- ------ ------ 1 enet 100001 1500 - - - - - 0 0 2 enet 100002 1500 - - - - - 0 0 3 enet 100003 1500 - - - - - 0 0 4 enet 100004 1500 - - - - - 0 0 5 enet 100005 1500 - - - - - 0 0 33 enet 100033 1500 - - - - - 0 0 100 enet 100100 1500 - - - - - 0 0 200 enet 100200 1500 - - - - - 0 0 800 enet 100800 1500 - - - - - 0 0 1002 fddi 101002 1500 - 0 - - - 0 0 1003 tr 101003 1500 - 0 - - srb 0 0 1004 fdnet 101004 1500 - - 1 ieee - 0 0 1005 trnet 101005 1500 - - 1 ibm - 0 0 sw11# sw11# show vlan id 3 VLAN Name Status Ports ---- -------------------------------- --------- ------------------------------- 3 Engineering_VLAN active Fa0/1 VLAN Type SAID MTU Parent RingNo BridgeNo Stp BrdgMode Trans1 Trans2 ---- ----- ---------- ----- ------ ------ -------- ---- -------- ------ ------ 3 enet 100003 1500 - - - - - 0 0 sw11# Step 3: Configuring VLAN trunks on Catalyst 4000/5500/6500 SwitchesConfiguring trunks on the Catalyst is a two-step process:
Configuring the autonegotiation, or DTP, is more difficult than simply statically defining the trunk. This is mainly because of some of the differences in the default trunks for the various Catalysts switches. Most Catalysts default to ISL; however, the Catalyst 4000 without the Layer 3 module doesn't support ISL. Another example is that 802.1q autonegotiation is supported only in Software Release 4.2. It's these little things that can make DTP unreliable in large heterogeneous networks. However, sometimes this feature is desirable. Table 2-12 lists all the modes and outcomes of DTP. By default, all ports are in a nontrunking status. You will have to configure each port as a trunk and put it into a mode. Recall from earlier that these are the five modes:
When the port is configured as a trunk, the encapsulation must be set. There are three types of encapsulation, ISL, 802.1q/DOT1Q, and negotiate. The negotiate option will do just that; first it will try to negotiate an ISL trunk, followed by an 802.1q trunk. The syntax to accomplish these two steps is as follows: Switch (enable) set trunk mod_num/port_num [ on off desirable auto nonegotiate ] Switch (enable) set trunk mod_num/port_num [ isl dot1q ] As mentioned previously, the most reliable and quickest way to configure a trunk without consulting Table 2-13 is to set the trunk to on and fix the encapsulation type to ISL or 802.1q/dot1q. Example 2-20 exhibits the configuration of an 802.1q trunk on port 2/6. Example 2-20 Configuring an 802.1q TrunkSwitch (enable) set trunk 2/6 dot1q Port(s) 2/6 trunk type set to dot1q. Switch (enable) set trunk 2/6 on Port(s) 2/6 trunk mode set to on. Switch (enable) 2001 Jun 12 09:33:58 %DTP-5-TRUNKPORTON:Port 2/6 has become dot1q trunk Switch (enable) 2001 Jun 12 09:34:11 %PAGP-5-PORTTOSTP:Port 2/6 joined bridge port 2/6 Table 2-13. Ethernet DTP Configuration Outcomes
NOTE Another autoconfiguration issue might arise with VTP and DISL. When DISL negotiates an ISL trunk, it includes the VTP name in the message. If the VTP domain names differ on the switches, the trunk will not become active. Again to circumvent this, simply configure the trunk to be on, and configure the encapsulation type. To view the status of a trunk, use the following commands: show trunk [ detail ] show trunk [ mod_num/port_num ] [ detail ] show vtp status Example 2-21 lists the output of show trunk command. If the trunk is not listed, some key fields to note are the following:
The status of the trunk should be trunking, and the mode should be on or should match a valid setting for DTP, as listed in Table 2-12. The encapsulation must match on both sides of the trunk. The "VLANs that are allowed and active in the management domain" states what VLANs the trunk is sending; if no VLANs are listed, the trunk is not configured properly. The native VLAN ID is the VLAN that 802.1q will use this VLAN for its single instance of Spanning Tree (MST). This VLAN must be the same throughout the VTP domain. Example 2-21 show trunk Command Output Switch (enable) show trunk detail Port Mode Encapsulation Status Native vlan -------- ----------- ------------- ------------ ----------- 2/1 on dot1q trunking 1 2/2 on dot1q trunking 1 Port Peer-Port Mode Encapsulation Status -------- --------- ----------- ------------- ------------ 2/1 GigabitEt unknown unknown unknown 2/2 GigabitEt unknown unknown unknown Port Vlans allowed on trunk -------- --------------------------------------------------------------------- 2/1 1-1005 2/2 1-1005 Port Vlans allowed and active in management domain -------- --------------------------------------------------------------------- 2/1 1-5,33,100,200,800 2/2 1-5,33,100,200,800 Port Vlans in spanning tree forwarding state and not pruned -------- --------------------------------------------------------------------- 2/1 1-5,33,100,200,800 2/2 1-3 Switch (enable) Sometimes, it might be hard to determine whether a trunk line is functioning. The trunk can report a status of trunking but not be in a fully exchanging VTP updates. The trunk status should be viewed on each side of the link, to ensure that it is functioning properly. Observing the Peer-Port status is another quick way to tell whether the trunk has recognized the other side of the link. If the Peer-Port status is unknown, it can mean that an encapsulation mismatch has occurred and that the trunk is not operating properly. As VTP synchronizes within the domain, the VLAN database from server to server and server to client will have the same VLANs listed in them. Only switches in the VTP transparent mode or trunks that have VLANs cleared will have different VLAN databases. Comparing the VLAN databases of the two switches connected by a trunk is another way to verify that the trunk is working. When the trunk becomes active, VTP advertisements will be sent and received. Three types of VTP advertisements occur on the trunk:
You can observe VTP advertisements with the show vtp status command as demonstrated in Example 2-22. This should be used as another indicator that the trunk line is functioning properly. Example 2-22 Observing VTP Advertisements with the show vtp status Command Switch (enable) show vtp status VTP statistics: summary advts received 66 subset advts received 4 request advts received 1 summary advts transmitted 16 subset advts transmitted 13 request advts transmitted 0 No of config revision errors 0 No of config digest errors 0 VTP pruning statistics: Trunk Join Transmitted Join Received Summary advts received from non-pruning-capable device -------- ---------------- ------------- --------------------------- 2/1 1047 1045 0 2/2 1041 1046 0 2/20 631 635 0 Switch (enable) The show trunk command also lists the VLANs that are prune-eligible. Do not confuse prune-eligible VLANs with VLAN propagation. Prune-eligible means that unnecessary broadcast and user data, for a specific VLAN, will not be forwarded over trunk lines to switches that do not have an active port in that particular VLAN. By default, all VLAN information and Spanning Tree frames for each VLAN are advertised out all trunking interfaces. VLANs and STP can be removed from a trunk only by using the clear trunk command. We will discuss these functions more in the upcoming section "Step 4: Controlling STP and VLAN Propagation." NOTE Recall from the previous section that VTP information is communicated only from a VTP server to a VTP client if the VTP server revision number is greater than the client's. Extreme caution should be used whenever changing a VTP server or VTP client in a "synchronized" network. When the network is synchronized, all VTP revision numbers will match. When you make a change to VTP or the VLAN, the revision number will increment, so the switch that you are changing has a chance of becoming the device with the highest VTP revision number. This, in turn , could synchronize the whole network to this switch's VLAN database that you are modifying. Step 3: Configuring VLAN Trunks on Catalyst 2900XL/3500G SwitchesConfiguring trunks on this series of Catalyst is a two-step process just like on the Catalyst 5500 family:
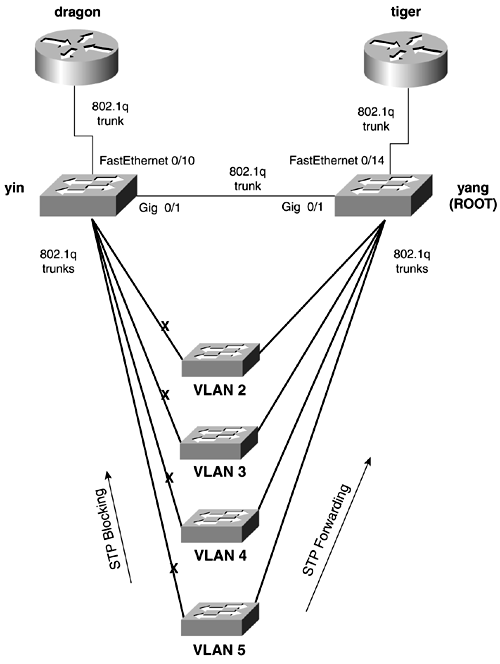
By default, all ports are set to a nontrunking mode, so the first step is to configure the port as a trunk. The second step calls for you to set the encapsulation of the trunk. These steps are accomplished with the following commands from the interface configuration mode: (config-if)# switchport mode trunk (config-if)# switchport trunk encapsulation [ isl dot1q ] Example 2-23 demonstrates the configuration of an ISL trunk. Example 2-23 Configuring an ISL TrunkSwitch# conf t Enter configuration commands, one per line. End with CNTL/Z. Switch(config)# int fastEthernet 0/19 Switch(config-if)# switchport mode trunk Switch(config-if)# switchport trunk encapsulation isl Switch(config-if)# ^Z To verify that the trunk is working, be sure to check the status of both sides of link, as mentioned previously. The output of the show interface interface_name switchport command presents a general status of the trunk. The information presented here is similar to the information for the show trunk command on the Catalyst 4000/5500/6500 switch. This command shows the status of the trunk and the encapsulation. VLAN information such as the default VLAN, the active VLANs on the links, and any prune-eligible VLANs also is listed. Example 2-24 lists the output of the show interface interface_name switchport command. Example 2-24 Status of a Trunk Line sw15# show int fastEthernet 0/19 switchport Name: Fa0/19 Switchport: Enabled Administrative mode: trunk Operational Mode: trunk Administrative Trunking Encapsulation: isl Operational Trunking Encapsulation: isl Negotiation of Trunking: Disabled Access Mode VLAN: 0 ((Inactive)) Trunking Native Mode VLAN: 1 (default) Trunking VLANs Enabled: ALL Trunking VLANs Active: 1-5,33,100,200,800 Pruning VLANs Enabled: 2-1001 Priority for untagged frames: 0 Override vlan tag priority: FALSE Voice VLAN: none Appliance trust: none sw15# Along with the trunk lines, the VTP domain counters should be examined using the show vtp counters command (see Example 2-25). This will help present a clearer picture on whether the trunk line is operational. Example 2-25 Determining the Status of a Trunk by Viewing VTP Counters sw15# show vtp counters VTP statistics: Summary advertisements received : 10 Subset advertisements received : 2 Request advertisements received : 0 Summary advertisements transmitted : 55 Subset advertisements transmitted : 2 Request advertisements transmitted : 12 Number of config revision errors : 0 Number of config digest errors : 0 Number of V1 summary errors : 0 VTP pruning statistics: Trunk Join Transmitted Join Received Summary advts received from non-pruning-capable device ---------------- ---------------- ---------------- --------------------------- Fa0/19 801 775 0 Fa0/20 1173 1164 0 Fa0/21 In 802.1q networks, it is critical to ensure that the default VLAN is the same throughout the entire VTP domain. This is because 802.1q uses MST, and MST makes the entire VTP domain appear as a single-bridged domain to all third-party 802.1q switches. Cisco ensures compatibility with MST domains by implementing PVST+ along with MST. This is an extended version of Per VLAN Spanning Tree (PVST+) that provides seamless transparent integration for 802.1q networks. MST runs on the default VLAN, so it is important to have the same default VLAN throughout the entire internetwork. The default VLAN is 1. To change the default VLAN, use the following interface command on the trunk: (config-if)# switchport trunk native vlan vlan-id To change the native VLAN on a Catalyst 4000/5500/6500 series switches, create a VLAN on the same port that the 802.1 trunk is on. Step 4: Controlling STP and VLAN PropagationThe final step for configuring Catalyst Ethernet switches is optional but can be extremely important in large networks. Cisco implements a couple of features that allow for switches to be plug-and-play in small networks, but these can have the negative effect of generating significant amounts of traffic in large networks. PVST, coupled with the default setting that every VLAN is communicated on every trunk port, can cause the edge switches to be overrun processing Spanning Tree requests and other broadcasts. For example, in the network in Figure 2-10, the crane switch has only a single VLAN, VLAN 2. But because this switch is in the same VTP domain as the other switches, it will participate in Spanning Tree for VLAN 3 and VLAN 4. There is no need for this switch to waste resources processing Spanning Tree requests for a VLAN that is not even on the switch. The larger and more redundant the network is, the worse the problem gets. For example, if you had 50 edge switches, there would be 50 separate Spanning Tree topologies on one trunk for one switch! And all of this happens before any user traffic can use the switch. Figure 2-10. VLAN Trunking and STP It is a common misconception that VLAN pruning will solve STP issues. But VLAN pruning affects only user traffic specifically broadcast, multicast, and flooded unicast traffic. Basically, STP constructs the path that data can flow on, and pruning controls the "broadcast" data that flows on that path. Cisco offers two effective ways for dealing with excessive broadcasts and STP:
In Figure 2-10, VLAN 2 is present on the crane, yin, and yang switches but not on the mantis switch. If VTP pruning is enabled for VLAN 2, the mantis switch will not receive broadcast, multicast, and flooded unicast traffic for VLAN 2. Likewise, the crane switch will not receive the flooded traffic from VLAN 3 and VLAN 4. The clearing trunks need to be performed on the " core " switches, or the VTP servers. All VLANs should be cleared, except the ones that exist on the downstream switch. Newer versions of Catalyst software allow for the clearing of VLAN 1. However, most switches still will not allow you to clear VLAN 1. To clear VLANs from trunks on the Catalyst 4000/5500/6500 family of switches, use the following command: Switch (enable) clear trunk [ mod_num/port_num ] vlans_2-1001 Multiple VLANs can be cleared using a comma as a separator and a hyphen for a range of inclusive VLANs. For example, to clear VLAN 3, VLAN 5, and VLANs 10 to 150, you would use the following command: Switch (enable) clear trunk 2/1 2,5 10-150 To clear trunks from VLANs on the Catalyst 2900XL/3500G family of switches, use the following interface command: Switch(config-if)# switchport trunk allowed vlan [add all except remove] vlans_2-1001
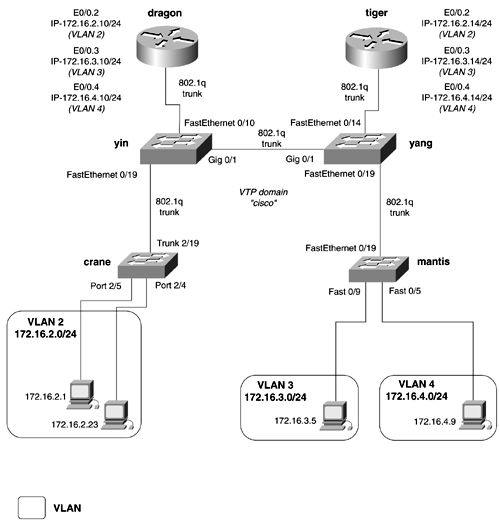
For example, to clear VLAN 3 through VLAN 6, you would use the following command: Switch(config-if)# switchport trunk allowed vlan remove 3-6 Figure 2-11 shows the same network as Figure 2-10, with updated interfaces names. In this example, on the yin switch, all VLANs except 1 and 2 on the trunk to the crane switch will be cleared. Before clearing the trunk, examine Spanning Tree for the various VLANs on the yin switch. You will notice that Spanning Tree for all the VLANs is running on all trunks. Example 2-26 lists the output of the show spanning-tree command for VLAN 3. This command is key to helping you understand and control Spanning Tree in switched networks. In the next section, we discuss this command in more detail. Notice that in Example 2-26, VLAN 3 is running on the trunk to the dragon router, the yang switch, and the crane switch. Figure 2-11. VLAN Trunking and STP Example 2-26 Spanning Tree Is Forwarding on All Trunksyin# show spanning-tree vlan 3 Spanning tree 3 is executing the IEEE compatible Spanning Tree protocol Bridge Identifier has priority 32768, address 0004.275e.f5c2 Configured hello time 2, max age 20, forward delay 15 Current root has priority 32768, address 0004.275e.f0c2 Root port is 67, cost of root path is 4 Topology change flag not set, detected flag not set, changes 1 Times: hold 1, topology change 35, notification 2 hello 2, max age 20, forward delay 15 Timers: hello 0, topology change 0, notification 0 Interface Fa0/10 (port 23) in Spanning tree 3 is FORWARDING Port path cost 19, Port priority 128 Designated root has priority 32768, address 0004.275e.f0c2 Designated bridge has priority 32768, address 0004.275e.f5c2 Designated port is 23, path cost 4 Timers: message age 0, forward delay 0, hold 0 BPDU: sent 3766, received 0 Interface Fa0/19 (port 33) in Spanning tree 3 is FORWARDING In this particular example, the yin switch is a Catalyst 3500G series switch. Therefore, to clear the trunk, you should use the switchport command. Example 2-27 demonstrates the clearing of VLANs 3 to 1001 on the trunk between the yin and crane switches. The second portion of the example shows the Spanning Tree for VLAN 3. Notice that VLAN 3 is no longer forwarding out the trunk Fa0/19, the trunk line to the crane switch. Example 2-27 Clearing a Trunk of VLANsyin(config)# int fastEthernet 0/19 yin(config-if)# switchport trunk allowed vlan remove 3-1001 yin(config-if)# ^Z yin# show spanning-tree vlan 3 Spanning tree 3 is executing the IEEE compatible Spanning Tree protocol Bridge Identifier has priority 32768, address 0004.275e.f5c2 Configured hello time 2, max age 20, forward delay 15 Current root has priority 32768, address 0004.275e.f0c2 Root port is 67, cost of root path is 4 Topology change flag set, detected flag not set, changes 4 Times: hold 1, topology change 35, notification 2 hello 2, max age 20, forward delay 15 Timers: hello 0, topology change 0, notification 0 Interface Fa0/10 (port 23) in Spanning tree 3 is FORWARDING Port path cost 19, Port priority 128 Designated root has priority 32768, address 0004.275e.f0c2 Designated bridge has priority 32768, address 0004.275e.f5c2 Designated port is 23, path cost 4 Timers: message age 0, forward delay 0, hold 0 BPDU: sent 4589, received 0 Interface Gi0/1 (port 67) in Spanning tree 3 is FORWARDING Port path cost 4, Port priority 128 Designated root has priority 32768, address 0004.275e.f0c2 Designated bridge has priority 32768, address 0004.275e.f0c2 Designated port is 67, path cost 0 Timers: message age 3, forward delay 0, hold 0 BPDU: sent 14, received 4593 yin# The command show interface interface_name switchport allowed-vlan also shows what VLANs are carried on the trunk. The show trunk command is the Catalyst 4000/5500/6500 equivalent of the command. Example 2-28 lists the output of the switchport command, showing that VLANs 3 to 1001 no longer appear on the trunk. VLANs 1002 to 1005 are not Ethernet VLANs and cannot be cleared on this trunk. Example 2-28 Showing the Allowed VLANs on a Trunk yin# show int fastEthernet 0/19 switchport allowed-vlan "1,2,1002-1005" yin# Clearing trunk lines is one way to control STP, but for the switches that need redundancy, additional methods to control STP must be used. NOTE Monitoring Switch Ports with a Network Analyzers Switches do not forward all frames to every port in a VLAN. Recall that the switch is selective on what ports it forwards frames to, even when they are in the same VLAN. Because of this, you must enter a special command when monitoring a switch port with a network analyzer: set span { mod/src_ports } { dest_mod/dest_port_of_monitor } [ rx tx both ] Without this command, the network analyzer will not properly capture information on the VLAN you're monitoring. Configuring STP Root PlacementRedundant switched networks do not perform any type of automatic load balancing. Because the STP forwarding/blocking decision is based in part on a static MAC addresses, all traffic tends to follow the same direction and the same path for all VLANs. This leads to some links being overutilized, while others remain idle. Figure 2-12 illustrates a network that has all converged on a single switch. The yang switch is the root of STP for VLANs 2, 3, 4, and 5. Figure 2-12. STP Root If you want to load-balance between the yin and yang switches, or if you were using HSRP on the dragon and tiger routers, you would want to control STP root placement. For example, if the dragon router was the HSRP primary for VLAN 2, you would want traffic to go through the yin switch instead of the yang switch. To control and distribute traffic in a switched network, the root for STP must be manually configured. There are multiple ways to configure the root of Spanning Tree for Catalyst switches. The methods that you use to set the root depend mostly on the environment that you trying to control. When setting the root bridge, you essentially are telling STP what ports to put into blocking and what ports to put into forwarding mode. Because STP is run on a per-VLAN basis (PVST), each VLAN can have a different root bridge. This enables you to send traffic over links that normally would not get used. In Figure 2-13, the yin switch is set to be the STP root for VLAN 4 and VLAN 5, while the yang switch is the STP root for VLAN 2 and VLAN 3. This causes the edge switches to balance their load more evenly over the trunks lines. VLANs 4 and 5 will forward to yin, while VLANs 2, 3 will forward to yang. Figure 2-13. STP Root Before we can further discuss how to set STP root, you must learn how to determine where the root bridge is located. The key command for this on the Catalyst 4000/5500/6500 is the show spantree vlan command. We prefer to use this command because Spanning Tree operates on a per-VLAN basis. Example 2-29 lists the output of the show spantree command. Example 2-29 Viewing Spanning Tree for VLAN 2 crane (enable) show spantree 2 VLAN 2 Spanning tree enabled Spanning tree type ieee Designated Root 00-30-19-76-4d-01 Designated Root Priority 88 Designated Root Cost 0 Designated Root Port 1/0 Root Max Age 20 sec Hello Time 2 sec Forward Delay 15 sec Bridge ID MAC ADDR 00-30-19-76-4d-01 Bridge ID Priority 88 Bridge Max Age 20 sec Hello Time 2 sec Forward Delay 15 sec Port Vlan Port-State Cost Priority Fast-Start Group-Method --------- ---- ------------- ----- -------- ---------- ------------ 2/4 2 forwarding 100 32 disabled 2/19 2 forwarding 19 32 disabled 2/20 2 forwarding 19 32 disabled crane (enable) Every bit of information provided by this command is useful. The fields are defined as follows (refer to the previous section of STP for more details):
The final columns show each port that is participating in STP within the VLAN. They also list whether the port is forwarding or blocking, as well as the cost and service priority of the port. Do not confuse this priority with the Spanning Tree bridge priority. The values of the port priority ranges from 0 to 63 (high to low), with 32 as the default. The command to view Spanning Tree on a Catalyst 2900XL/3500G series switches is as follows: Switch# show spanning-tree vlan vlan The previous example (Example 2-26) demonstrated the output of this command. Another command that is useful in presenting a general operational picture of Spanning Tree is the show spantree summary command. This command provides an overview of the VLANs and tells how many ports and the state of the port. Example 2-30 lists the output for this command. Example 2-30 Viewing Spanning Tree for VLAN 2 Switch (enable) show spantree summary Summary of connected spanning tree ports by vlan Uplinkfast disabled for bridge. Backbonefast disabled for bridge. Vlan Blocking Listening Learning Forwarding STP Active ----- -------- --------- -------- ---------- ---------- 1 1 0 0 1 2 2 0 0 0 3 3 3 0 0 0 2 2 4 0 0 0 2 2 100 0 0 0 2 2 200 0 0 0 2 2 300 0 0 0 2 2 Blocking Listening Learning Forwarding STP Active ----- -------- --------- -------- ---------- ---------- Total 1 0 0 14 15 Switch (enable) To properly set the STP root, it helps to recall the four-step decision process that STP follows when determining root and which ports will forward and which ones will block. The four-step decision process is based on the following:
On the Catalyst 4000/5500/6500 series switches, four primary ways exist to control STP root selection:
The sections that follow examine the complete syntax and description for what each of these commands do. set spantree root CommandThe syntax for this command is as follows: set spantree root [ secondary ] [ vlan_list ] [ dia network_diameter ] [ hello hello_time ] This command is a powerful macro that issues Spanning Tree commands to adjust the Spanning Tree timers until the local bridge/switch is elected root. It does this only once upon keying in the command. If other switches are added to the network, this command should be performed again. The Catalyst accomplishes this by examining the BDPUs of the existing root bridge. If the value of the priority is greater then 8192, the macro sets the local bridge priority to 8192. If the BPDU contains a priority less then 8192, the macro sets the local bridge priority to 1 less than that value. For example, the root bridge sends a configuration BDPU that is received by the new switch. The new switch, with the macro enabled, examines the priority of the BPDU and finds the value equal to 89. The macro then adjusts the local bridge priority to 88, thereby becoming elected as the new root bridge. The secondary option sets the bridge's local priority to 16,384. Recall that the default bridge priority is 32,768, so the value of 16,384 is a reasonable choice for the backup bridge. The Diameter and Hello timers are used to adjust the hello and max age parameters of STP. Care should be used when adjusting any timers other then the bridge priority. This command exists only on the Catalyst 4000/5500/6500 series switches. set spantree priority CommandThe syntax for this command is as follows: set spantree priority [ bridge-priority ] [vlans] This command is a direct way to influence the bridge priority. Because the priority is the single most important factor in root selection, this command forces the election of root cleanly. The values of the bridge priority range from 0 to 65535. Valid values are 0, 4096, 8192, 12288, 16384, 20480, 24576, 28672, 32768 (default), 36864, 40960, 45056, 49152, 53248, 57344, and 61440, with 0 indicating high priority and 61440 indicating low priority. set spantree portvlancost CommandThe syntax for this command is as follows: set spantree portvlancost mod_num/port_num [ cost 1-65535 ] [ vlans ] Use this command to influence the cost that Spanning Tree reports to downstream neighbors. This is the cost that STP uses when adding all the possible paths to root when determining which one is the least-cost path. Remember, a lower-cost path is more preferable. See Table 2-5 for a complete list of the default link cost values. set spantree portvlanpri CommandThe syntax for this command is as follows: set spantree portvlanpri mod_num/port_num [ priority 0-63 ] [ vlans ] This command sets the port priority that the port will send to its downstream neighbors. Because the command can be performed on per-VLAN per port level, it can be useful. A primary use of this command is when switches want to load-share over multiple trunks among them. The values of the port priority range from 0 to 63, with 32 as the default, where 0 is a high priority and 63 is a low priority. Table 2-14 lists the commands along with where in the STP decision process the command is exerting influence. The higher up in the chart it is, the more powerful the command is in controlling root selection. Table 2-14. Ethernet DTP Configuration Outcomes
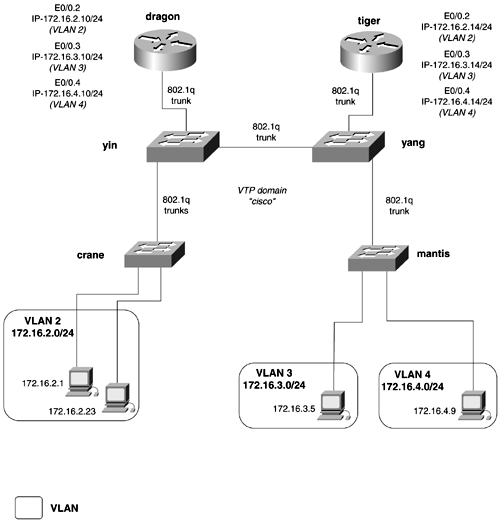
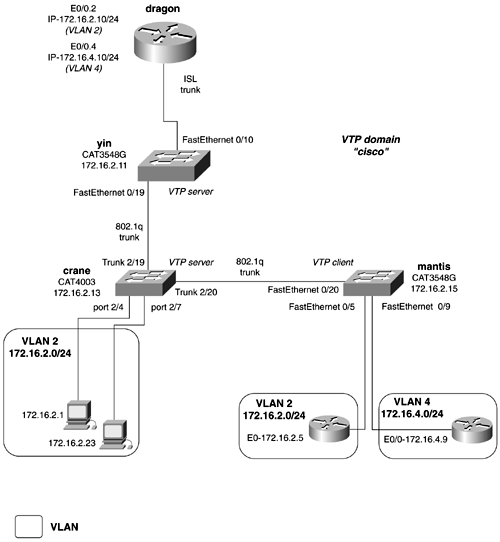
Practical Example: Configuring a Routed and Switched NetworkLet's apply a couple of these concepts to a practical example. Figure 2-14 shows a fairly common network that consists of switches and routers. There are two active VLANs on the network, VLAN2 and VLAN4. VLAN2 is the management VLAN and has some user traffic in it. It has the IP subnet of 172.16.2.0/24. VLAN4 is strictly a user VLAN; it has the IP subnet of 172.16.4.0/24. The dragon router routes between the VLANs and serve as the default gateway for the switches. In this example, you will configure the following: Figure 2-14. Switched and Routed Network
This network has two kinds of switches in it, so we can demonstrate the commands used in both families of switches. Beginning with the yin switch, you need to configure an IP address and a default gateway, VLAN trunks, along with VLANs 2 and 4. Recall the four-step process to configure Ethernet switches:
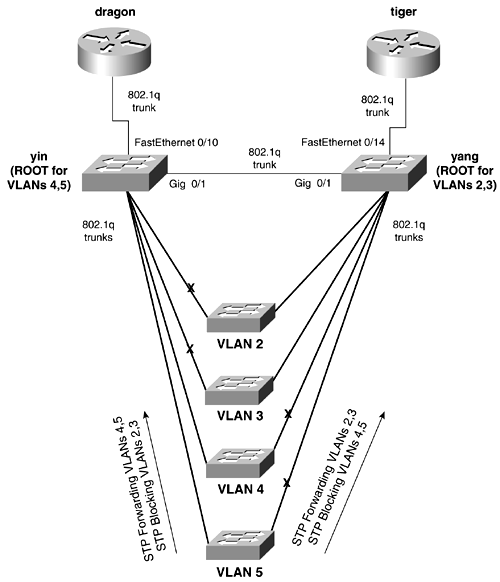
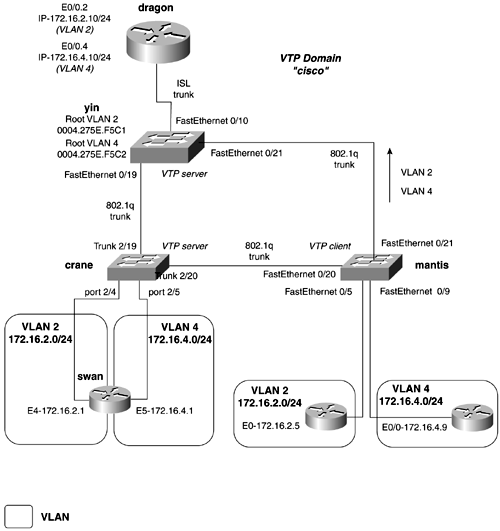
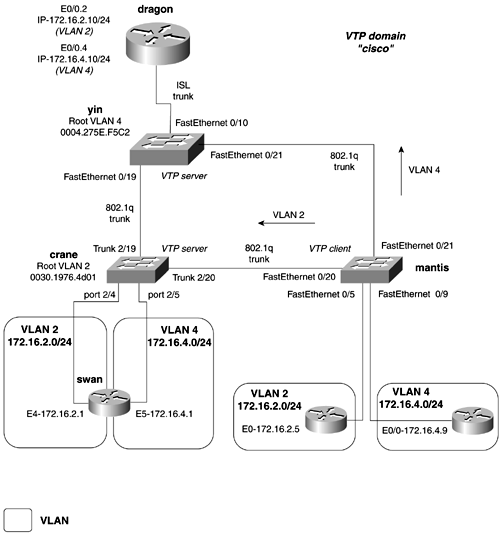
To configure the management VLAN as VLAN 2, you need to define a virtual interface called VLAN 2 on the yin and mantis routers. Assign the management IP address to this interface, and activate it by shutting down the virtual interface vlan 1. Example 2-31 illustrates the first step of the configuration on the yin router. Example 2-31 Configuring Basic ManagementSwitch# conf t Enter configuration commands, one per line. End with CNTL/Z. Switch(config)# hostname yin The management portion of the configuration on the mantis switch will resemble that of Example 2-31. Example 2-32 illustrates how to configure basic management on the crane switch, which is a Catalyst 4003. Because this series switch requires VLANs to be defined before the management VLAN can be moved off VLAN 1, you also will proceed to Step 2. Step 2 involves defining VLANs and the VTP domain. Example 2-32 Configuring Basic Management and the Default VLANConsole> (enable) set prompt crane Step 2 requires you to configure the VTP domaincisco, in this exampleand define VLANs on the VTP servers. The mantis switch is the only VTP client, so you can begin with that switch. Example 2-33 demonstrates the configuration of VTP domain and shows how to change the VTP mode to client on the mantis switch. Example 2-33 Configuring VTP Domain and VTP Clientmantis# vlan database After the VTP domain is created, switch ports can be assigned to VLANs. Example 2-34 illustrates the configuration of the mantis switch, assigning user ports to VLAN 2 and VLAN 4. Example 2-34 Assigning Ports to VLAN on the mantis Switchmantis# conf t Enter configuration commands, one per line. End with CNTL/Z. mantis(config)# interface fastEthernet 0/9 mantis(config-if)# switchport mode access Likewise, you must assign the ports 2/4 and 2/7 to VLAN 2 on the crane switch. Example 2-35 demonstrates this type on configuration. Example 2-35 Assigning Ports to VLAN on the crane Switch crane (enable) set vlan 2 2/4,2/7 VLAN 2 modified. VLAN 1 modified. VLAN Mod/Ports ---- ----------------------- 2 2/4,2/7,2/19-20 crane (enable) 2001 Jun 26 21:15:08 %PAGP-5-PORTFROMSTP:Port 2/4 left bridge por t 2/4 Example 2-36 shows the configuration of the VTP domain and VLANs on the crane switch, while the second half of the example demonstrates the same configuration on the yin switch. Example 2-36 Configuring VTP Domains and VLANscrane (enable) set vlan 4 yin(vlan)# vtp domain cisco Changing VTP domain name from Null to cisco yin(vlan)# vlan 2 name management VLAN 2 added: Name: management yin(vlan)# yin(vlan)# vlan 4 VLAN 4 added: Name: VLAN0004 yin(vlan)# The third step calls for you to configure VLAN trunks between the switches. As we mentioned previously, configuring static trunks is a lot easier and quicker than trying to memorize the huge autonegotiation table. Example 2-37 demonstrates the configuration of an ISL and 802.1q trunk on the yin switch. Example 2-37 Configuring an ISL and 802.1q Trunkyin(config)# interface fast 0/10 yin(config-if)# switchport mode trunk Example 2-38 illustrates the configuration of the trunks on the crane switch. Example 2-38 Configuring 802.1q Trunkscrane (enable) set trunk 2/19 on After the trunks are configured, you can check the status of the VTP domain on the VTP client switch, mantis. Example 2-39 illustrates that the VTP information is being communicated across the trunks. The show vlan command displays the new VLANs that the switch has learned. Example 2-39 Status of the VTP Domain on the mantis Switchmantis# show vtp status VTP Version : 2 Configuration Revision : 7 Maximum VLANs supported locally : 254 Number of existing VLANs : 7 VTP Operating Mode : Client VTP Domain Name : cisco VTP Pruning Mode : Disabled VTP V2 Mode : Disabled VTP Traps Generation : Disabled MD5 digest : 0x51 0x0C 0x00 0x9A 0x0B 0x13 0xE3 0xBA Configuration last modified by 172.16.2.13 at 6-26-01 20:39:23 Configuring a Trunk on a RouterTo route between VLANs, you need to have a router interface in each VLAN. Because solutions like this do not scale well because of the number of physical interfaces needed on large networks, you can configure an ISL or 802.1q trunk on the router. Cisco supports VLAN trunking on Ethernet router interfaces operating at least 100 Mbps. Configuring a trunk is much like configuring a Frame Relay subinterface. For VLAN trunks, you must create a logical Ethernet subinterface for every VLAN that you want to route between. You also must assign an encapsulation type to that subinterface. Finally, to actually "route," you need to enable a routing protocol. The subinterface will be treated just like a physical interface by the routing protocol. The syntax to accomplish this is as follows: Router(config) interface FastEthernet0. x Router(config-if) encapsulation [ dot1Q [ native native_vlan_id isl ] [ vlan_id ] Continuing from the previous model, Example 2-40 illustrates the configuration of a VLAN trunk on the dragon router. Example 2-40 Status of the VTP Domain on the mantis Routerdragon(config)# int fastEthernet 0/0.2 dragon(config-subif)# encapsulation isl 2 When this stage is complete, full IP connectivity will be established throughout the domain. All switches, routers, and hosts will be capable of ping ing each other. Load Balancing Across TrunksIn the previous model, there were no redundant trunks, so Spanning Tree was really not an issue. But if the model is modified slightly, we can insert some Spanning Tree issues into the network. Figure 2-15 presents a new network model with some minor changes. Figure 2-15. Load Sharing in a Switched Network By adding another trunk line between the mantis and yin switches, a loop is created in the network. STP will now put some of the ports into blocking mode, to make the network loop-free . By also adding a two-port router, swan, with an interface in VLAN 2 and VLAN 4, we create a valid reason to want to load-share across this network. In a production environment, the swan router and the dragon router might be running HSRP between them. The results of how the network converges, or which paths go into forwarding and blocking, can be unpredictable. Most often, but not always, the traffic will tend to follow one path throughout the network. This leaves some links carrying all the traffic, while others are virtually unused. In Figure 2-15, we have configured another 802.1q between the yin and mantis switches, and added the router as denoted. If STP is observed for VLANs 1, 2, and 4 on the mantis switch, you can see that all the traffic is taking the new trunk, Fast 0/21, to root. The yin switch is root for all the VLANs in the VTP domain. Example 2-41 demonstrates the show spanning-tree vlan command on the mantis switch. Example 2-41 show spanning-tree Command Output on the mantis Switchmantis# show spanning-tree vlan 2 Spanning tree 2 is executing the IEEE compatible Spanning Tree protocol Bridge Identifier has priority 32768, address 00d0.976c.b781 Configured hello time 2, max age 20, forward delay 15 Current root has priority 32768, address 0004.275e.f5c1 In this model, you want to load-balance the VLANs over the trunk lines from the mantis switch. All traffic from VLAN 2 will go to the swan router, while all traffic for VLAN 4 defaults to the dragon router. To accomplish this, you need to set the root for VLAN 2 to be the crane switch, while the root for VLAN 4 should be the yin switch. By using the set root macro command, you can set the root for VLAN 2 on the crane switch. Example 2-42 demonstrates the setting for the root for VLAN 2 on the crane switch. The command is preceded by the show spant 2 command, displaying the old and new root bridges for VLAN 2. Example 2-42 Setting Root for VLAN 2crane (enable) show spant 2 VLAN 2 Spanning tree enabled Spanning tree type ieee Designated Root 00-04-27-5e-f5-c1 To verify the configuration, also check STP on the mantis switch, as listed in Example 2-43. The mantis switch now shows the root bridge for vlan 2 as 0030.1976.4d01, which is the crane switch. Interface fast 0/20 is now forwarding for VLAN 2, and interface fast 0/21 has been put in blocking mode. VLAN 4 continues to have the yin switch as its root bridge. Example 2-43 STP Load Balancingmantis# show spanning-tree vlan 2 Spanning tree 2 is executing the IEEE compatible Spanning Tree protocol Bridge Identifier has priority 32768, address 00d0.976c.b781 Configured hello time 2, max age 20, forward delay 15 Current root has priority 8192, address 0030.1976.4d01 Figure 2-16 now shows how the network is handling and forwarding VLANs. Figure 2-16. Load Balancing over Trunks To enforce consistent Spanning Tree selection throughout the network, you also should set the priority for VLAN 4 on the yin switch. This can be done using the priority command, as demonstrated in Example 2-44. Example 2-44 Setting Root on a Catalyst 2900XL/3500G Switch yin(config)# spanning-tree vlan 4 priority 100 To verify the change, view STP for VLAN 4 on the mantis switch, as in Example 2-45. Example 2-45 Verifying the Priority of 100 for VLAN 4 mantis# show spanning-tree vlan 4 Spanning tree 4 is executing the IEEE compatible Spanning Tree protocol Bridge Identifier has priority 32768, address 00d0.976c.b782 Configured hello time 2, max age 20, forward delay 15 Current root has priority 100, address 0004.275e.f5c2 Root port is 35, cost of root path is 19 Topology change flag not set, detected flag not set, changes 5 Times: hold 1, topology change 35, notification 2 hello 2, max age 20, forward delay 15 Timers: hello 0, topology change 0, notification 0 The world of Ethernet switching is growing at a tremendous pace. There are many more interesting and useful technologies that we simply did not have the time to discuss. We highly recommend reading Kennedy Clark and Kevin Hamilton's book Cisco LAN Switching , which is loaded with information on LAN switching for extended reference. Some topics that you might want to pursue on your own that we did not cover in this book are listed here:
|

| < Free Open Study > |
EAN: 2147483647
Pages: 283