OSPF Authentication
| < Free Open Study > |
Configuring OSPFUnlike other routing protocols, OSPF requires a certain amount of predesign before implementation. Careful consideration must be applied to the OSPF network as a whole, not just a single area. The following list contains some design considerations that you should take into account when deploying OSPF:
With these design considerations in mind, you will use the following seven-step task list to configure OSPF:
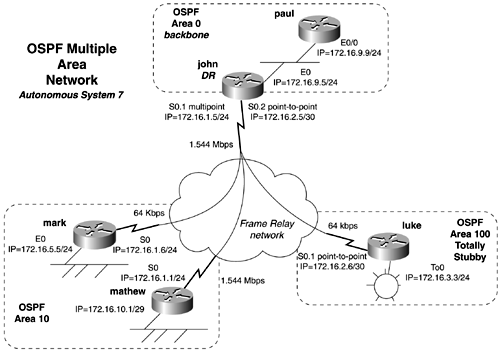
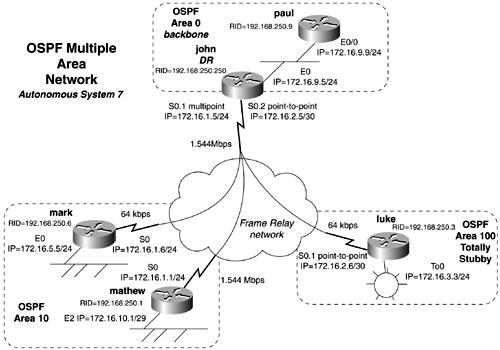
Practical Example: Configuring Multiple OSPF Area Types over Frame RelayTo better understand this rather lengthy process, let's apply it to an practical example. Figure 12-7 illustrates an OSPF network that is in Step 1 of the configuration process. This model of OSPF has a Frame Relay multipoint and point-to-point network. You will be configuring a totally stubby area, Area 100, for the luke router. The paul router will reside in Area 0, the backbone area, along with the Ethernet interface of the router john. The mark and mathew routers will be in OSPF Area 10. We have marked john to be the DR for the WAN and LAN networks. Figure 12-7. OSPF Multiple-Area Network Step 2 calls for defining or configuring RIDs. In this particular network, only the mathew router is running a version of Cisco IOS Software prior to Release 12.0, so it will have to use a loopback address to configure a RID. Recall that OSPF will use the highest loopback address for a RID; this is why this step precedes enabling OSPF. On the mathew router, create a static RID with the following commands: mathew(config)# int loop 0 mathew(config-if)# ip address 172.16.250.1 255.255.255.0 Figure 12-8 illustrates the RIDs used in this model. It should be noted that this step is optional but recommended for stability reasons. Figure 12-8. OSPF Static RIDs TIP When configuring OSPF in a lab scenario, we assign our RIDs so that the last octet of the RID is the router number. For example, if you have the routers R1, R2 and R3, you would assign the RIDs to be 192.168.250.1, 192.168.250.2, and 192.168.250.3, respectively. The DR in the lab has an unusually high RID, 250, so it stands out from the rest. When viewing the OSPF database, having RIDs that somewhat "self-document" the network can be a great benefit. Step 3 involves enabling the OSPF process and configuring RIDs. The OSPF autonomous system is 7, so you will use 7 as the OSPF process ID. During this step, you also will configure the RIDs with the router command router-id ip_address. Example 12-3 demonstrates this step on the mark and john routers. Example 12-3 Enabling OSPF on mark and johnmark(config)# router ospf 7 mark(config-router)# router-id 192.168.250.6 john(config)# router ospf 7 john(config-router)# router-id 192.168.250.250 After the OSPF process is enabled on all the routers, Step 4 requires that you configure the interfaces or networks participating in OSPF. Using the router command network ip_address wildcard_mask area x, you define the networks to run OSPF and also specify the area that those networks will reside in. Example 12-4 demonstrates the configuration of network statements on the router john. Example 12-4 Configuring OSPF on the Router johnjohn(config)# router ospf 7 john(config-router)# network 172.16.9.0 0.0.0.255 area 0 john(config-router)# network 172.16.1.0 0.0.0.255 area 10 john(config-router)# network 172.16.2.4 0.0.0.3 area 100 You can configure the network statements on the remaining routers in many ways. We personally prefer limiting the network statement with a specific wildcard mask to one network per statement, or to a single interface with the 0.0.0.0 as the wildcard mask. In large networks, this type of configuration might be less desirable, and you might want to use a single network statement to group multiple interfaces into the same OSPF area. However, if you add new interfaces and they must go into different areas, you will have to remove the network statement and add it again for the new network statement to take effect. At this point during the configuration, OSPF builds adjacencies on the Frame Relay point-to-point network between john and luke. Another adjacency is built on the Ethernet network between john and paul. OSPF, however, will not be capable of building an adjacency on the Frame Relay multipoint network between john, mark, and mathew without additional configuration. You can verify adjacency formation by performing a show ip ospf neighbor command on the router john, as in Example 12-5. The show and debug commands for OSPF are discussed in the next section. Example 12-5 show ip ospf neighbor Performed on the Router john john# show ip ospf neighbor Neighbor ID Pri State Dead Time Address Interface 192.168.250.9 1 FULL/BDR 00:00:34 172.16.9.9 Ethernet0 192.168.250.3 1 FULL/ - 00:00:38 172.16.2.6 Serial0.2 john# Notice how clearly the router IDs show up in the previous command. This can significantly help troubleshooting OSPF on any size network. Step 5 calls for the configuration of additional neighbor support to remedy the adjacency situation between john, mark, and mathew. Because you took the extra time to hard-code RIDs on all the routers, the john router will be DR for the connected LAN and WAN interfaces. You will take this a step further when defining neighbor statements. For the router john to build an adjacency with mark and mathew, you will need to add neighbor statements to all the routers. By setting the OSPF priority to 0 on the interface, that router will never participate in DR/BDR election. On multipoint networks, only the routers that have PVCs to all remote locations should be eligible for DR/BDR election. The default priority of 1 will be sufficient on the neighbor statements of the mark and mathew routers that point toward john. Example 12-6 illustrates the relevant portions of the OSPF configuration, to this point, on john, mark, and mathew, respectively. Example 12-6 OSPF Configuration of john, mark, and mathew Routershostname john ! interface Serial0.1 multipoint ip address 172.16.1.5 255.255.255.0 no ip directed-broadcast ip ospf priority 255 By adding the neighbor statements, OSPF now builds adjacencies over the Frame Relay multipoint network. This can be verified by performing the show ip ospf neighbor command on the router john. Example 12-7 demonstrates this command on john. Example 12-7 show ip ospf neighbor Command Output for Router john john# show ip ospf neighbor Neighbor ID Pri State Dead Time Address Interface 192.168.250.9 1 FULL/BDR 00:00:32 172.16.9.9 Ethernet0 172.16.250.1 0 FULL/DROTHER 00:01:55 172.16.1.1 Serial0.1 192.168.250.6 0 FULL/DROTHER 00:01:46 172.16.1.6 Serial0.1 192.168.250.3 1 FULL/ - 00:00:37 172.16.2.6 Serial0.2 john# The mathew and mark routers will not become adjacent with each other because there is not a direct connection between them. Example 12-8 shows the active neighbor on the mathew router. The adjacency is in a FULL state, with john being the DR for the link. Example 12-8 show ip ospf neighbor Command Output for Router mathew mathew# show ip ospf neighbor Neighbor ID Pri State Dead Time Address Interface 192.168.250.250 255 FULL/DR 00:01:48 172.16.1.5 Serial0 mathew# You could accomplish this in other ways without using neighbor commands. Another way is to change the OSPF network type to either broadcast or point-to-multipoint. Technically, a point-to-multipoint would be a more accurate network type to use. Configuring the same network model, you will now use the network type of point-to-multipoint to create adjacencies between mathew, mark, and john. Example 12-9 lists the relevant configuration of the john and mathew routers, using the ip osfp network type command in place of neighbor statements. The configuration of mark would be identical to that of mathew. Example 12-9 Configuration of john and mark Using Network Typeshostname john ! interface Serial0 no ip address no ip directed-broadcast encapsulation frame-relay no ip mroute-cache ! interface Serial0.1 multipoint ip address 172.16.1.5 255.255.255.0 no ip directed-broadcast ip ospf network point-to-multipoint Example 12-10 lists how the neighbors look on the mathew and john routers. Example 12-10 OSPF Neighbors on mathew and johnmathew# show ip ospf neighbor Neighbor ID Pri State Dead Time Address Interface 192.168.250.250 1 FULL/ - 00:01:35 172.16.1.5 Serial0 mathew# ________________________________________________________________ john# show ip ospf neighbor Neighbor ID Pri State Dead Time Address Interface 192.168.250.9 1 FULL/BDR 00:00:36 172.16.9.9 Ethernet0 172.16.250.1 1 FULL/ - 00:01:58 172.16.1.1 Serial0.1 192.168.250.6 1 FULL/ - 00:01:58 172.16.1.6 Serial0.1 192.168.250.3 1 FULL/ - 00:00:38 172.16.2.6 Serial0.2 john# Steps 6 and 7 in the OSPF configuration process are optional; they involve configuring any OSPF area types and any other OSPF enhancements. In this model, you need only to configure one more step, and that is to configure the router luke to be in a totally stubby area. To configure a totally stubby area, the area needs to first be configured as a stub area, and then the argument no-summary must be used . The syntax will resemble the following: area 100 stub no-summary These commands should be added to the john and luke routers. Example 12-11 lists the output of the show ip ospf and show ip route command on the router luke. Example 12-11 Verifying the Totally Stubby Area on lukeluke# show ip ospf 7 Routing Process "ospf 7" with ID 192.168.250.3 Supports only single TOS(TOS0) routes Supports opaque LSA SPF schedule delay 5 secs, Hold time between two SPFs 10 secs Minimum LSA interval 5 secs. Minimum LSA arrival 1 secs Number of external LSA 0. Checksum Sum 0x0 Number of opaque AS LSA 0. Checksum Sum 0x0 Number of DCbitless external and opaque AS LSA 0 Number of DoNotAge external and opaque AS LSA 0 Number of areas in this router is 1. 0 normal 1 stub 0 nssa External flood list length 0 Area 100 Number of interfaces in this area is 2 It is a stub area, no summary LSA in this area Area has no authentication SPF algorithm executed 46 times Area ranges are Number of LSA 3. Checksum Sum 0x16F14 Number of opaque link LSA 0. Checksum Sum 0x0 Number of DCbitless LSA 0 Number of indication LSA 0 Number of DoNotAge LSA 0 Flood list length 0 luke# show ip route Codes: C - connected, S - static, I - IGRP, R - RIP, M - mobile, B - BGP D - EIGRP, EX - EIGRP external, O - OSPF, IA - OSPF inter area N1 - OSPF NSSA external type 1, N2 - OSPF NSSA external type 2 E1 - OSPF external type 1, E2 - OSPF external type 2, E - EGP i - IS-IS, L1 - IS-IS level-1, L2 - IS-IS level-2, ia - IS-IS inter area * - candidate default, U - per-user static route, o - ODR P - periodic downloaded static route Gateway of last resort is 172.16.2.5 to network 0.0.0.0 172.16.0.0/16 is variably subnetted, 2 subnets, 2 masks C 172.16.2.4/30 is directly connected, Serial0.1 C 172.16.3.0/24 is directly connected, TokenRing0 O*IA 0.0.0.0/0 [110/65] via 172.16.2.5, 00:02:23, Serial0.1 luke# Instead of a full routing table, the luke router will receive only a default route from john, as shown in Example 12-12. Example 12-12 shows the relevant portions of the configurations and the route tables used in this model. Example 12-12 Configurations and Route Table of john, mark, mathew, luke, and paul! hostname john ! interface Ethernet0 ip address 172.16.9.5 255.255.255.0 no ip directed-broadcast ! interface Serial0 no ip address no ip directed-broadcast encapsulation frame-relay no ip mroute-cache ! interface Serial0.1 multipoint ip address 172.16.1.5 255.255.255.0 no ip directed-broadcast ip ospf network point-to-multipoint frame-relay map ip 172.16.1.6 121 broadcast frame-relay map ip 172.16.1.1 111 broadcast ! interface Serial0.2 point-to-point ip address 172.16.2.5 255.255.255.252 no ip directed-broadcast frame-relay interface-dlci 150 ! router ospf 7 router-id 192.168.250.250 area 100 stub no-summary network 172.16.1.0 0.0.0.255 area 10 network 172.16.2.4 0.0.0.3 area 100 network 172.16.9.0 0.0.0.255 area 0 john# john# show ip route Codes: C - connected, S - static, I - IGRP, R - RIP, M - mobile, B - BGP D - EIGRP, EX - EIGRP external, O - OSPF, IA - OSPF inter area N1 - OSPF NSSA external type 1, N2 - OSPF NSSA external type 2 E1 - OSPF external type 1, E2 - OSPF external type 2, E - EGP i - IS-IS, L1 - IS-IS level-1, L2 - IS-IS level-2, ia - IS-IS inter area * - candidate default, U - per-user static route, o - ODR P - periodic downloaded static route Gateway of last resort is not set 172.16.0.0/16 is variably subnetted, 8 subnets, 4 masks C 172.16.9.0/24 is directly connected, Ethernet0 O 172.16.10.0/29 [110/74] via 172.16.1.1, 00:16:06, Serial0.1 O 172.16.5.0/24 [110/74] via 172.16.1.6, 00:16:06, Serial0.1 C 172.16.2.4/30 is directly connected, Serial0.2 O 172.16.1.6/32 [110/64] via 172.16.1.6, 00:16:06, Serial0.1 O 172.16.1.1/32 [110/64] via 172.16.1.1, 00:16:06, Serial0.1 C 172.16.1.0/24 is directly connected, Serial0.1 O 172.16.3.0/24 [110/70] via 172.16.2.6, 00:13:47, Serial0.2 john# ________________________________________________________________ ! hostname mark ! interface Ethernet0 ip address 172.16.5.5 255.255.255.0 no ip directed-broadcast ! interface Serial0 ip address 172.16.1.6 255.255.255.0 no ip directed-broadcast encapsulation frame-relay ip ospf network point-to-multipoint no ip mroute-cache frame-relay map ip 172.16.1.5 102 broadcast frame-relay map ip 172.16.1.1 102 broadcast ! router ospf 7 router-id 192.168.250.6 network 172.16.1.0 0.0.0.255 area 10 network 172.16.5.0 0.0.0.255 area 10 ! mark# mark# show ip route Codes: C - connected, S - static, I - IGRP, R - RIP, M - mobile, B - BGP D - EIGRP, EX - EIGRP external, O - OSPF, IA - OSPF inter area N1 - OSPF NSSA external type 1, N2 - OSPF NSSA external type 2 E1 - OSPF external type 1, E2 - OSPF external type 2, E - EGP i - IS-IS, L1 - IS-IS level-1, L2 - IS-IS level-2, ia - IS-IS inter area * - candidate default, U - per-user static route, o - ODR P - periodic downloaded static route Gateway of last resort is not set 172.16.0.0/16 is variably subnetted, 8 subnets, 4 masks O IA 172.16.9.0/24 [110/74] via 172.16.1.5, 00:29:30, Serial0 O 172.16.10.0/29 [110/138] via 172.16.1.5, 00:29:30, Serial0 O 172.16.1.5/32 [110/64] via 172.16.1.5, 00:29:30, Serial0 C 172.16.5.0/24 is directly connected, Ethernet0 O IA 172.16.2.4/30 [110/128] via 172.16.1.5, 00:29:30, Serial0 O 172.16.1.1/32 [110/128] via 172.16.1.5, 00:29:30, Serial0 C 172.16.1.0/24 is directly connected, Serial0 O IA 172.16.3.0/24 [110/134] via 172.16.1.5, 00:15:36, Serial0 mark# mark# ________________________________________________________________ ! hostname mathew ! interface Loopback0 ip address 172.16.250.1 255.255.255.0 ! interface Ethernet2 ip address 172.16.10.1 255.255.255.248 media-type 10BaseT ! interface Serial0 ip address 172.16.1.1 255.255.255.0 encapsulation frame-relay ip ospf network point-to-multipoint no ip mroute-cache frame-relay map ip 172.16.1.5 110 broadcast frame-relay map ip 172.16.1.6 110 broadcast ! router ospf 7 network 172.16.1.0 0.0.0.255 area 10 network 172.16.10.0 0.0.0.255 area 10 ! mathew# mathew# show ip route Codes: C - connected, S - static, I - IGRP, R - RIP, M - mobile, B - BGP D - EIGRP, EX - EIGRP external, O - OSPF, IA - OSPF inter area N1 - OSPF NSSA external type 1, N2 - OSPF NSSA external type 2 E1 - OSPF external type 1, E2 - OSPF external type 2, E - EGP i - IS-IS, L1 - IS-IS level-1, L2 - IS-IS level-2, * - candidate default U - per-user static route, o - ODR Gateway of last resort is not set 172.16.0.0/16 is variably subnetted, 9 subnets, 4 masks C 172.16.250.0/24 is directly connected, Loopback0 O IA 172.16.9.0/24 [110/74] via 172.16.1.5, 00:29:44, Serial0 C 172.16.10.0/29 is directly connected, Ethernet2 O 172.16.1.5/32 [110/64] via 172.16.1.5, 00:29:44, Serial0 O 172.16.5.0/24 [110/138] via 172.16.1.5, 00:29:44, Serial0 O IA 172.16.2.4/30 [110/128] via 172.16.1.5, 00:29:44, Serial0 O 172.16.1.6/32 [110/128] via 172.16.1.5, 00:29:44, Serial0 C 172.16.1.0/24 is directly connected, Serial0 O IA 172.16.3.0/24 [110/134] via 172.16.1.5, 00:15:54, Serial0 mathew# mathew# ________________________________________________________________ ! hostname luke ! interface Serial0 no ip address no ip directed-broadcast encapsulation frame-relay no ip mroute-cache frame-relay lmi-type cisco ! interface Serial0.1 point-to-point ip address 172.16.2.6 255.255.255.252 no ip directed-broadcast frame-relay interface-dlci 151 ! router ospf 7 router-id 192.168.250.3 area 100 stub no-summary network 172.16.2.4 0.0.0.3 area 100 network 172.16.3.0 0.0.0.255 area 100 ! luke# luke# show ip route Codes: C - connected, S - static, I - IGRP, R - RIP, M - mobile, B - BGP D - EIGRP, EX - EIGRP external, O - OSPF, IA - OSPF inter area N1 - OSPF NSSA external type 1, N2 - OSPF NSSA external type 2 E1 - OSPF external type 1, E2 - OSPF external type 2, E - EGP i - IS-IS, L1 - IS-IS level-1, L2 - IS-IS level-2, ia - IS-IS inter area * - candidate default, U - per-user static route, o - ODR P - periodic downloaded static route Gateway of last resort is 172.16.2.5 to network 0.0.0.0 172.16.0.0/16 is variably subnetted, 2 subnets, 2 masks C 172.16.2.4/30 is directly connected, Serial0.1 C 172.16.3.0/24 is directly connected, TokenRing0 O*IA 0.0.0.0/0 [110/65] via 172.16.2.5, 00:14:56, Serial0.1 luke# luke# ________________________________________________________________ ! hostname paul ! interface Ethernet0/0 ip address 172.16.9.9 255.255.255.0 no ip directed-broadcast ! router ospf 7 router-id 192.168.250.9 network 172.16.9.0 0.0.0.255 area 0 ! paul# paul# paul# show ip route Codes: C - connected, S - static, I - IGRP, R - RIP, M - mobile, B - BGP D - EIGRP, EX - EIGRP external, O - OSPF, IA - OSPF inter area N1 - OSPF NSSA external type 1, N2 - OSPF NSSA external type 2 E1 - OSPF external type 1, E2 - OSPF external type 2, E - EGP i - IS-IS, L1 - IS-IS level-1, L2 - IS-IS level-2, * - candidate default U - per-user static route, o - ODR Gateway of last resort is not set 172.16.0.0/16 is variably subnetted, 8 subnets, 4 masks C 172.16.9.0/24 is directly connected, Ethernet0/0 O IA 172.16.10.0/29 [110/84] via 172.16.9.5, 00:30:32, Ethernet0/0 O IA 172.16.1.5/32 [110/10] via 172.16.9.5, 00:31:27, Ethernet0/0 O IA 172.16.5.0/24 [110/84] via 172.16.9.5, 00:30:42, Ethernet0/0 O IA 172.16.2.4/30 [110/74] via 172.16.9.5, 00:31:27, Ethernet0/0 O IA 172.16.1.6/32 [110/74] via 172.16.9.5, 00:30:42, Ethernet0/0 O IA 172.16.1.1/32 [110/74] via 172.16.9.5, 00:30:32, Ethernet0/0 O IA 172.16.3.0/24 [110/80] via 172.16.9.5, 00:16:41, Ethernet0/0 paul# Before further discussing these and other OSPF configuration options, let's take a closer look at the "Big show " and "Big D" commands for OSPF. |
| < Free Open Study > |
EAN: 2147483647
Pages: 283